Nissan Maxima Digital Dash HUD Tutorial
An option on the 3rd generation Nissan Maxima GXE model was a combination digital dash and HUD (heads up display) projector. While visiting a "u-pull" junkyard I ran across a Maxima with these features. In addition to the dash/gauge cluster and the HUD display/trim the fuel pump sending unit and the entire dash wiring harness is also needed. The following is a tutorial I have made to help out anyone else who runs across one of these rare options. My apologies for some of the blurry photos as I was using an older digital camera. I've highlighted certain areas in the photos and you can view a full resolution photo by clicking the thumbnail photos below.
Other Nissan Maxima Tutorials:
Nissan Maxima Fuel Injector Change Tutorial
Nissan Maxima Timing Belt Change Tutorial
Nissan Maxima Lower Control Arm Bushing Change Tutorial
Disclaimer: Use these directions only as a guide and at your own risk. You're responsible for any damage you do to the vehicle so BE CAREFUL. Your vehicle may in fact have slightly different methods so use common sense if the directions don't match what you see. The demo vehicle being shown is a 1991 Nissan Maxima SE with the VG30E engine.
Parts List (from the donor vehicle)
- Digital gauge cluster
- Heads Up Display (HUD) projector
- HUD trim piece (sits on top of the dash)
- (3) HUD projector metal clips (sit in the HUD dash hole Main wiring harness
- Fuel pump sending unit
Tools needed
- Small flat screwdriver ("eyeglass" type)
- #1 Phillips screwdriver
- #2 Phillips screwdriver
- Short or angled head #2 Phillips head screwdriver
- Socket wrench with extension
- 8mm socket
- 10mm socket
- 12mm socket
- Plastic pry tools or hose clamp pliers
- Pliers
- Duct tape
- Razor knife
- Shop rags
- Dremel tool with cutting discs
- Sandwich size Ziploc-type bags for holding screws
- Sharpie-type permanent marker for labeling the bags of screws
Testing the Digital Dash and HUD
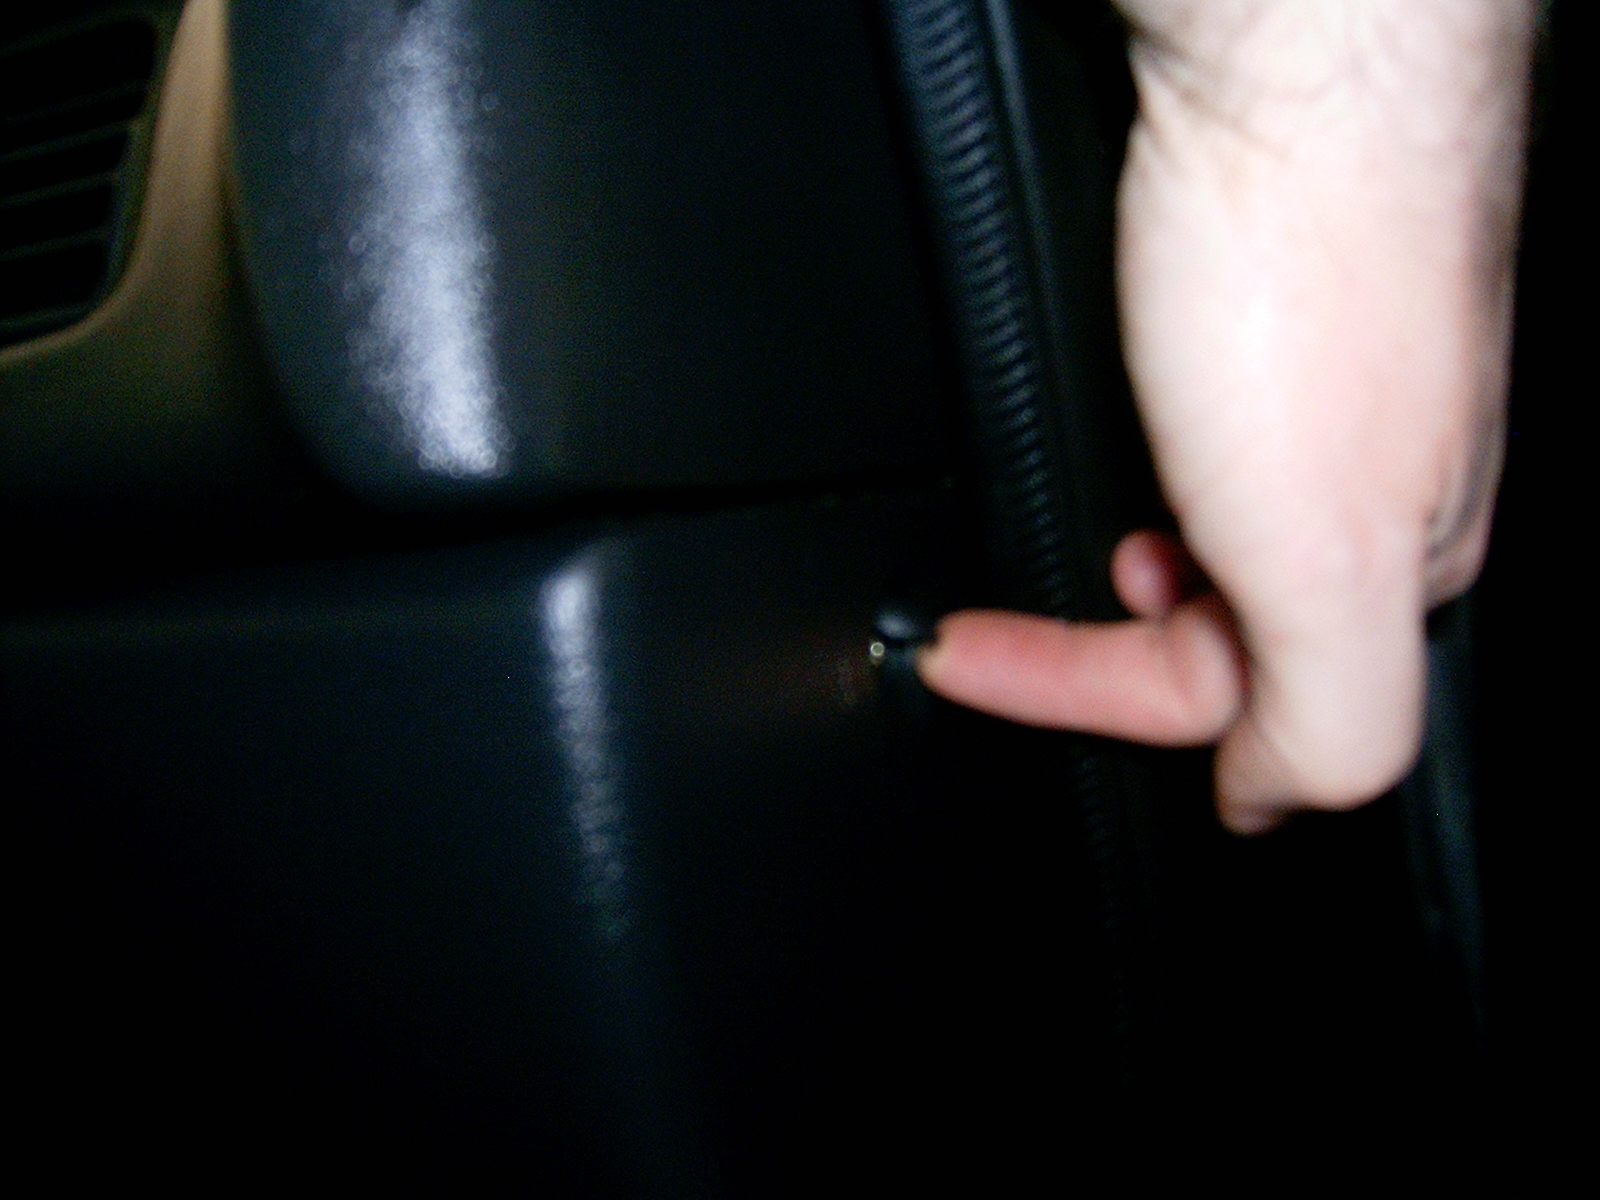
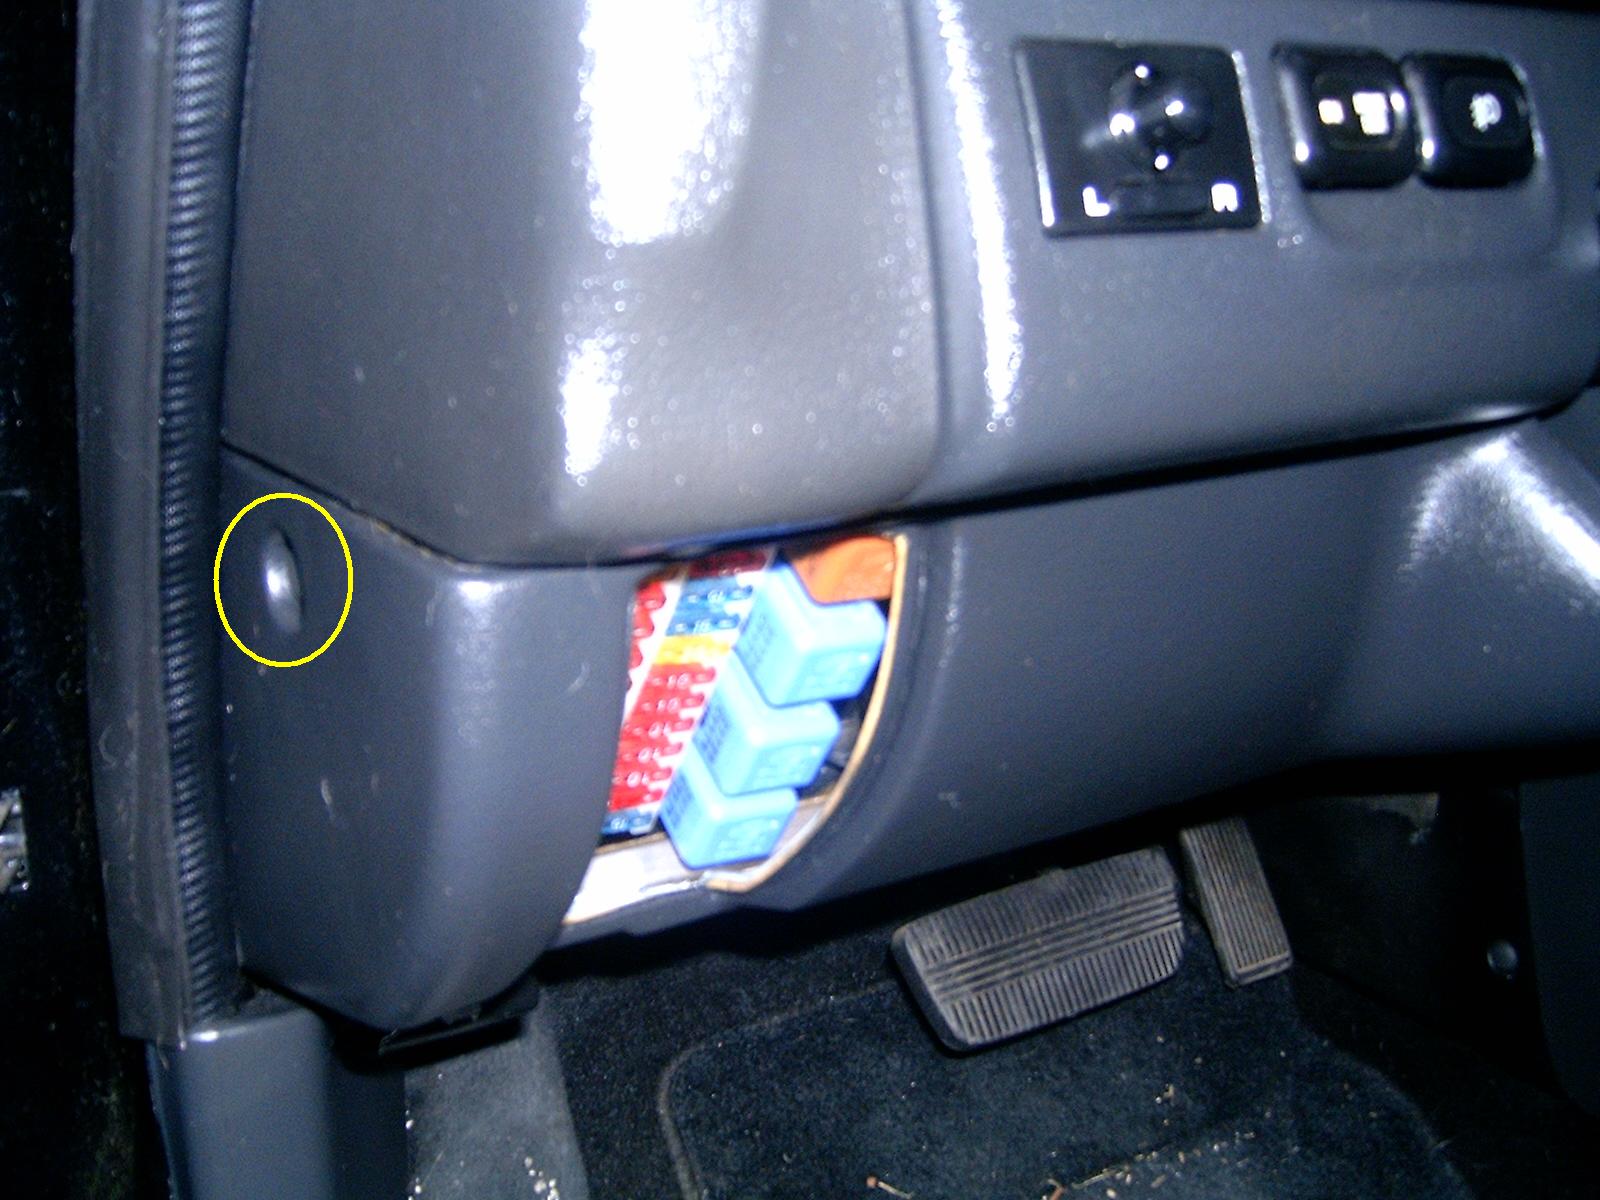 You don't want to assume anything so first we need to verify that the new digital dash and HUD work. To do this we need to unplug our vehicle's harness and plug in the GXE (donor vehicle) harness. (Obviously we need to have removed the parts from the donor vehicle already so skip ahead to see how that is done). To get to this plug we need to remove the lower portion of the driver's side dash. There is one screw covered by a plastic cap that needs to be removed from the side of this cover. There is a small notch on the side of the cap. Place a small pry tool such as an eyeglass screwdriver in this slot and pop the cap up. Then use a short or angled screwdriver with a #2 Phillips bit to remove the screw.
In addition to the one screw on the side we'll need to remove seven more attachment points. There are two on the corners of the lower panel closest to the firewall (not shown in the photos). These are 10mm hex head screws with Phillips slots in them. Use a socket or a #1 Phillips head screwdriver to remove these.

 Near the top of the panel, just above the top of the fuse panel, are the remaining five fasteners. Immediately to the left and right of the steering column bulge in the panel are two more 10mm hex head screws. Between the two on the right side is a black plastic push pin. Unscrew a few threads using a Phillips head screwdriver and the pull it out by hand. On the far left of the panel near the top corner is a Phillips head screw. Remove the panel and all of these fasteners and put them in a bag near the panel itself.
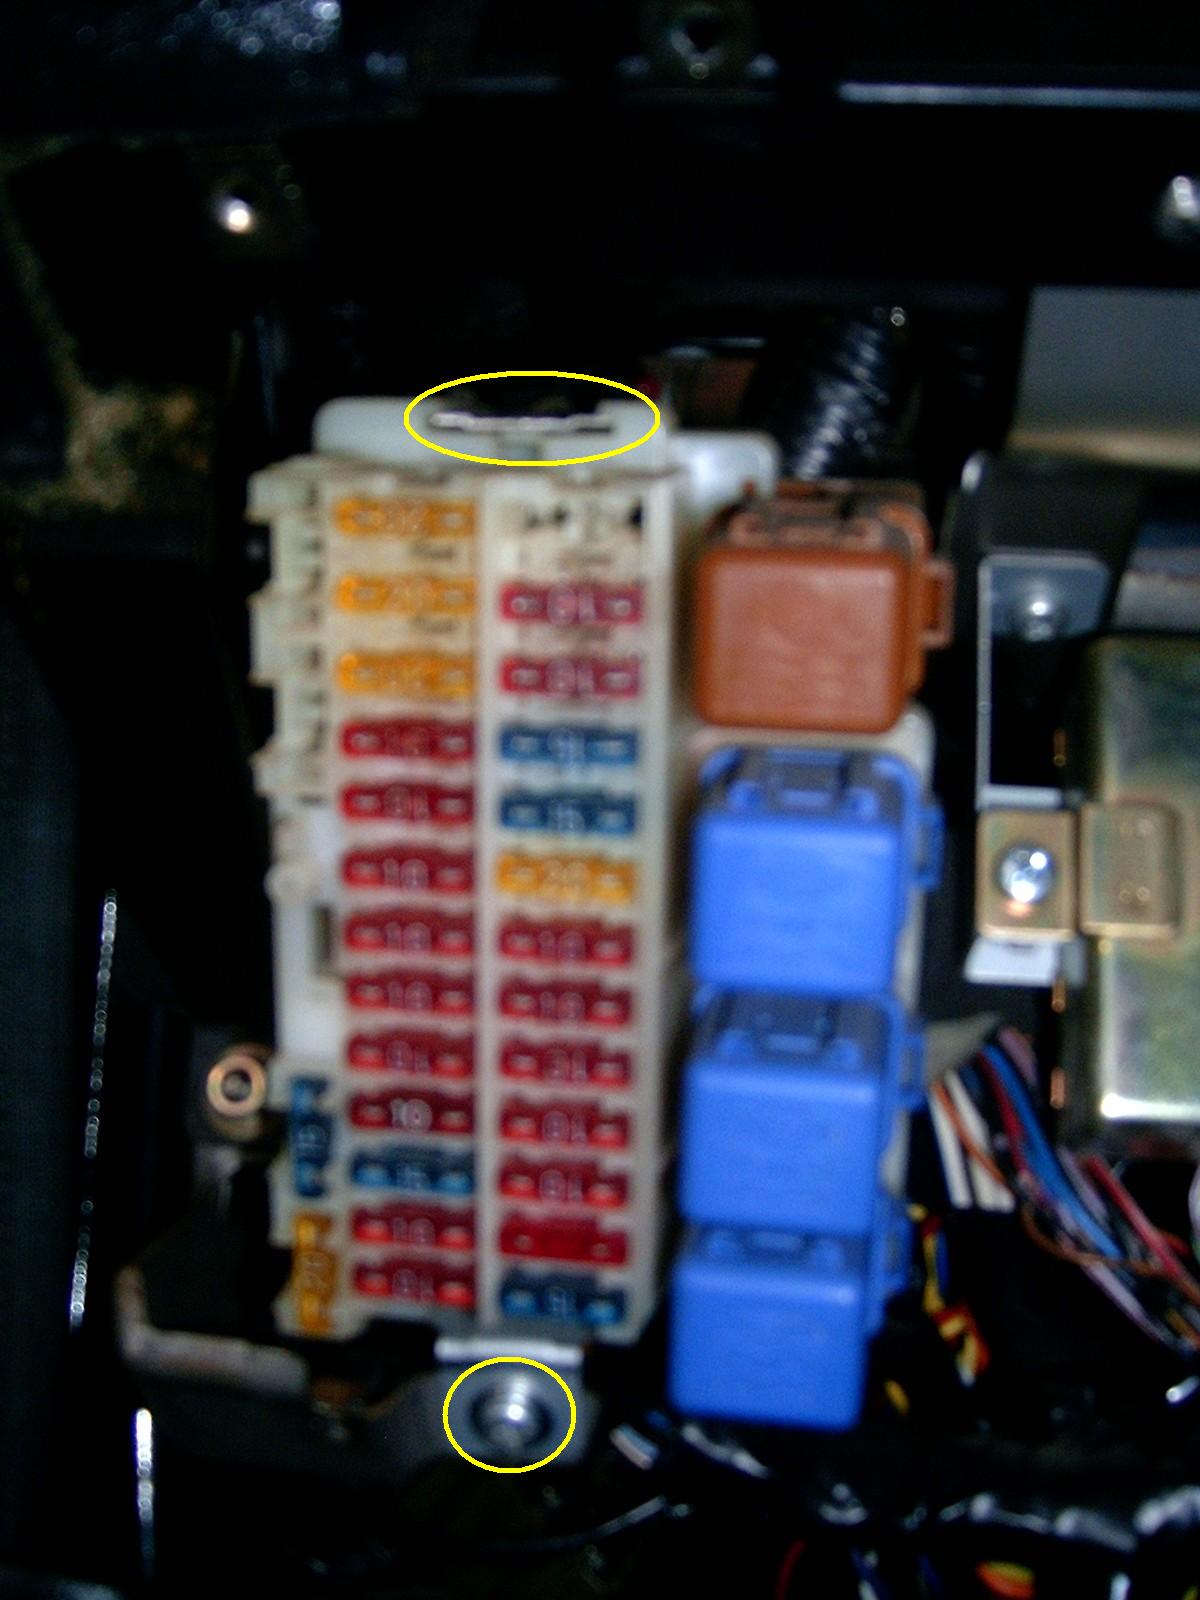 Now let's unplug the main wiring harness from the vehicle. It's accessed by removing the fuse box. The fuse box is held in place by a large Phillips head (#1) screw at the bottom and a simple notch/tab at the top. Begin by removing the bottom screw and then pry the notch/tab apart and pull the fuse box out.
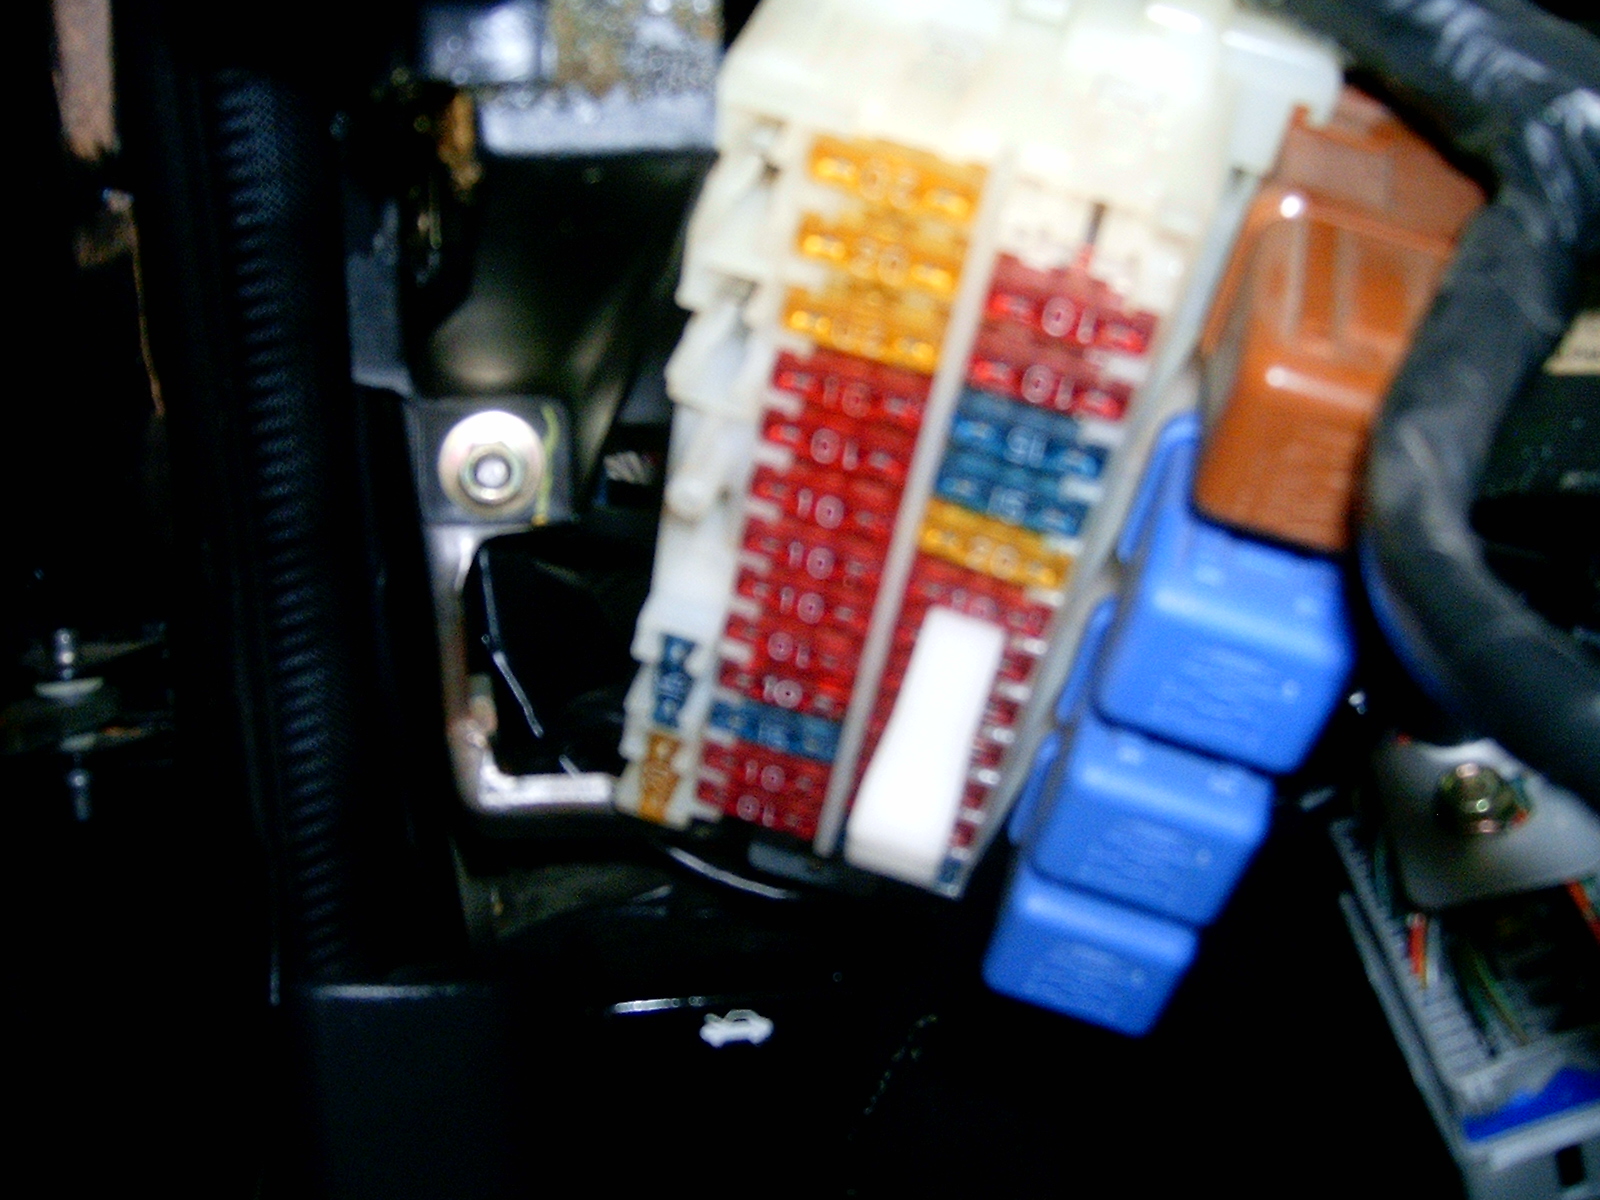
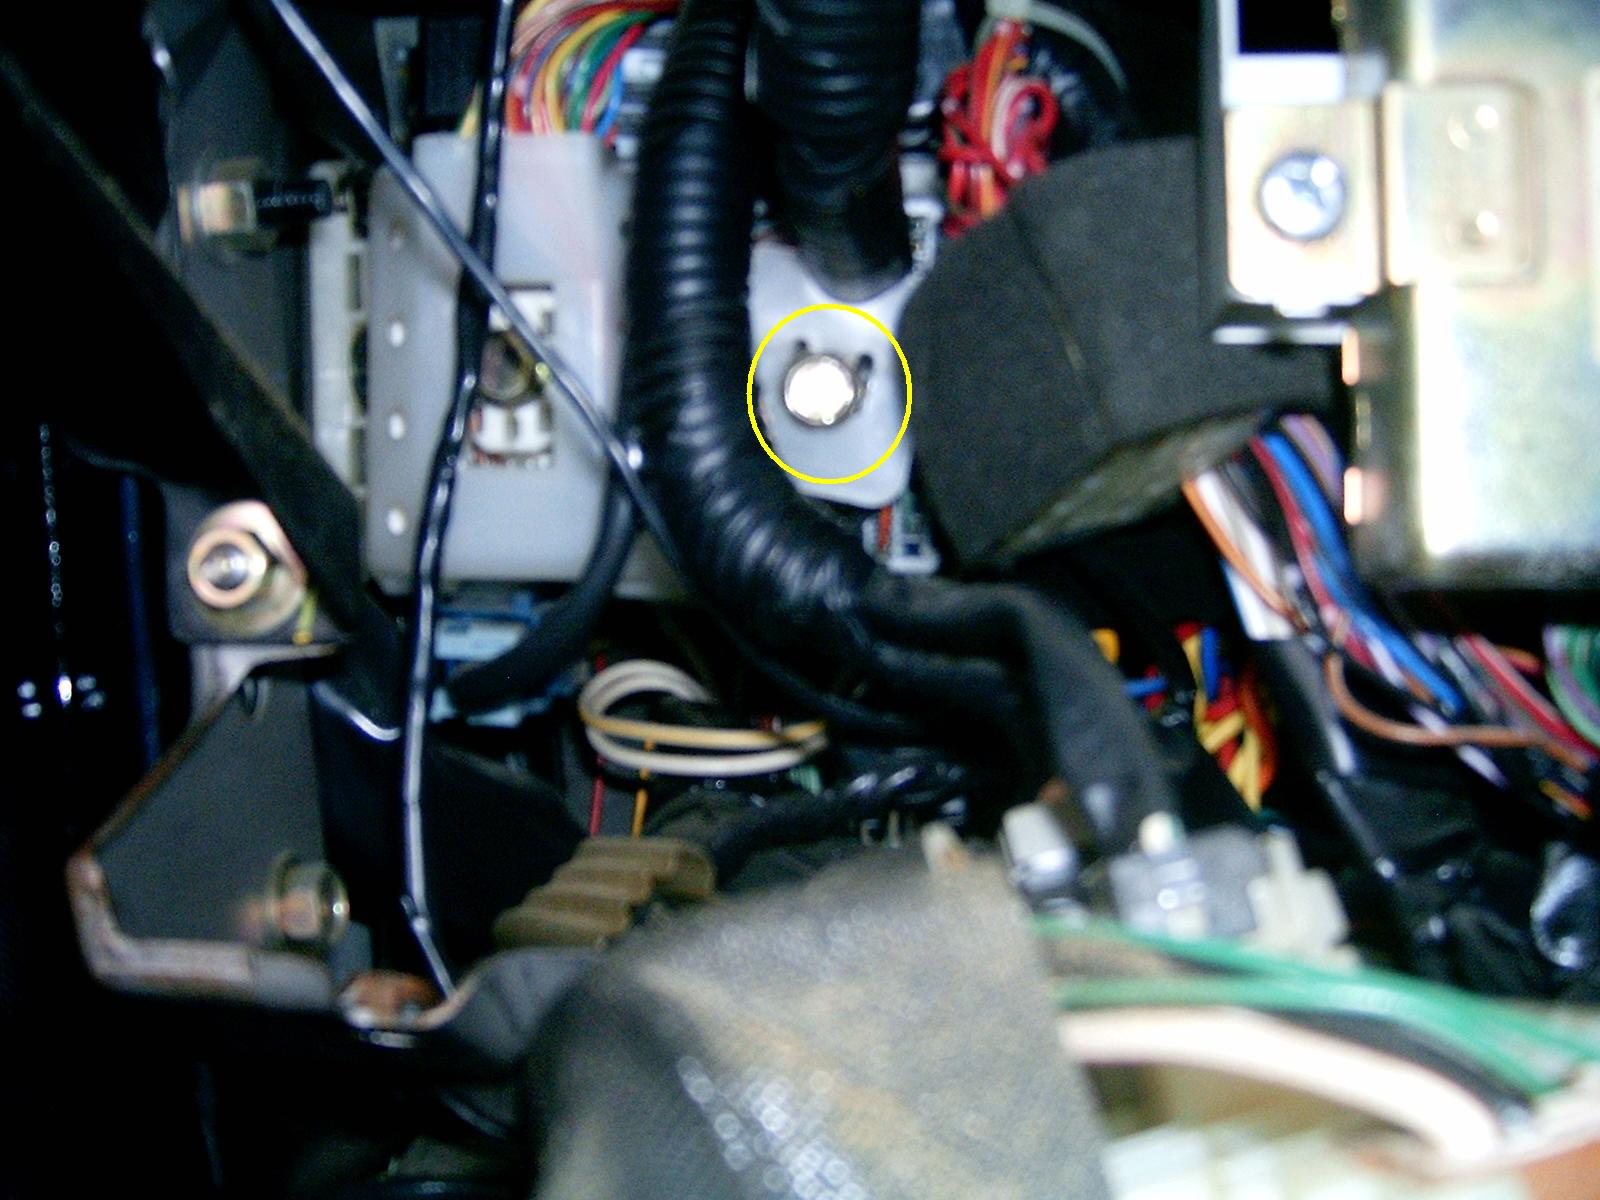
 Back in the jungle of wires is the plug you want. It's the rectangular one on the right. It's held in by friction and a 10mm hex head bolt. Loosen the bolt with a socket and long extension. Then pull/wiggle the plug until it comes free.
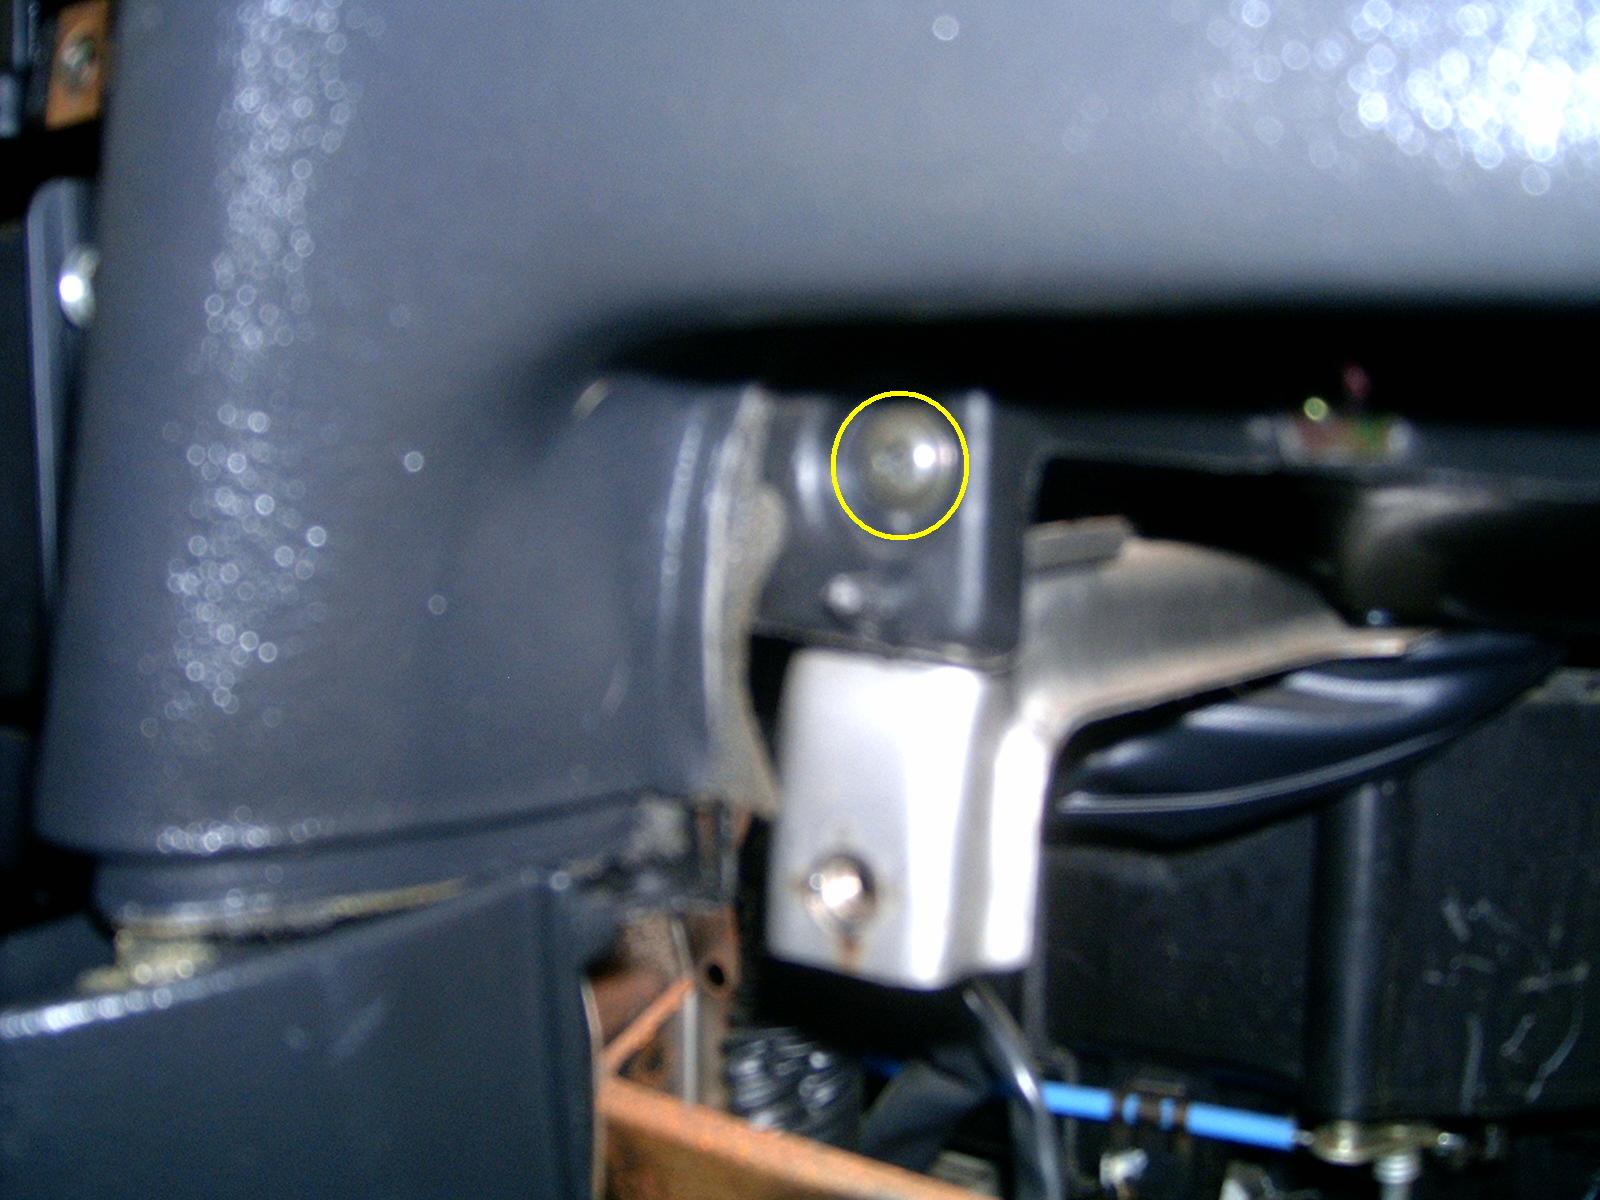
 While you're in the area you can also remove the 10mm nut that is holding the lower section of the main dash. This is needed to remove the top (main) dash.
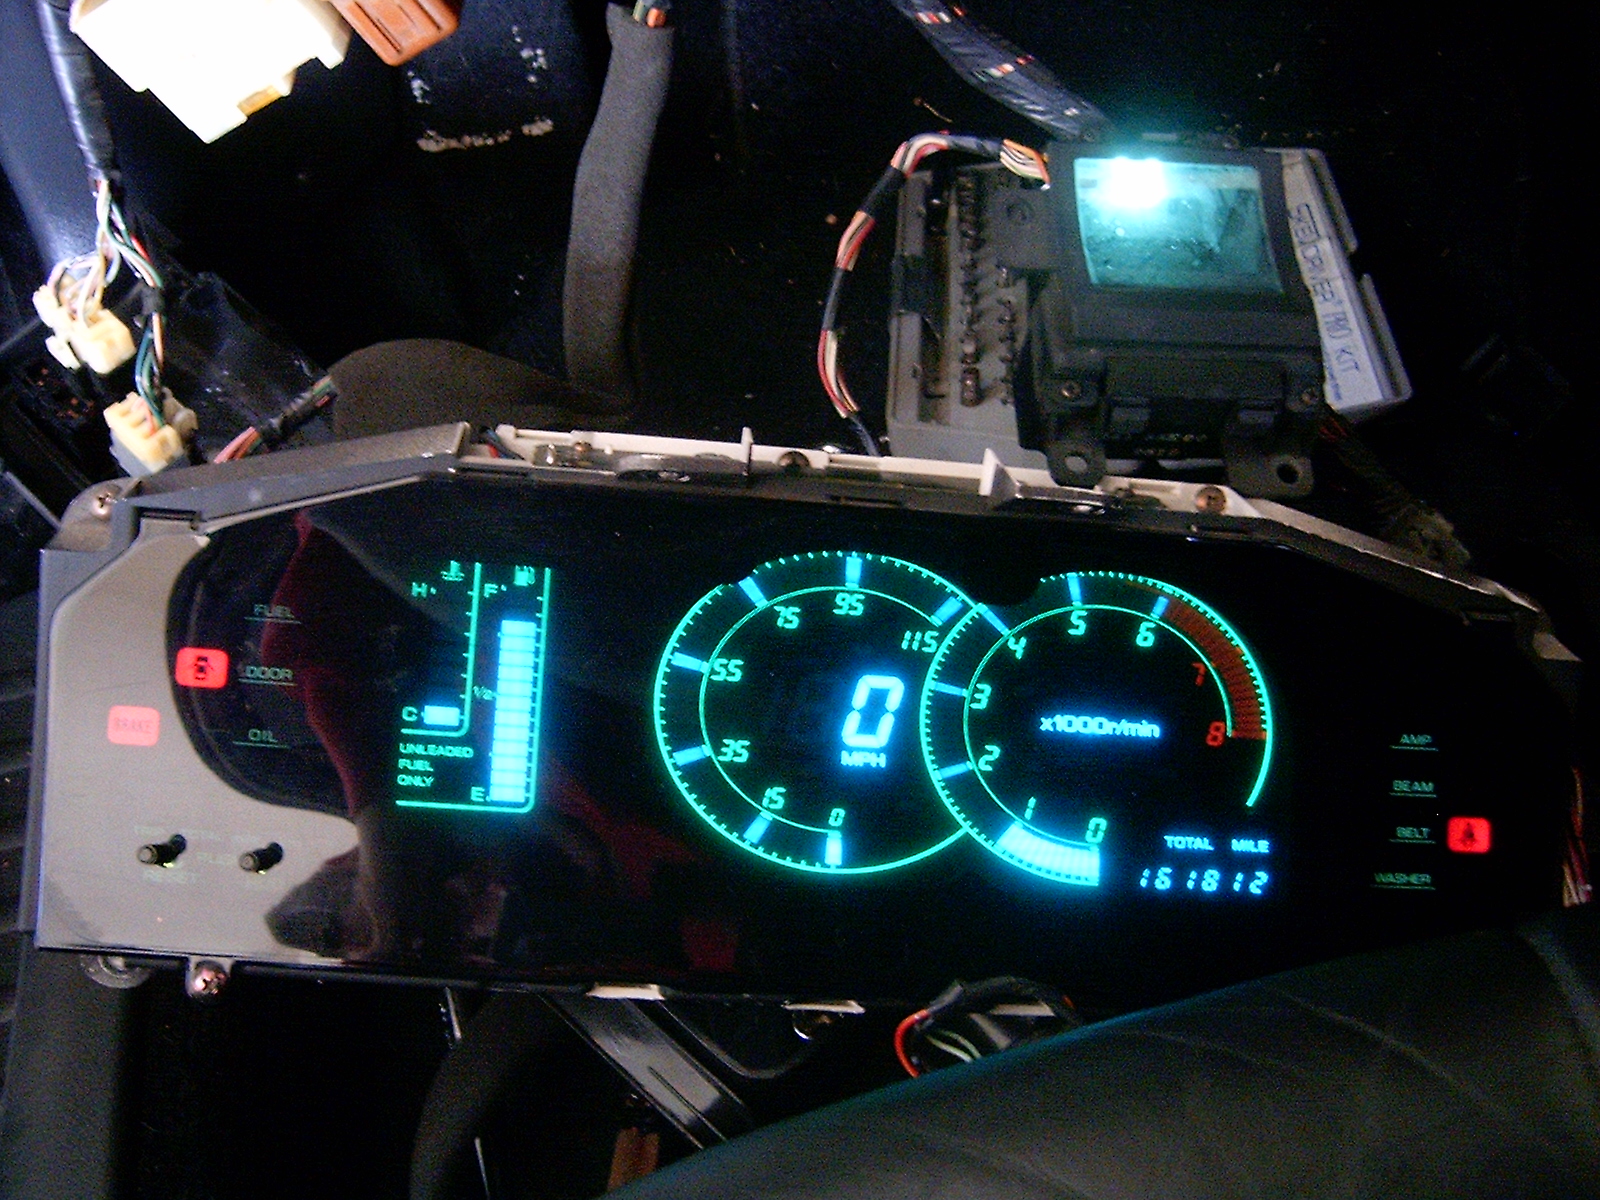 Plug in the GXE (donor vehicle) harness and tighten the 10mm bolt to make sure the harness is seated. Plug the digital dash into the harness and the HUD projector into the rear of the digital dash cluster. You do not need to plug in the switches for the power mirrors, cruise control, etc. Start the vehicle and if all is well you should see this.
If your HUD projector is not shining make sure it isn't just the HUD being turned off. It's the lever right next to the odometer lever (bottom left of the digital gauge panel). Since you haven't changed the fuel pump sender you will probably have a faulty reading on the fuel gauge.
If we have a success with this test we can begin the swap. Shut down the vehicle and remove the digital cluster, HUD projector and main harness from the vehicle. Now we need to depressurize the fuel system so we can swap sending units. Find the fuel pump fuse in the fuse box (there's a fuse diagram on the back of the access panel). Start the car and then pull the fuel pump fuse. The car will run a few seconds and then spit, sputter and finally quit. Remove the key and then remove the negative battery cable. This will probably not be necessary on a junkyard donor vehicle as they usually have been depressurized and the battery removed.
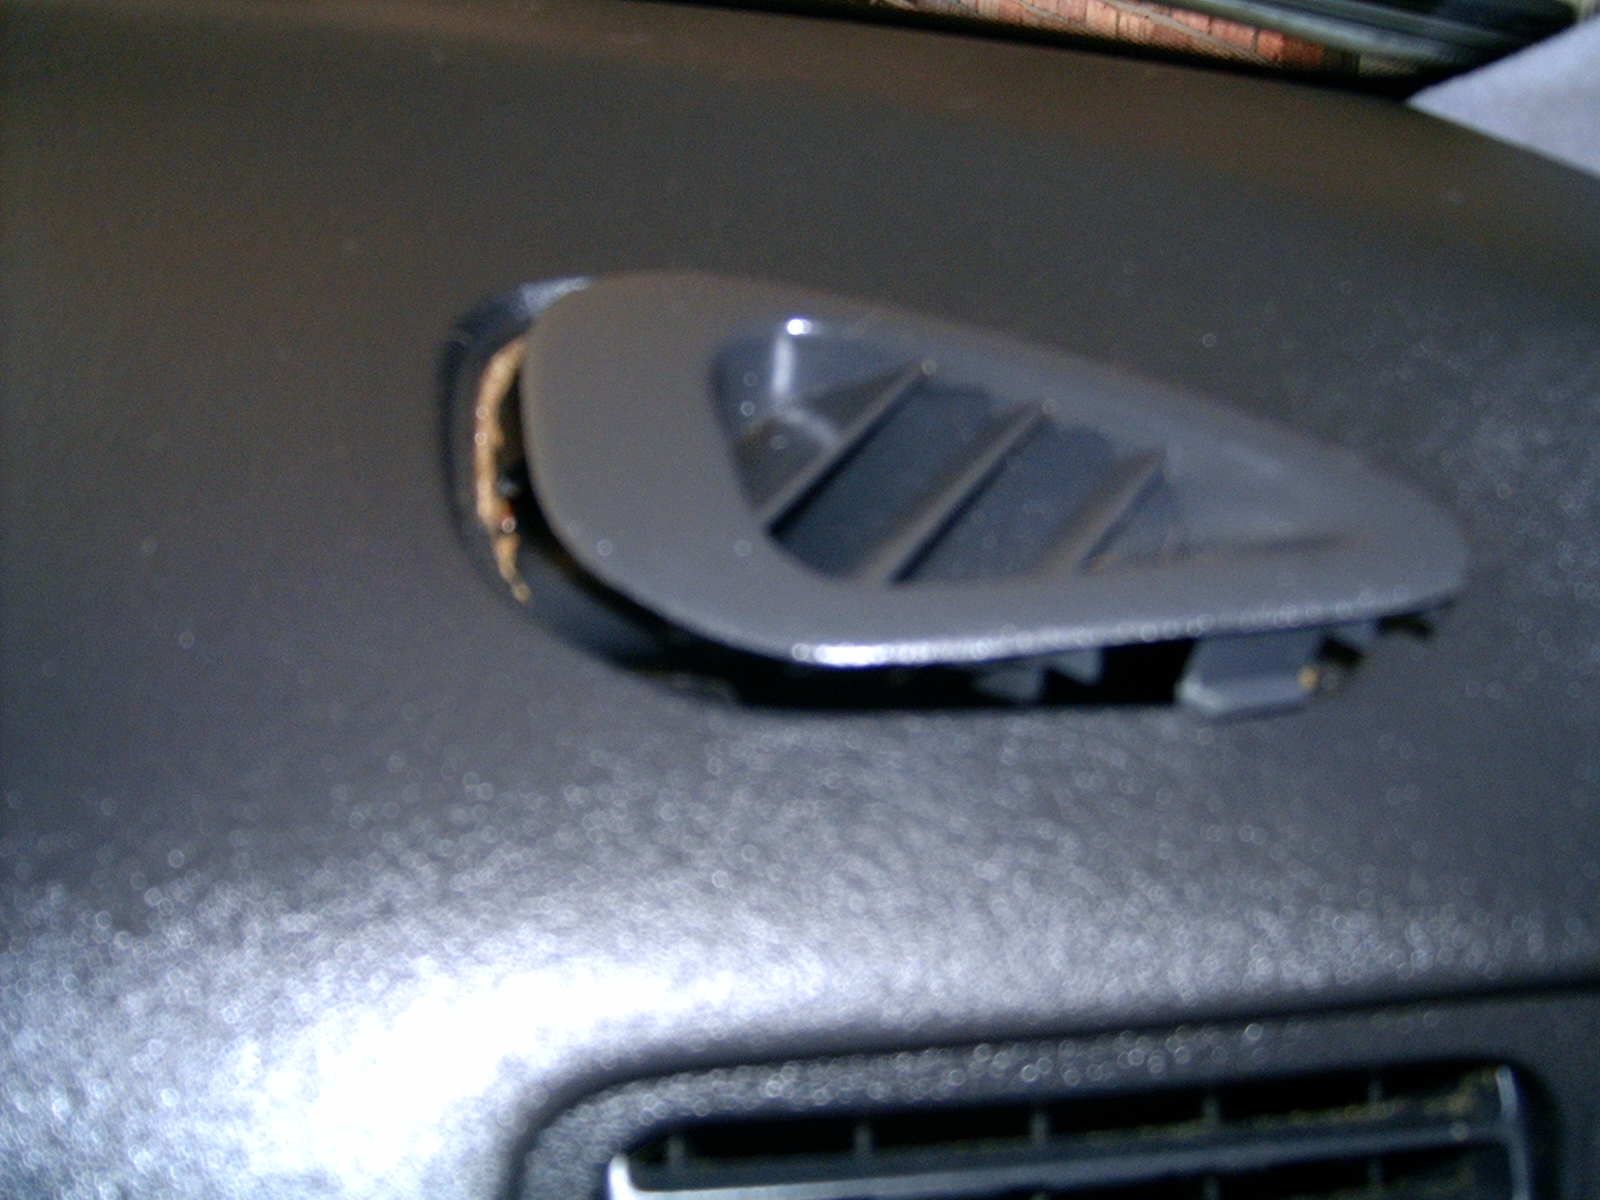 Now we'll disassemble the dash. Begin by removing some of the trim panels so you can access all of the necessary screws. There are two side defrost vents on either end of the dash. Carefully pry these up and then pull them out at an angle. Do not grab the slats in the vent or they will break off.
 Now remove the two defrost vents from the front of the dash near the windshield. You will again need to use a lot of care so you don't break the plastic clips off the back side. There are two long pieces of trim. The one on the passenger side is longer than the driver's side. There is also a small rectangular piece that fits between the two. Pry this up first. It's relatively sturdy so it shouldn't break easily but still use care when removing it. The removed piece is in the foreground of the photo below.
Now remove the two long pieces. There are longer tabs on the edge facing you (the cabin) so pry the back side (windshield side) up gently. Do this along the entire length of the piece. Then rotate the windshield edge of the trim towards you and remove the trim. Set these somewhere far, far away so you don't step on them accidentally. They are fragile and may be brittle depending on your car care regiment on how much time they spend in the sun.
 Remove the screw on the passenger side of the dash. This is covered by a cap just like the one on the driver's side.
 Now remove the four similar screws that hold the lower, center of the dash on both sides. These will loosen the dash and give you some wiggle room when removing and installing the dash. You may be able to skip removal of these four screws as well as removal of the radio. I chose to take them out.
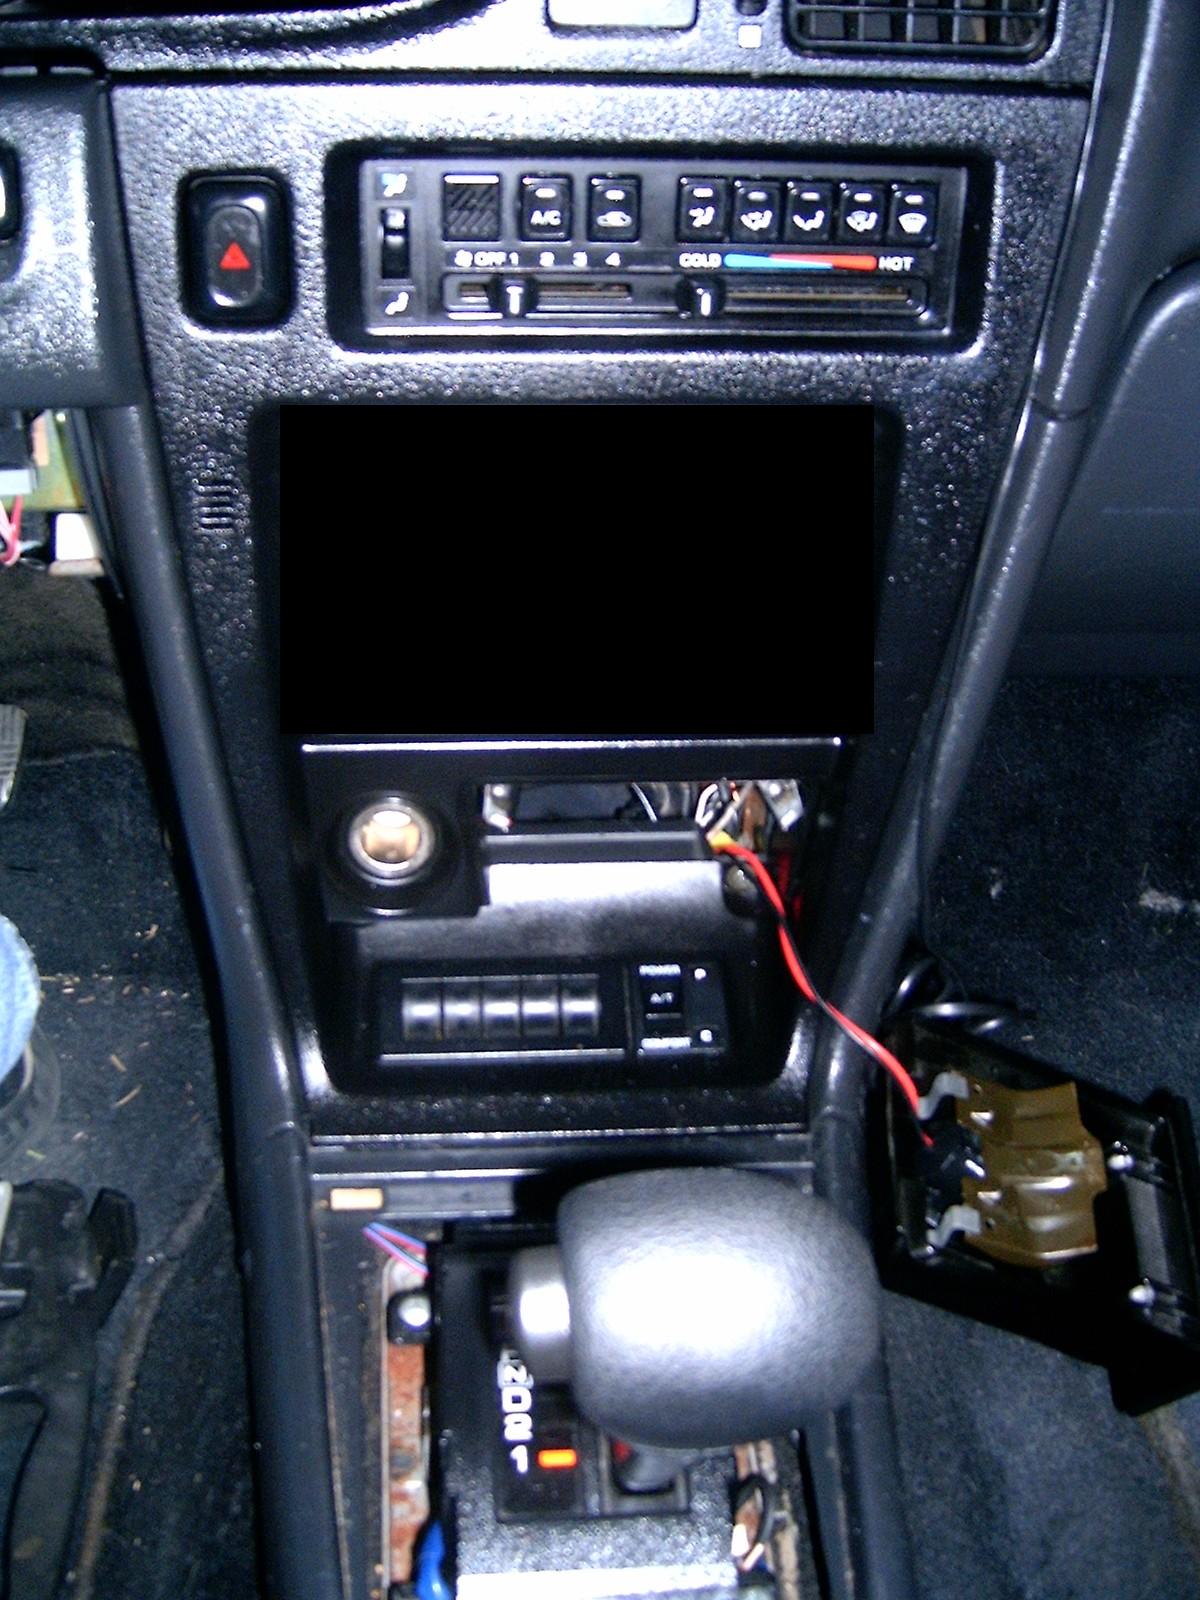 Next we'll remove the center trim panel itself. Begin by removing the large plastic trim ring around the shifter. This just pops up and you can pry it from the back (console side) of the panel. Next remove the cigarette lighter and the ashtray completely from the dash.
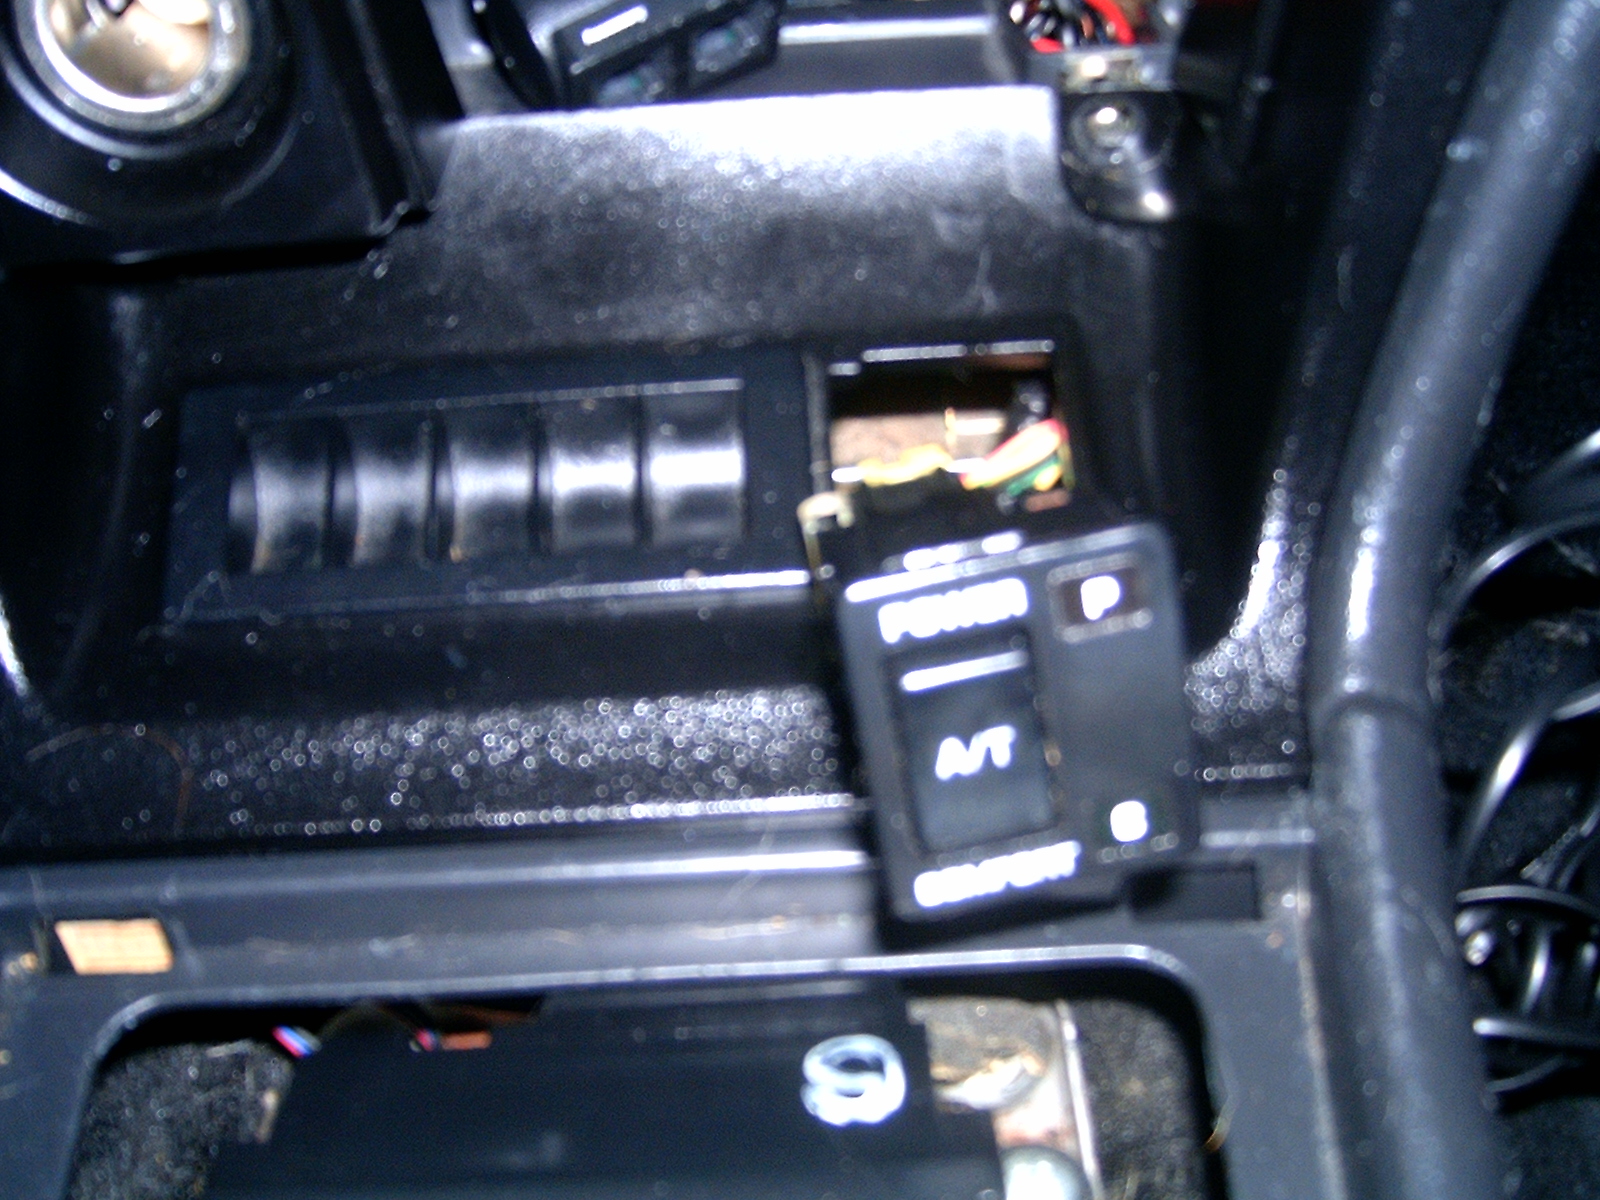 Pry out the power/comfort transmission switch and disconnect the two harnesses from the back of the switch. I believe only SE models have this switch.
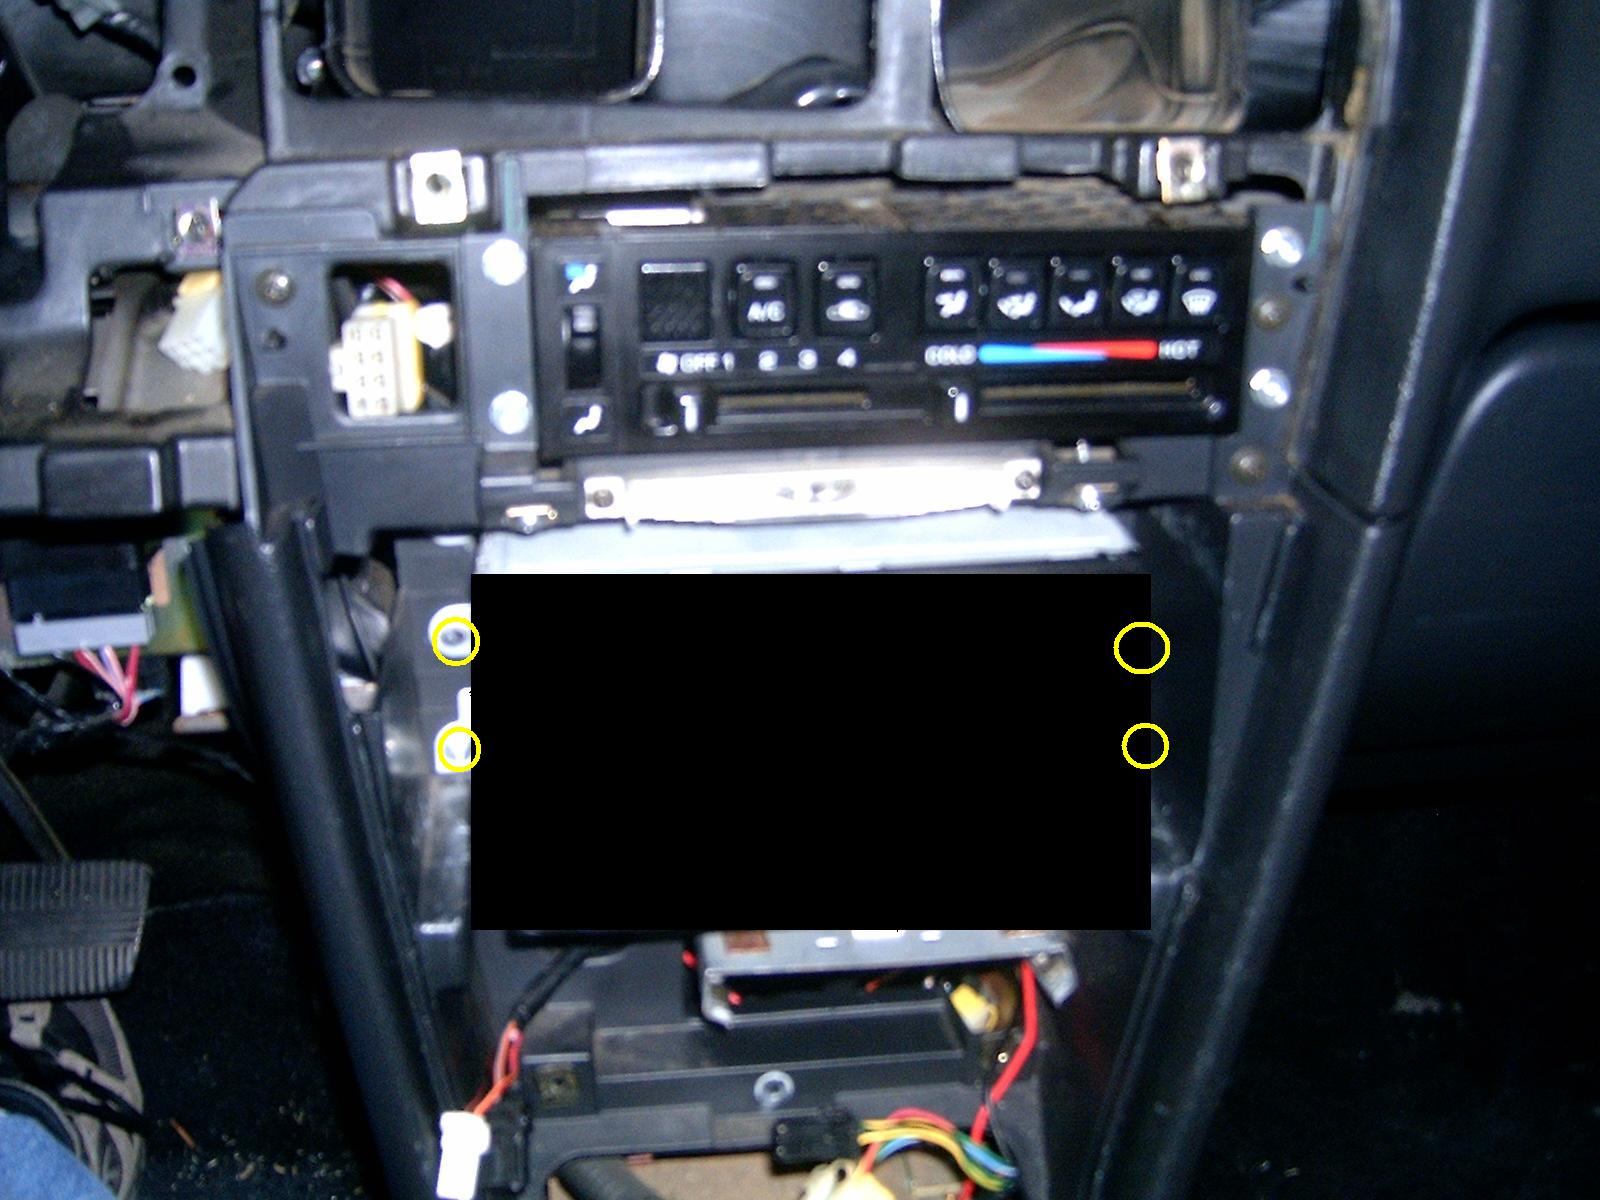
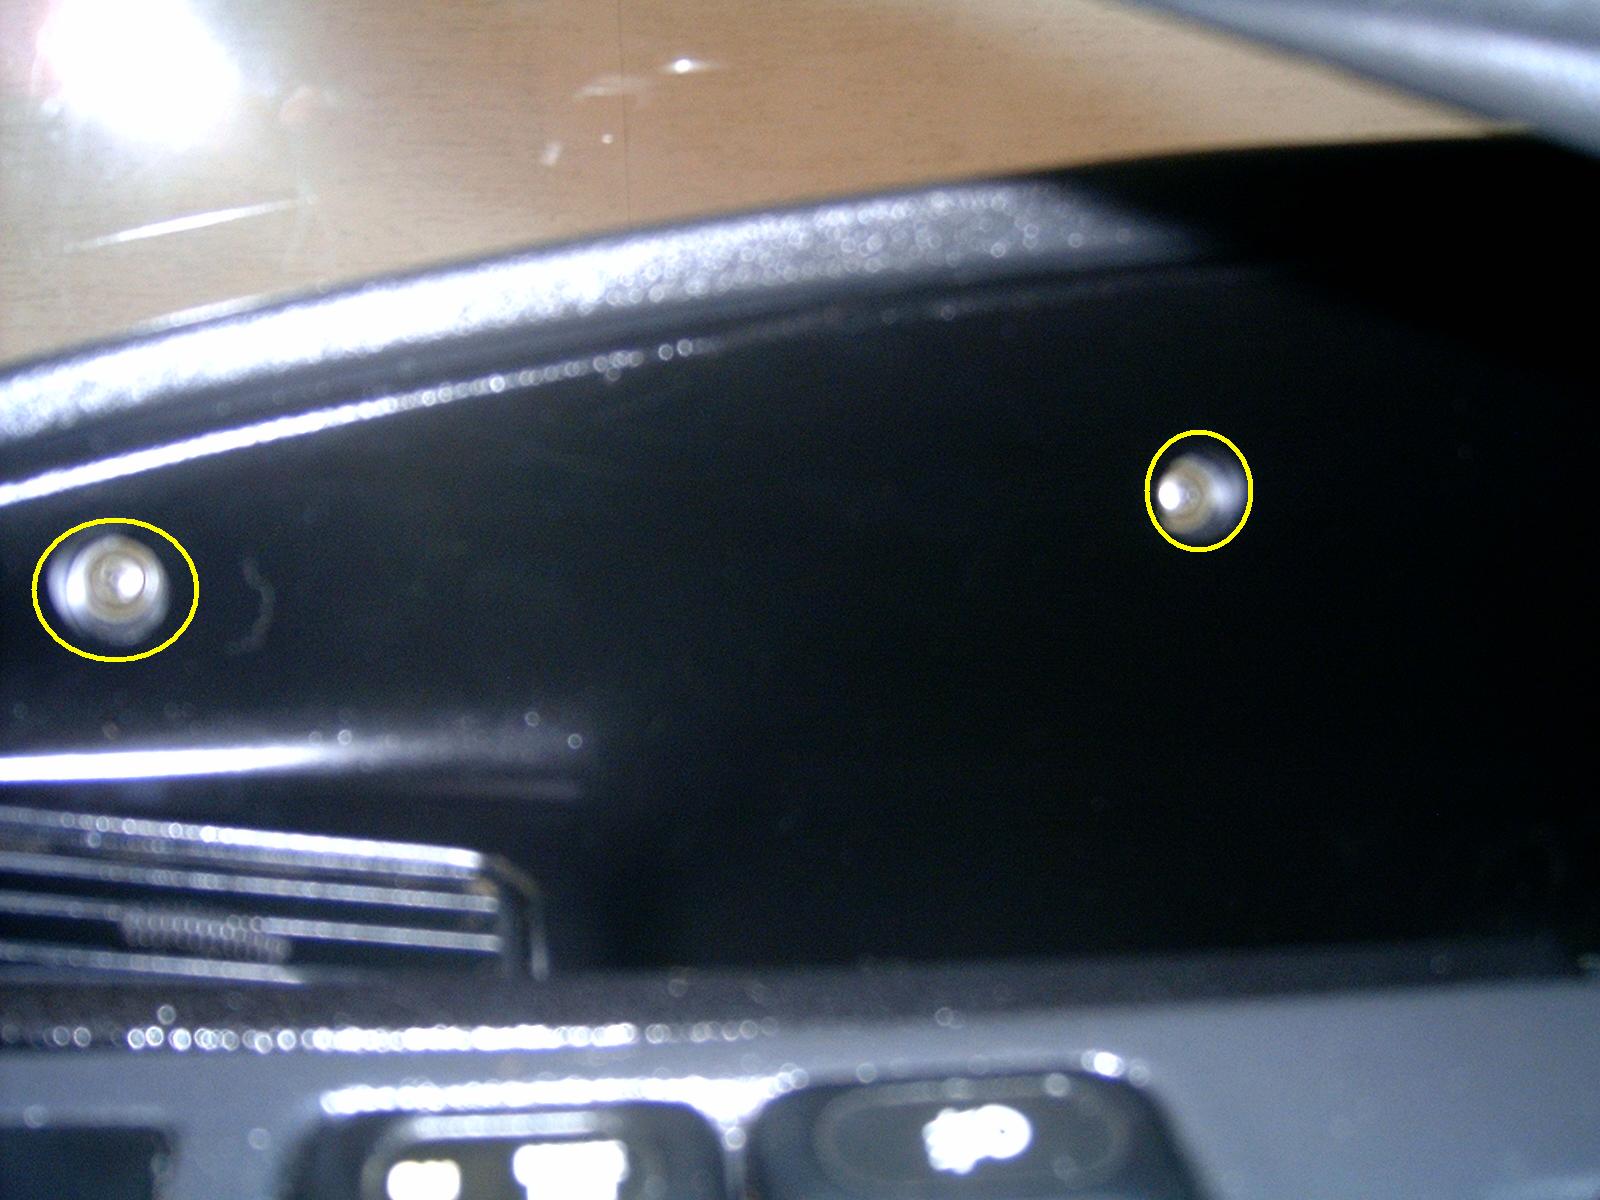
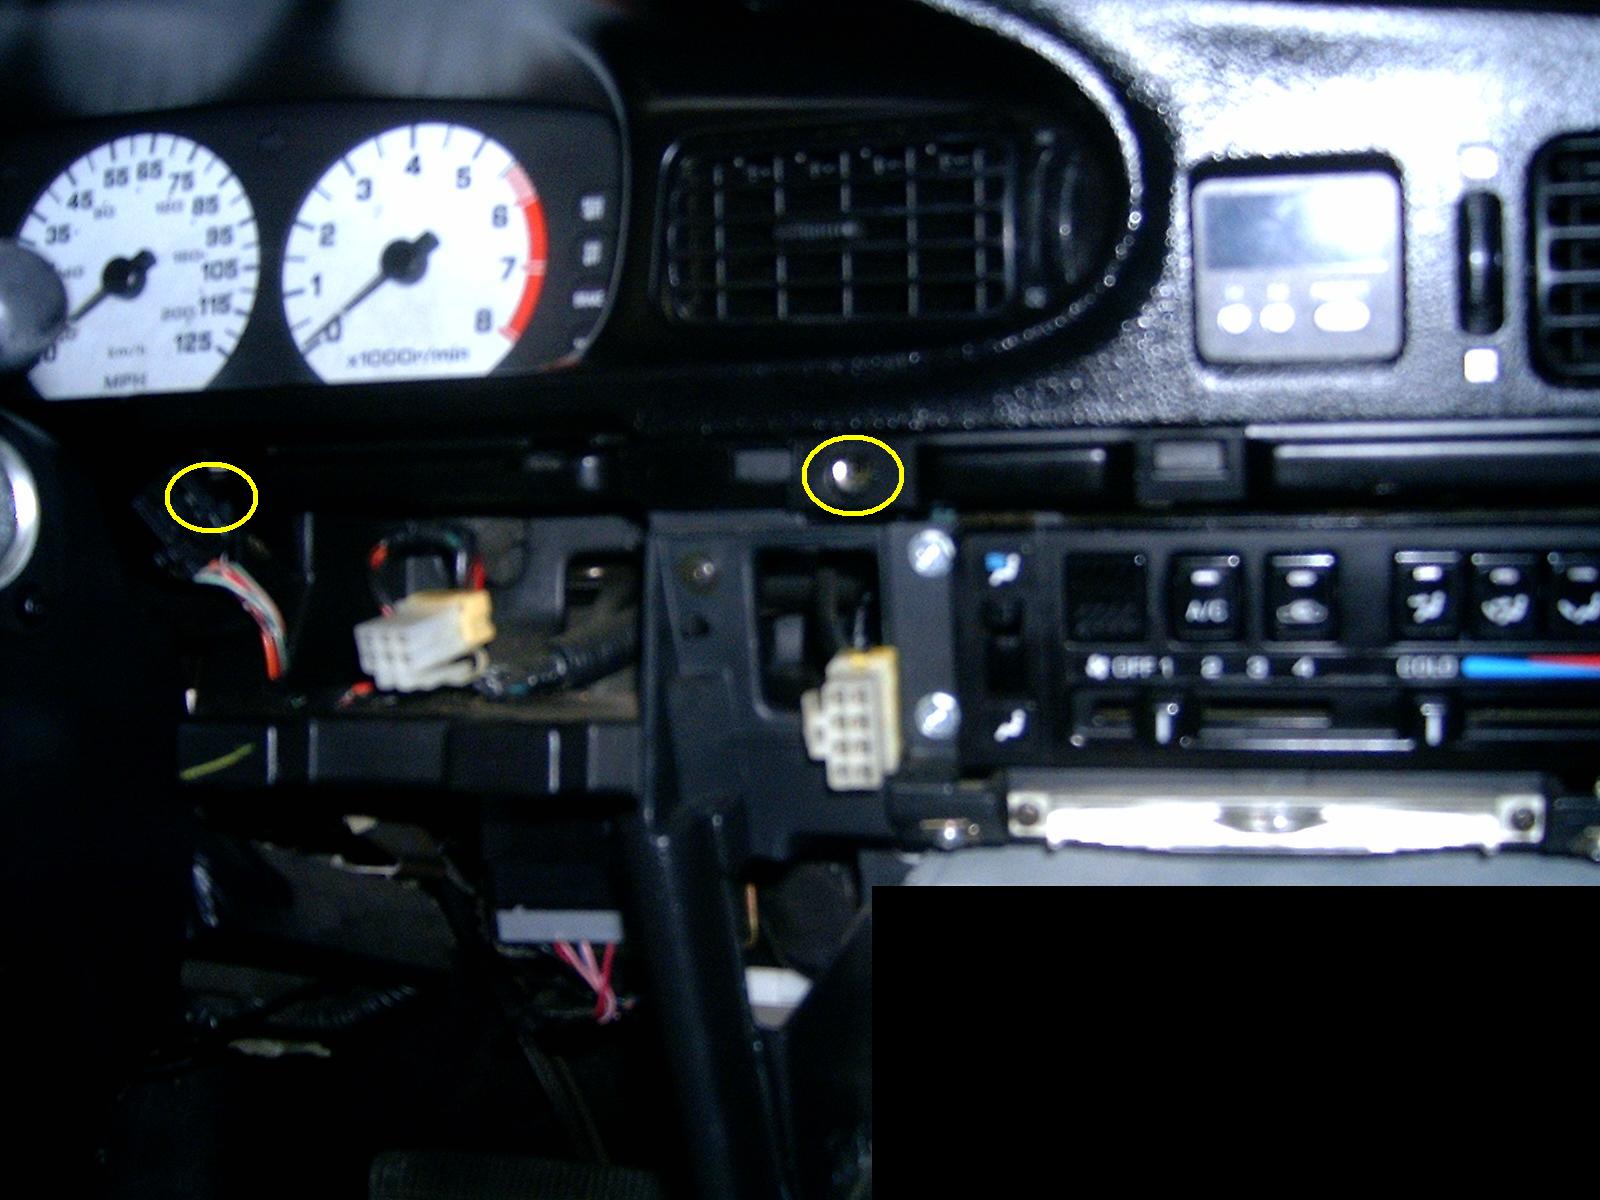
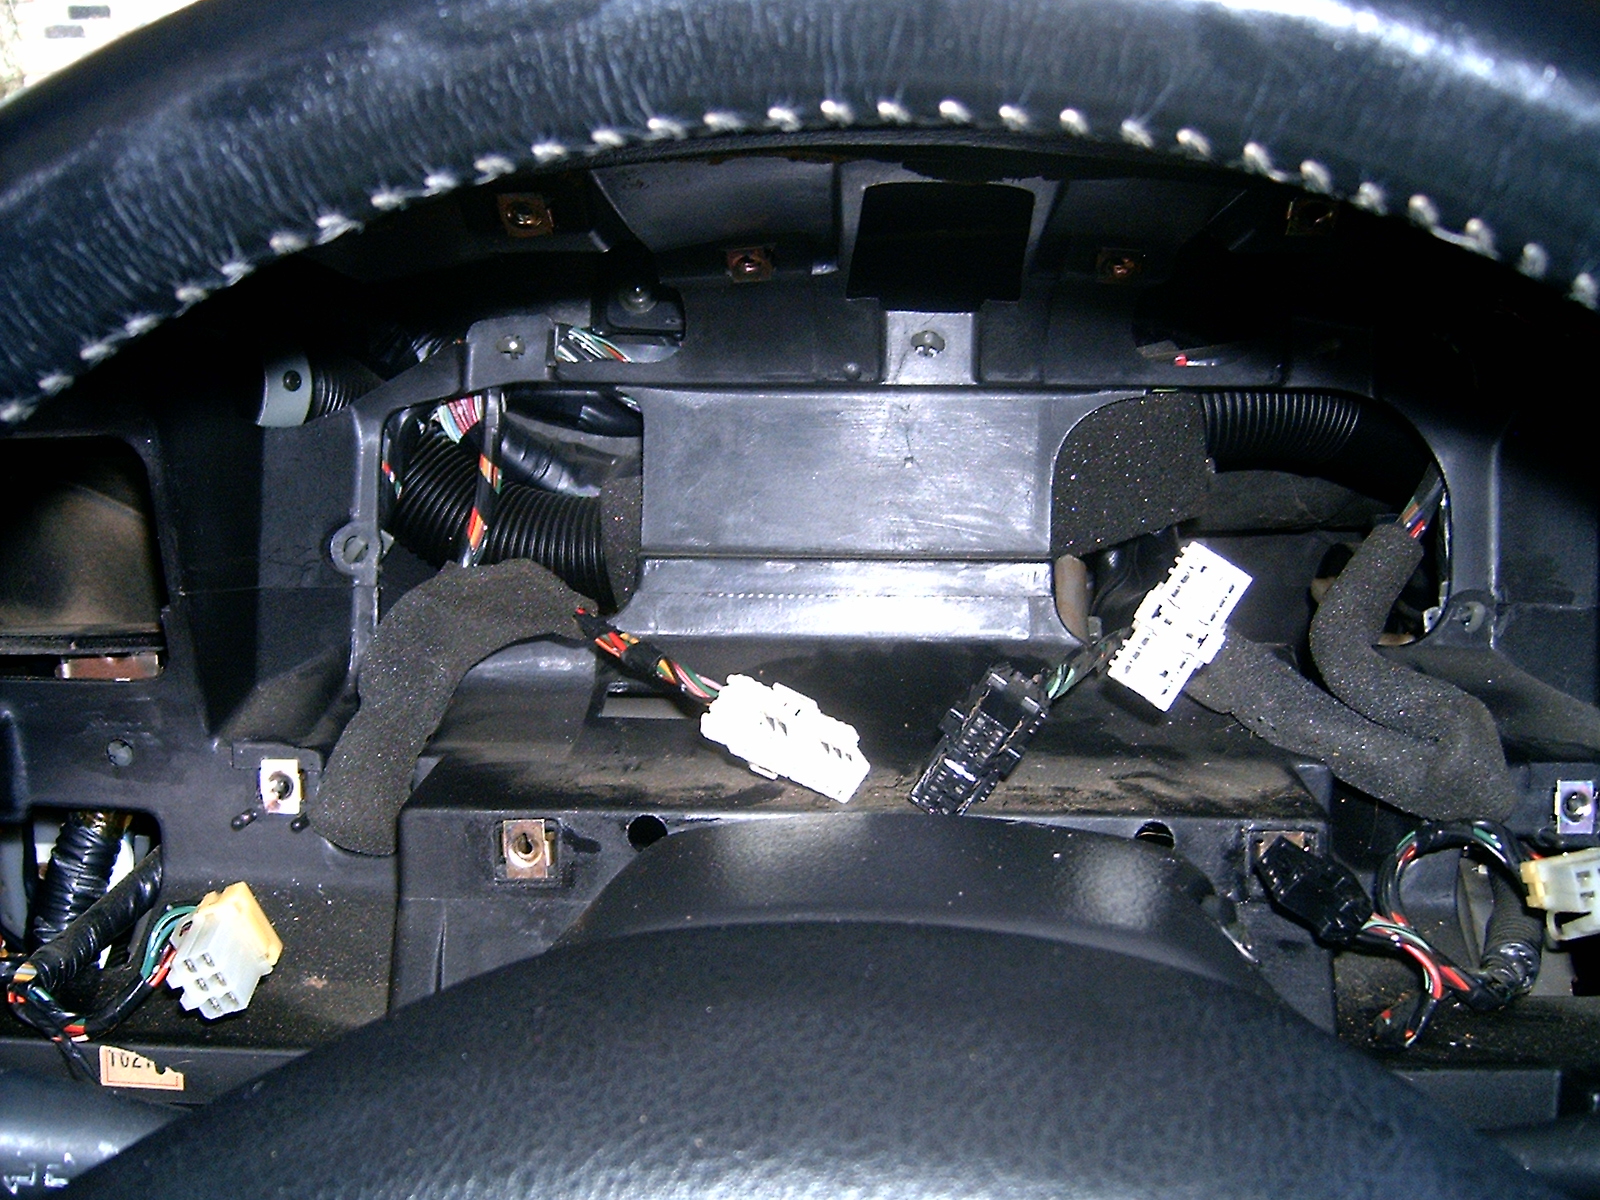
Remove the two screws right above the radio. These are put in at an angle and you'll need to get under that area with a flashlight to see them. They're a #2 Phillips head screw. This is where they are located on the dash. Obviously the panel has already been removed in this picture but it makes it easier to see what you're looking for.
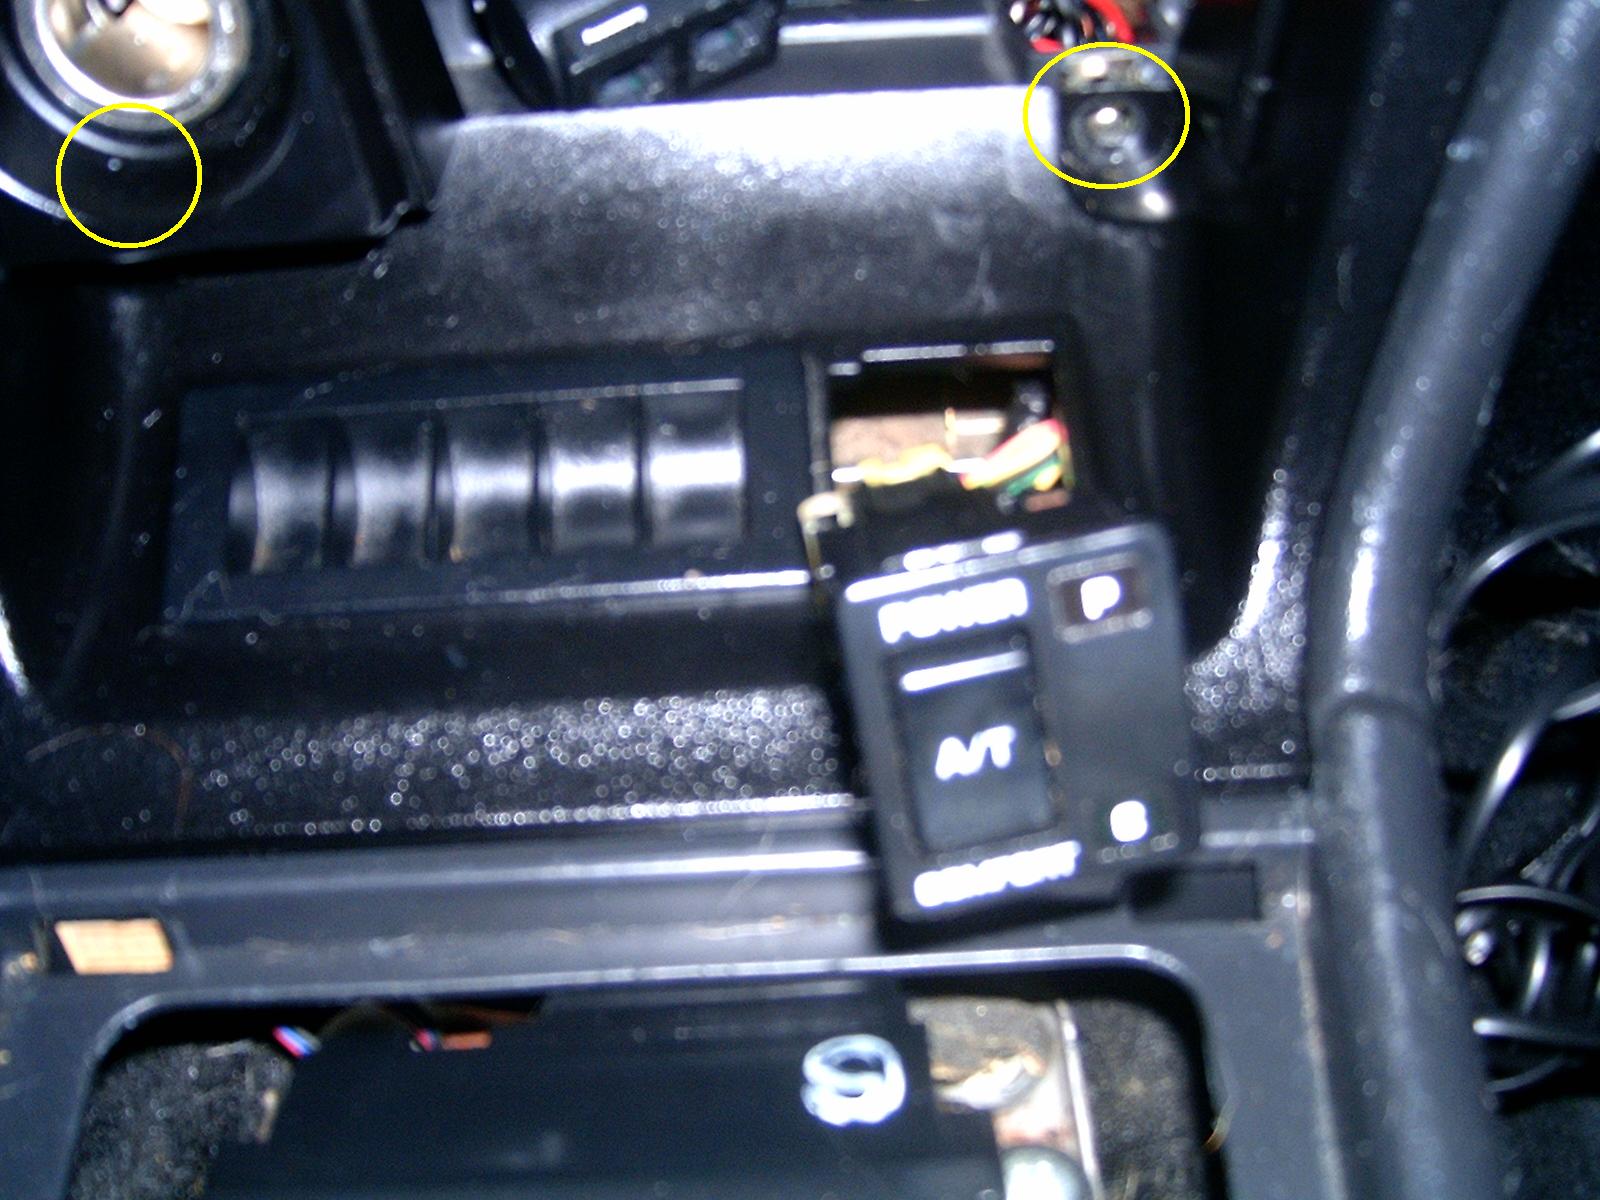 Now remove the two screws that are recessed into the bottom of the panel. One is under and to the left of the cigarette lighter and the other is under and to the right of the ashtray.
Carefully pry the dash panel out. Do not force it as it is still attached by two wiring harnesses at the bottom (cigarette lighter) and one at the top (hazard switch). Once the panel is free reach around to the hazard switch and squeeze the harness plug to release it from the switch. This will give you enough room to now remove the two harnesses from the back of the cigarette lighter. The panel should now be completely free and you can set it aside.
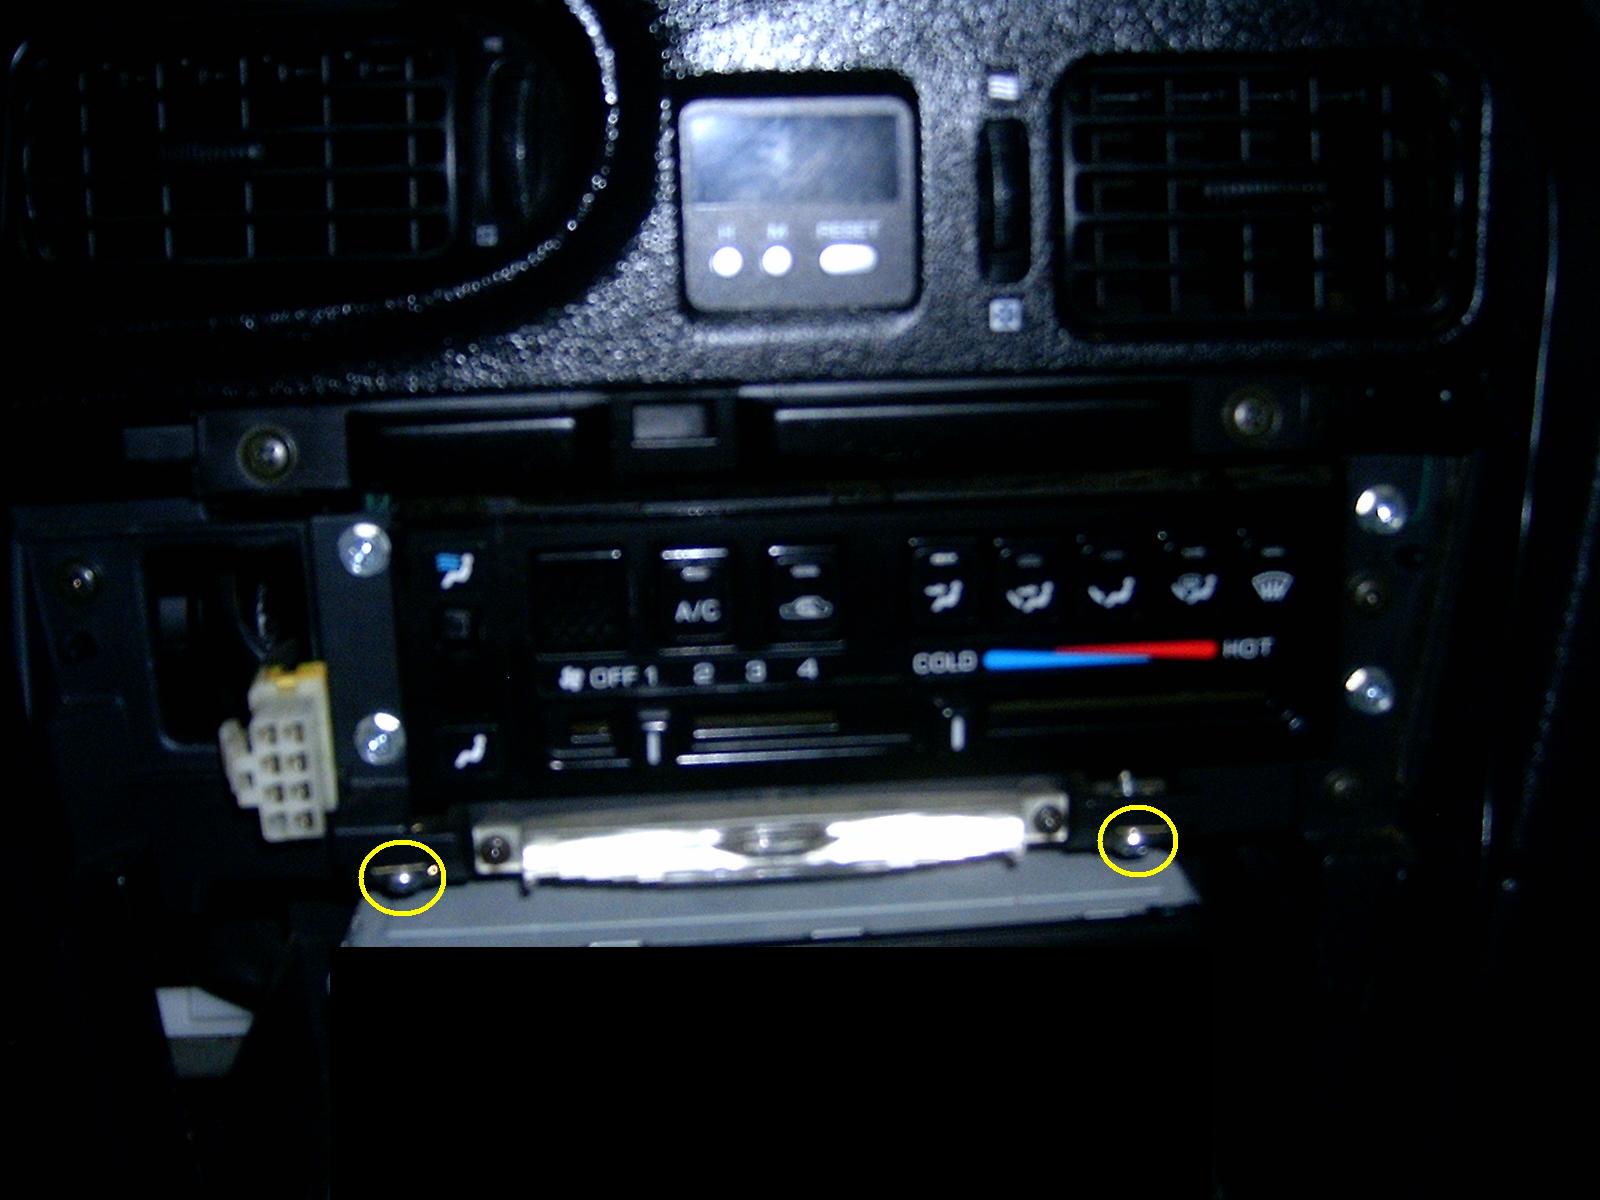
 Next remove the four screws that hold the radio/cup holder/map pocket assembly in place. Then pull the radio out and disconnect the wiring harnesses and radio antenna.
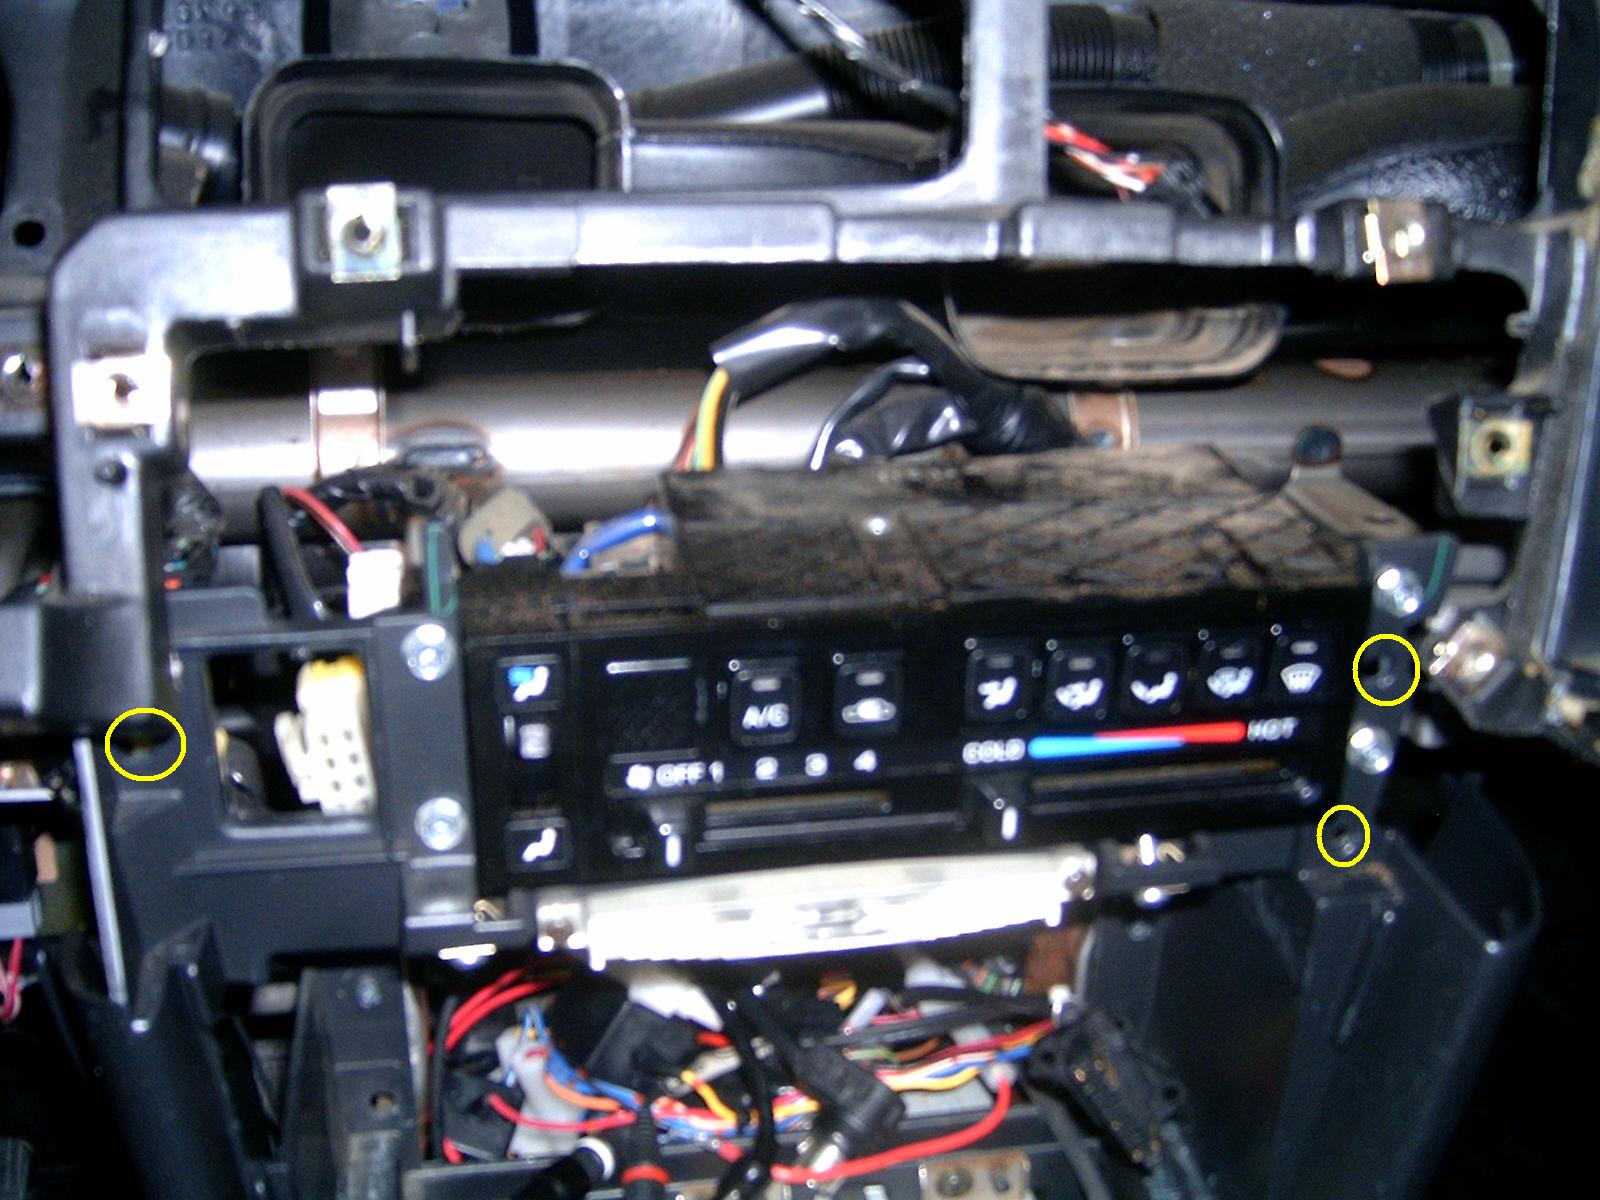
 Now we can remove the switch panel (power mirrors, cruise, fog lights, dimmer, defrost). There are four Phillips head screws that hold this panel on. There are two on either side of the panel and you can see them from the bottom which is how you will need to position your screwdriver to remove them. After they are removed you can pry the panel off. Be sure and put the steering column to its lowest position before attempting removal. There will be wiring harness plugs that need to be removed for each switch so keep this in mind when pulling the panel out. There isn't a lot of slack in the wiring.
 Now that the switch panel is removed the gauge and vent panel can be removed. There are four screws that face down in the panel that shades the gauges. These are a little hidden but you can see them with a flashlight if you get under the panel. Remove these four Phillips head screws. Note the angle they come out at so you can put them in at the same angle. It isn't straight down.>

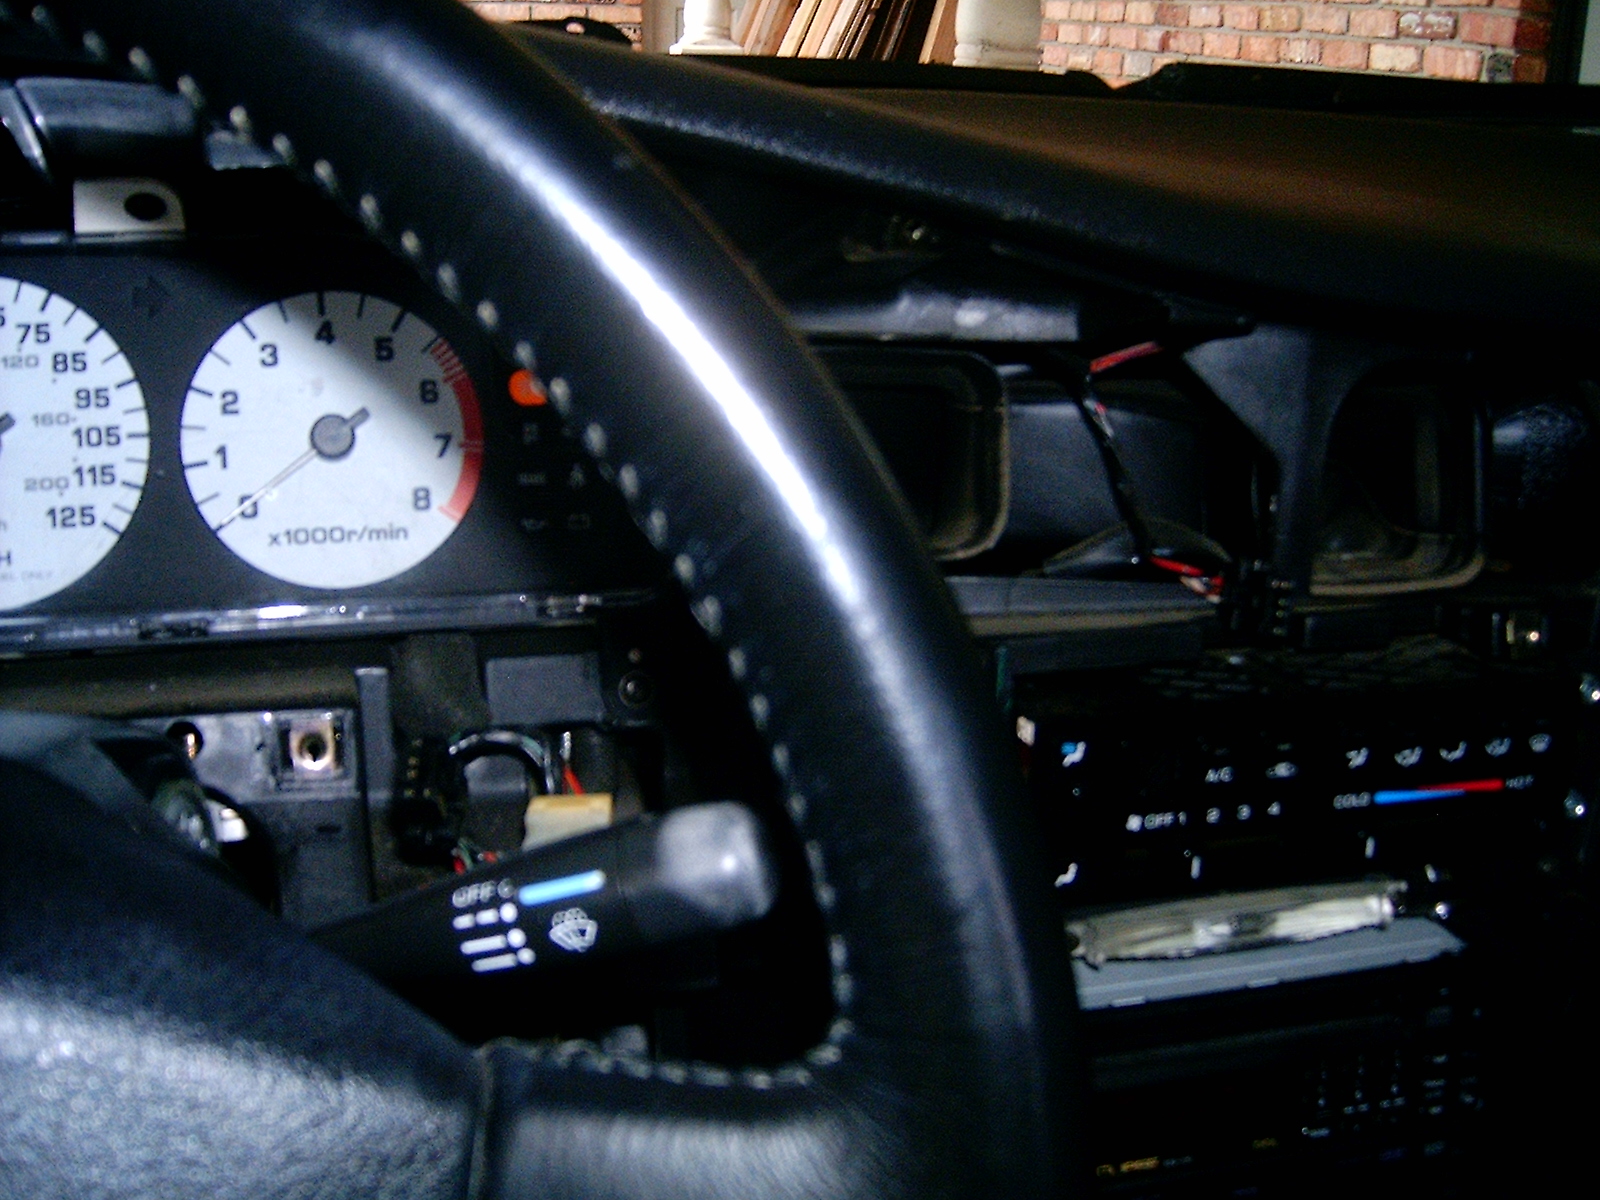
 Now remove the five Phillips head screws from the bottom of the same panel. Some of the photos below show the panel already removed which makes the screw locations easier to see.
Pull the panel out a couple of inches. You'll need to reach behind the clock and unplug its harness. If your clock needs to be repaired this is a good time to do it. Finish removing the panel, and again, remember to have the steering column in the full down position.
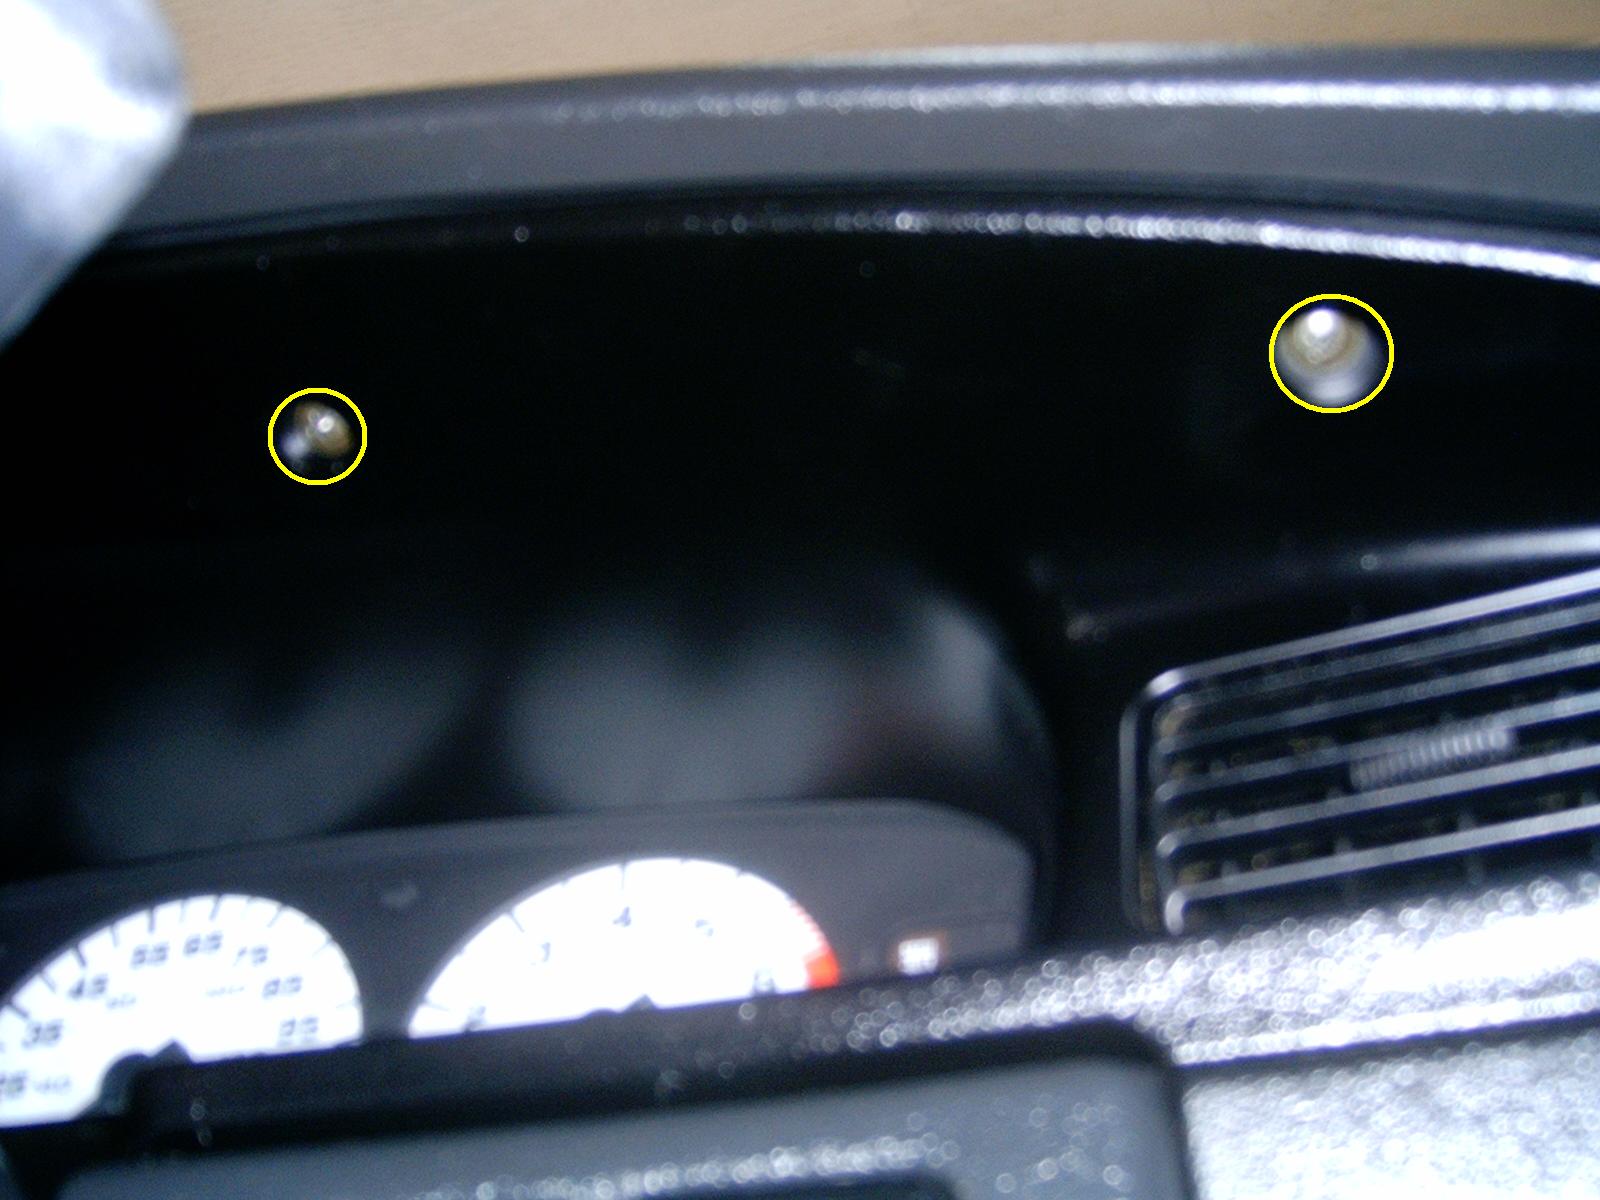
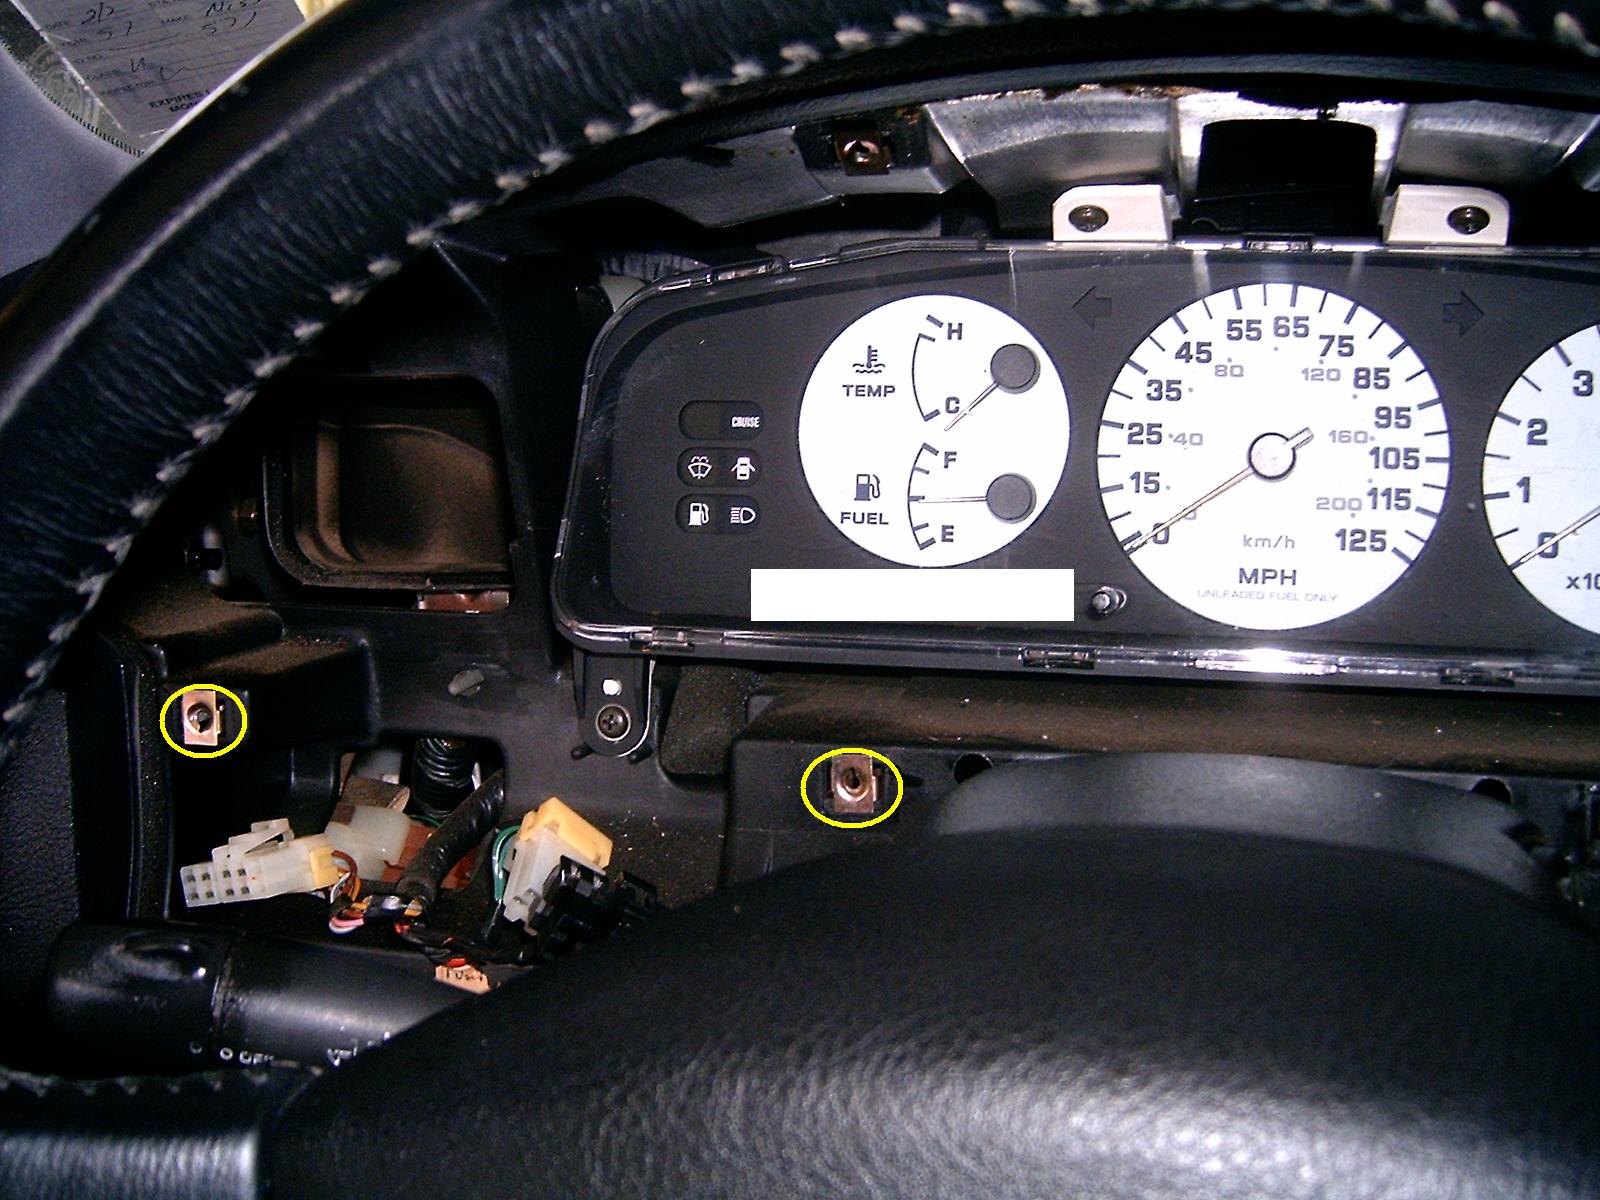
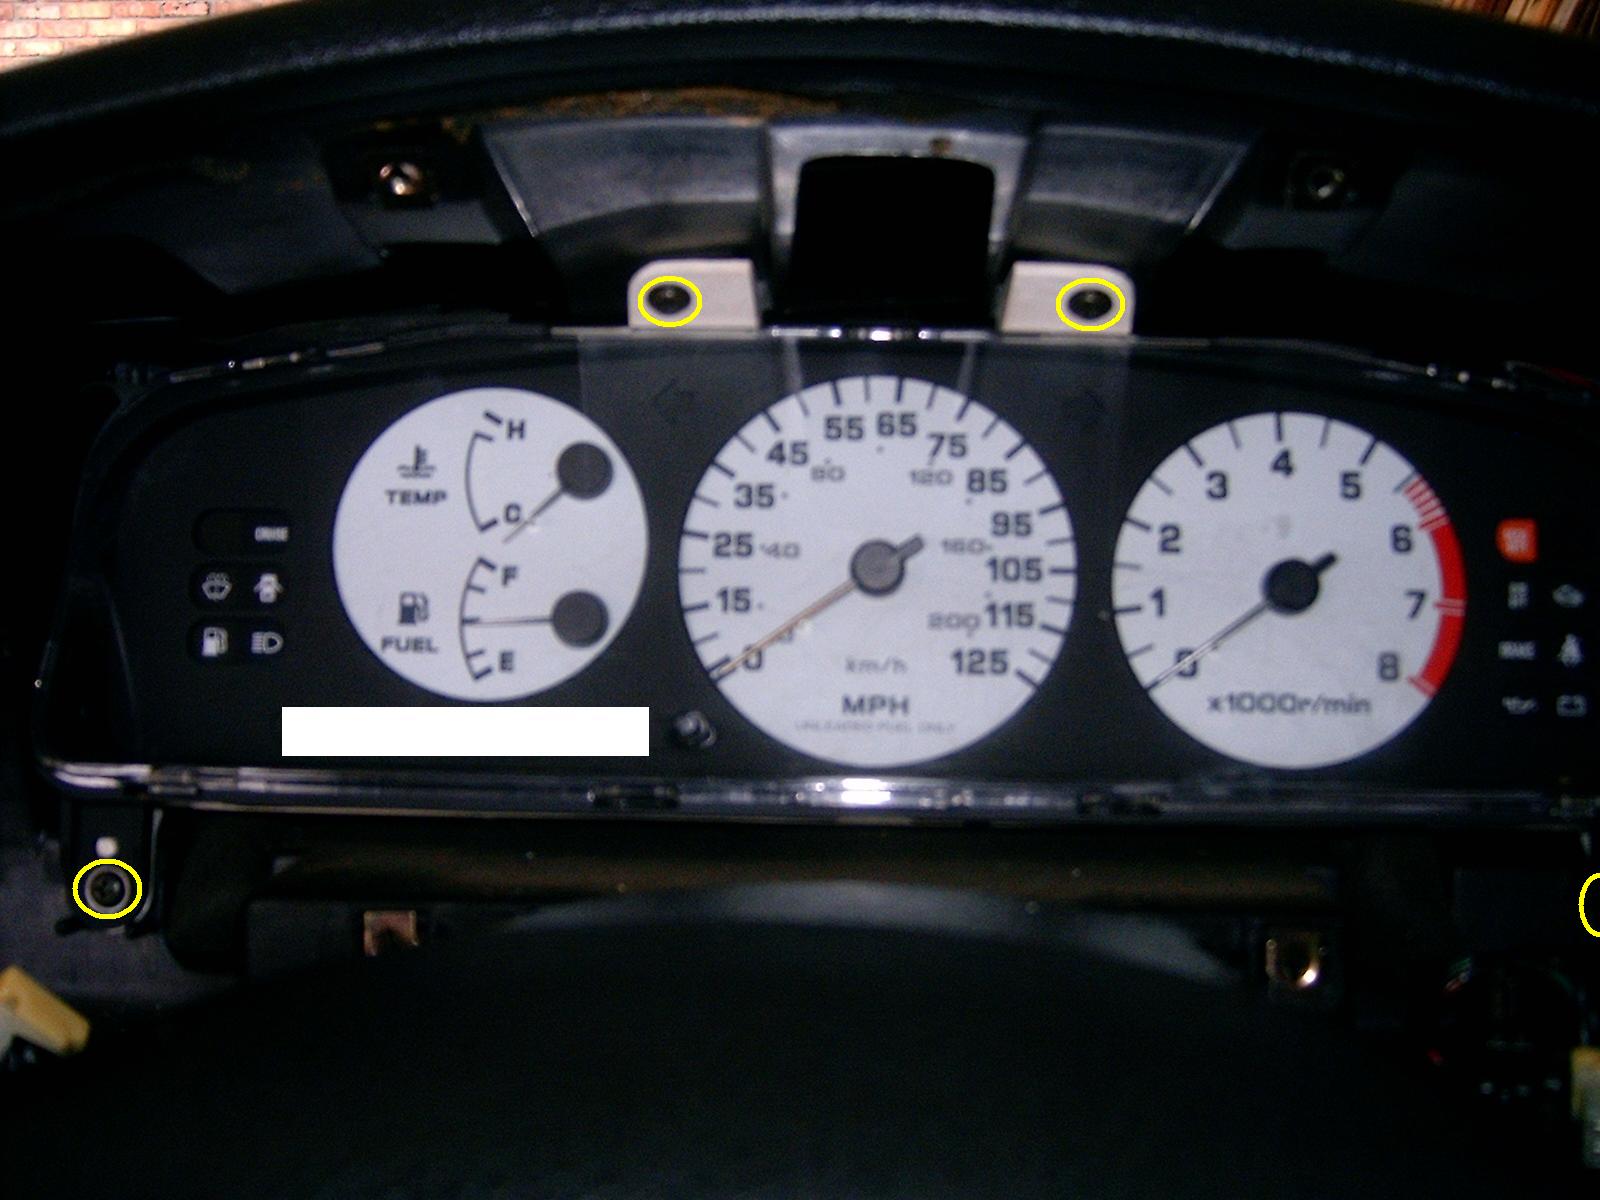 Now remove the gauge panel. There are four screws that hold it in place. Two are above the panel and two below.
 Pull the gauge panel out and unplug all of the wiring harnesses. Write down your odometer reading. The new digital gauge panel will remember the mileage from the donor car so you'll want to make note of the difference for your own records.
To make room for a few panels to be removed, pull the weather stripping away from the front edge of both doors (driver and passenger). Start at the top of the A pillar covers and continue to pull out the trim all the way to the kick panels. Then remove both A pillar covers. There are plastic tabs with metal clips on the covers that hold them in place. Start at the top and carefully pry the panel away from the vehicle. Set these somewhere safe and clean.
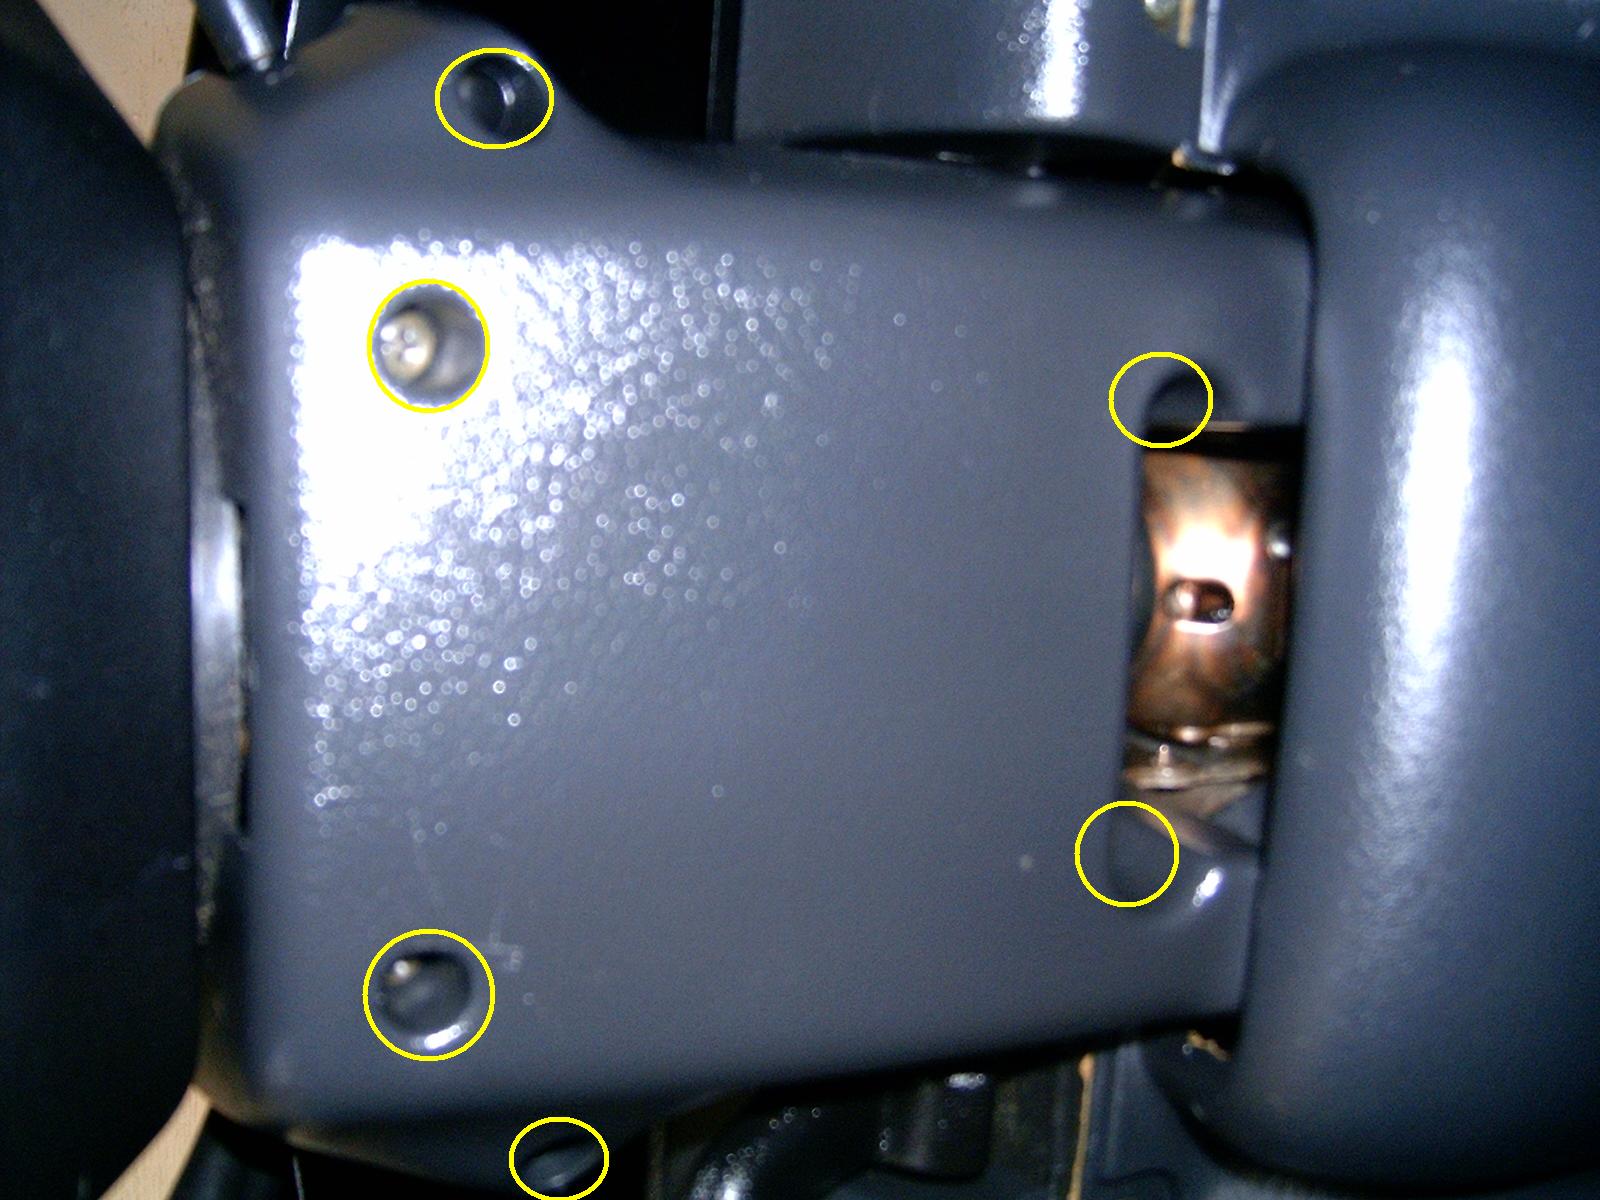 Finally, on the passenger side we need to remove the steering column trim and adjustment lever. Begin by removing the six Phillips head screws from under the trim panel.
This will free the top and bottom halves of the trim. You can then separate and remove these two pieces. Be sure to keep the screws with these pieces. Also, the small trim around the key cylinder will now be loose so remember to put it with the two column pieces.
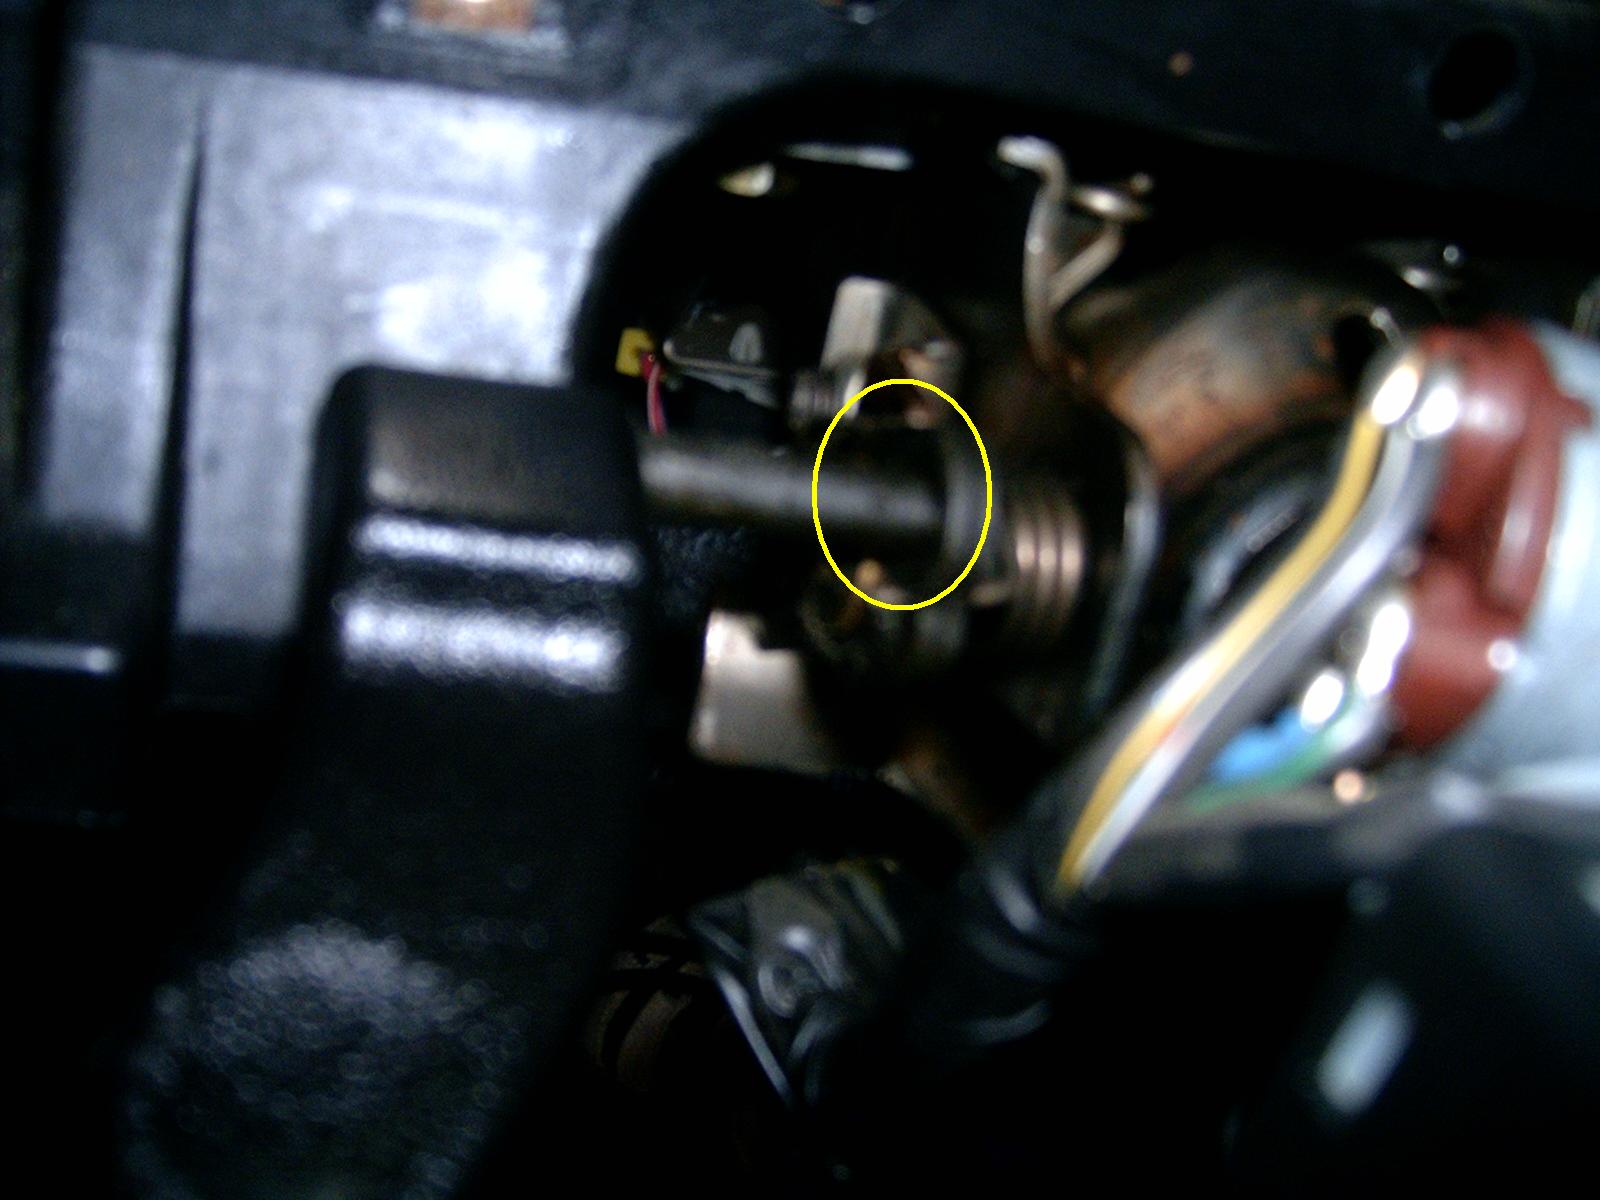
 First, make sure the steering column is in its lowest position. Now we remove the steering column adjustment lever. This is necessary to remove the entire dash without damaging it. The lever is held in by a "C" clip. Use a flat screwdriver or a pair of pliers to pull/push the clip out of place. Remove the washer that was behind the clip and then wiggle the lever out. Note the location of the spring for reassembly. Put these items together and place them somewhere safe.
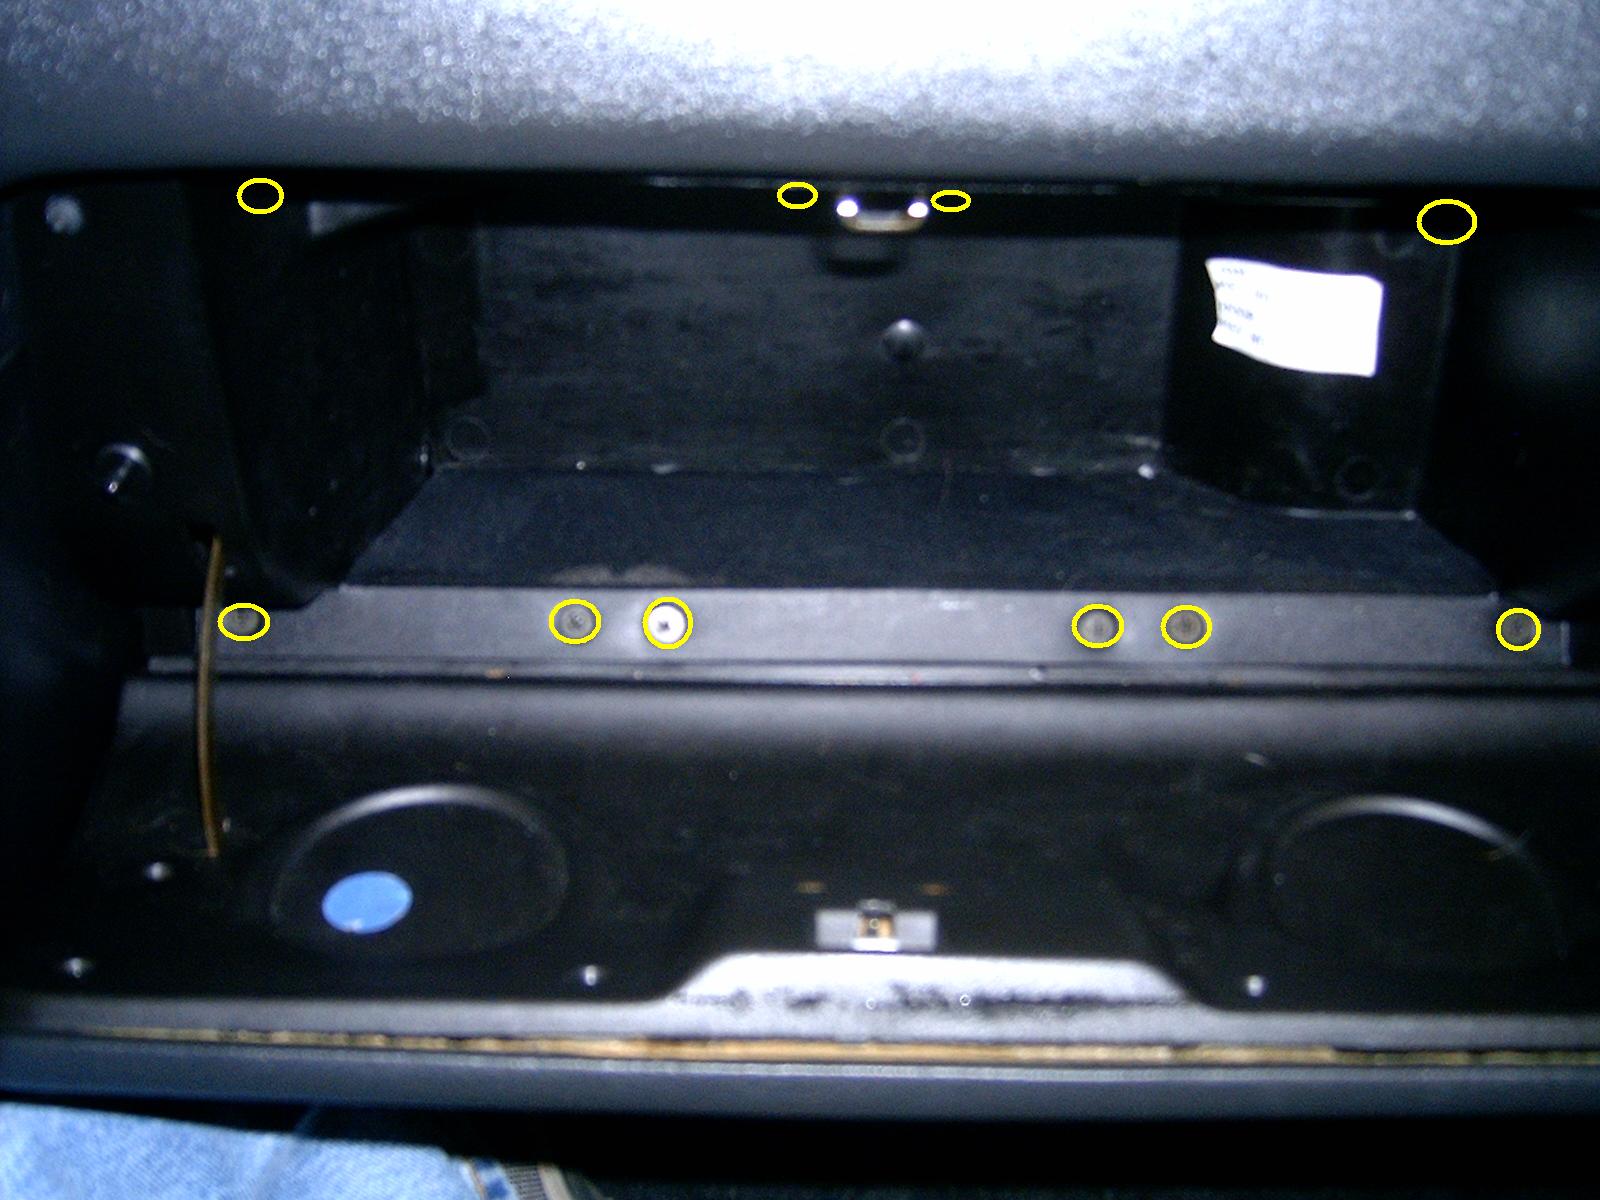
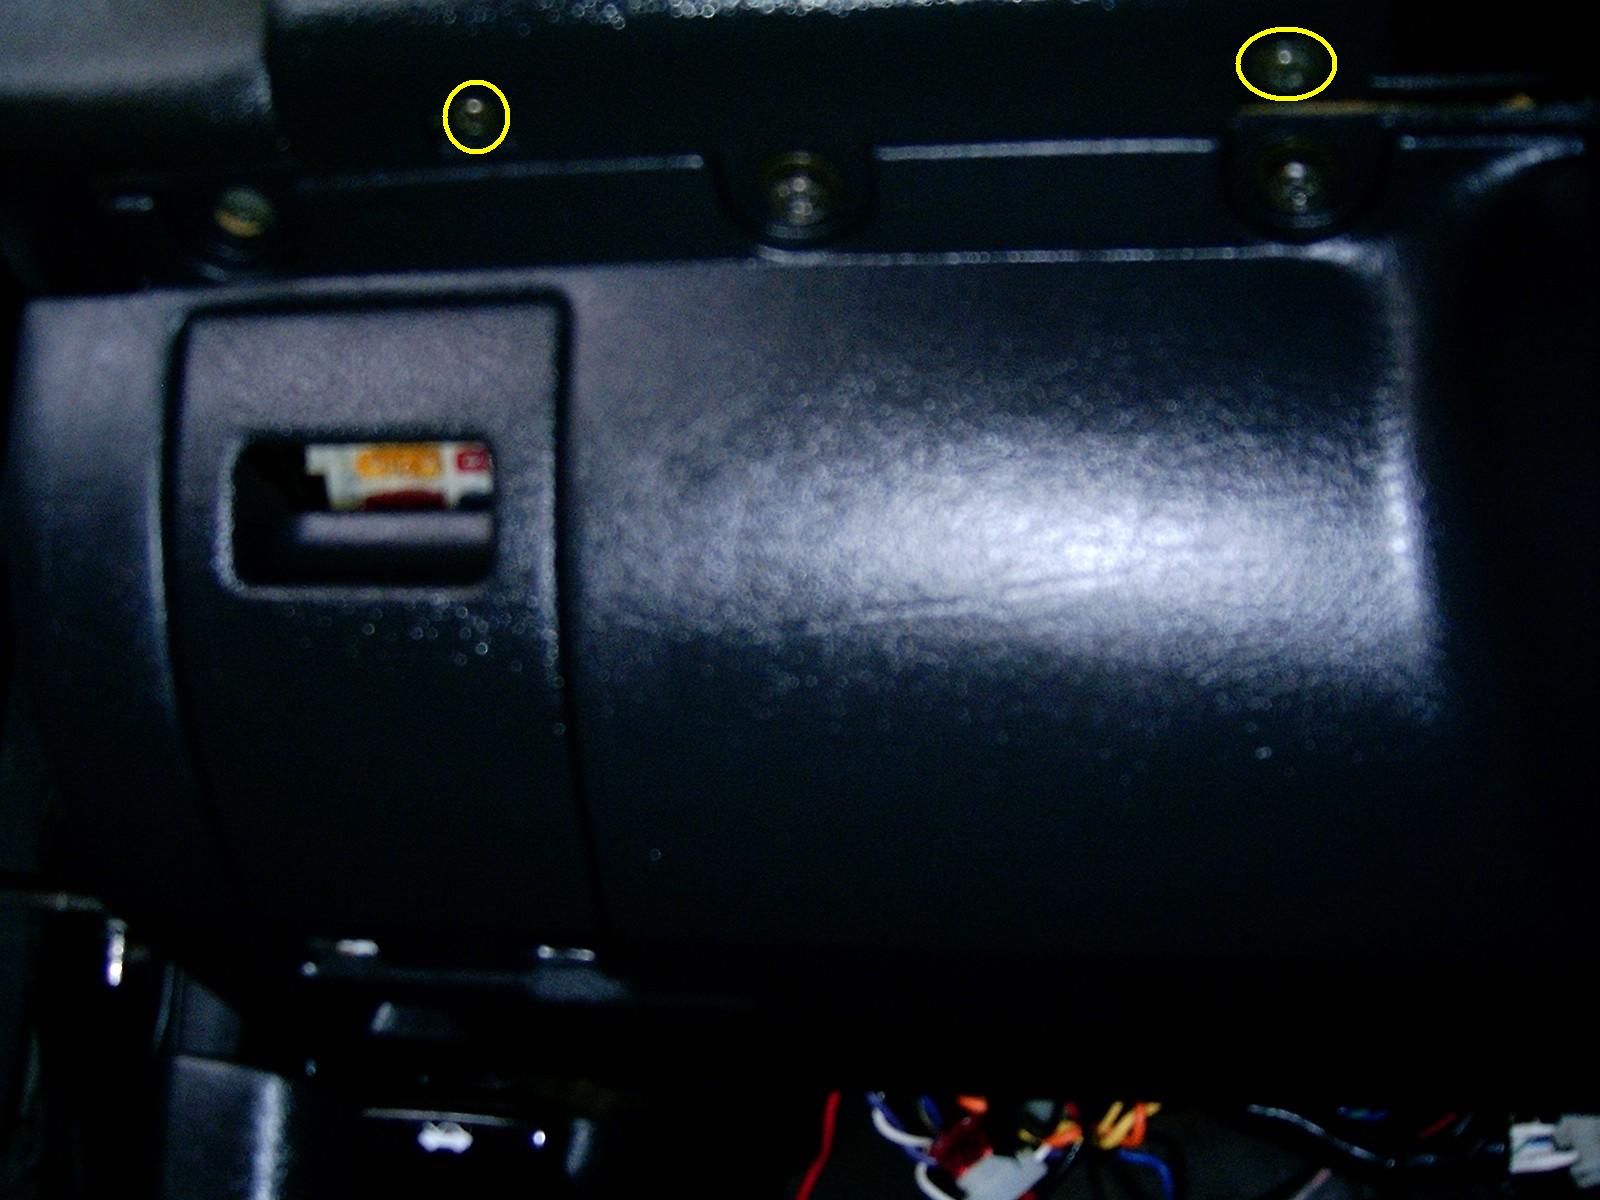
 Now let's move to the passenger side. Begin removal of the passenger side of the dash by removing the glove box. Open the glove box up and you will see many Phillips head screws. All of these are coming out. I start by removing all six of the screws along the bottom side. Note that these are tapered cone type screws. Then move up to the screws along the top of the glove box. All four of these are pan head screws including the two that hold the glove box latch in place. Place all of these screws in a separate bag.
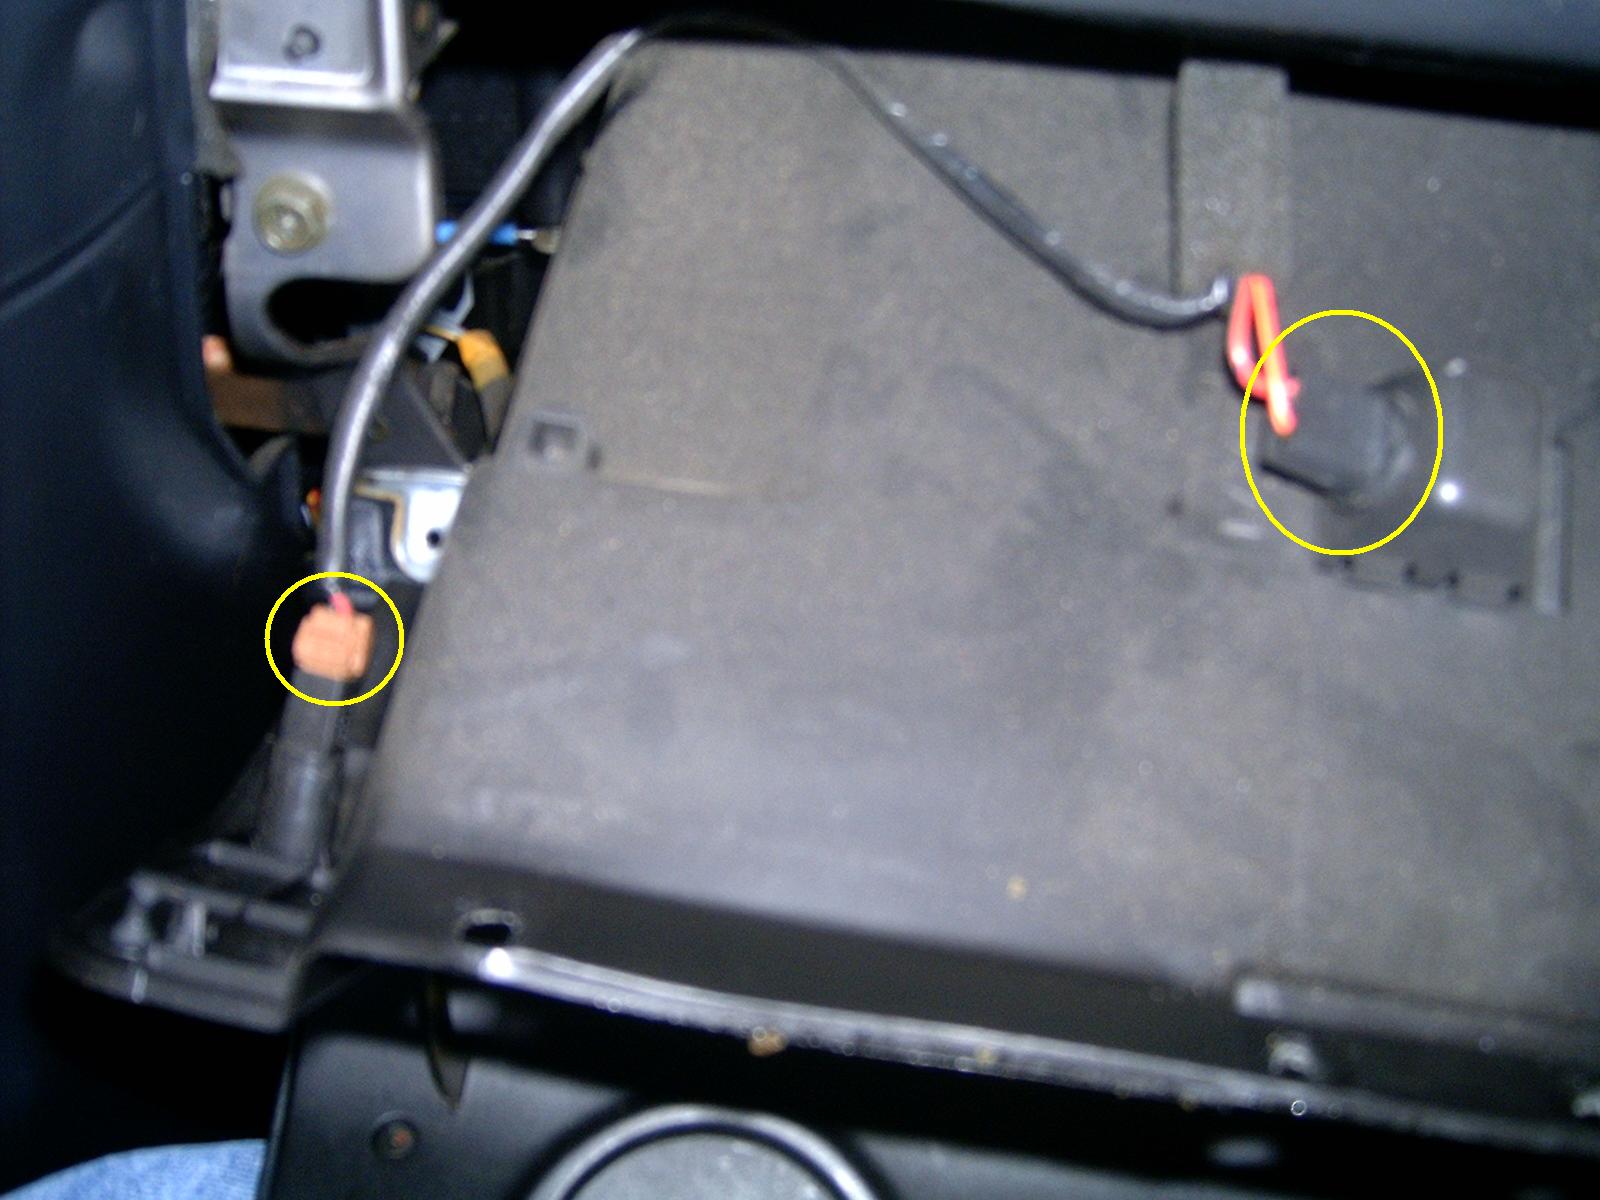 Pull the glove box out and then remove the small plug harness and light bulb. The light bulb twists and locks in place so you'll need to give it a quarter turn and then pull out.
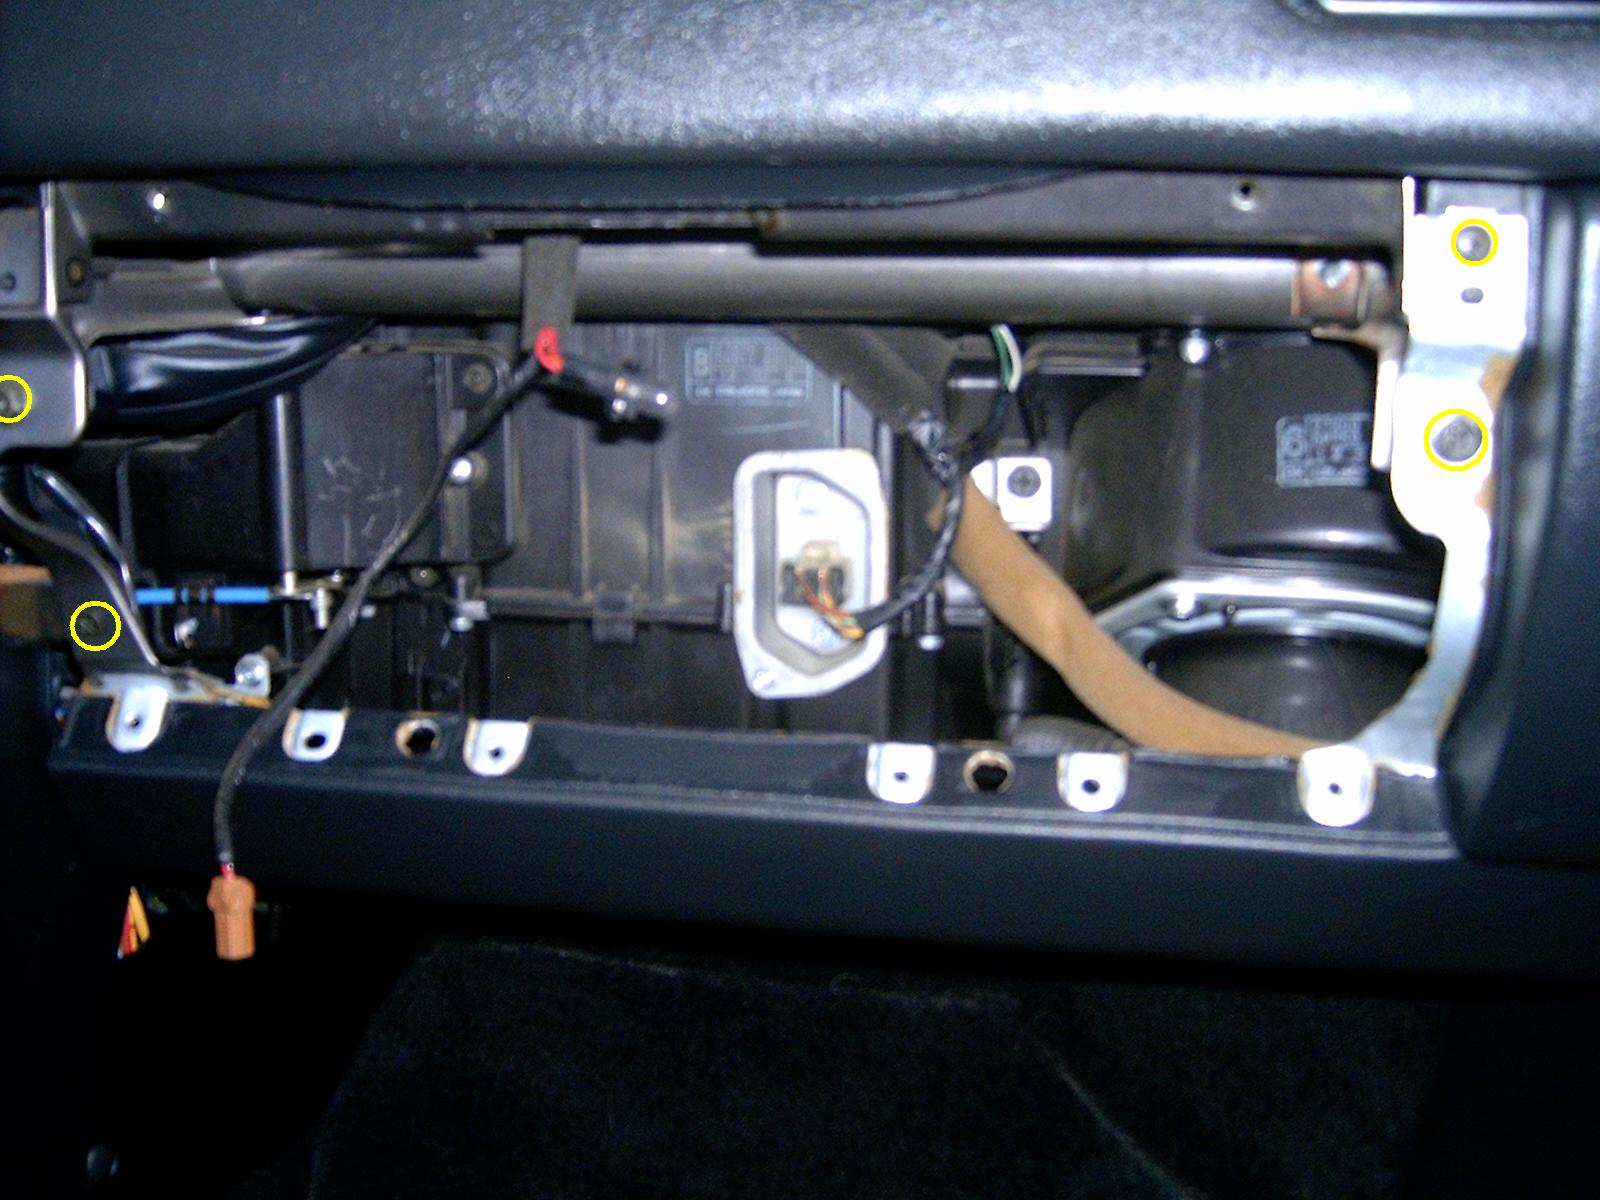
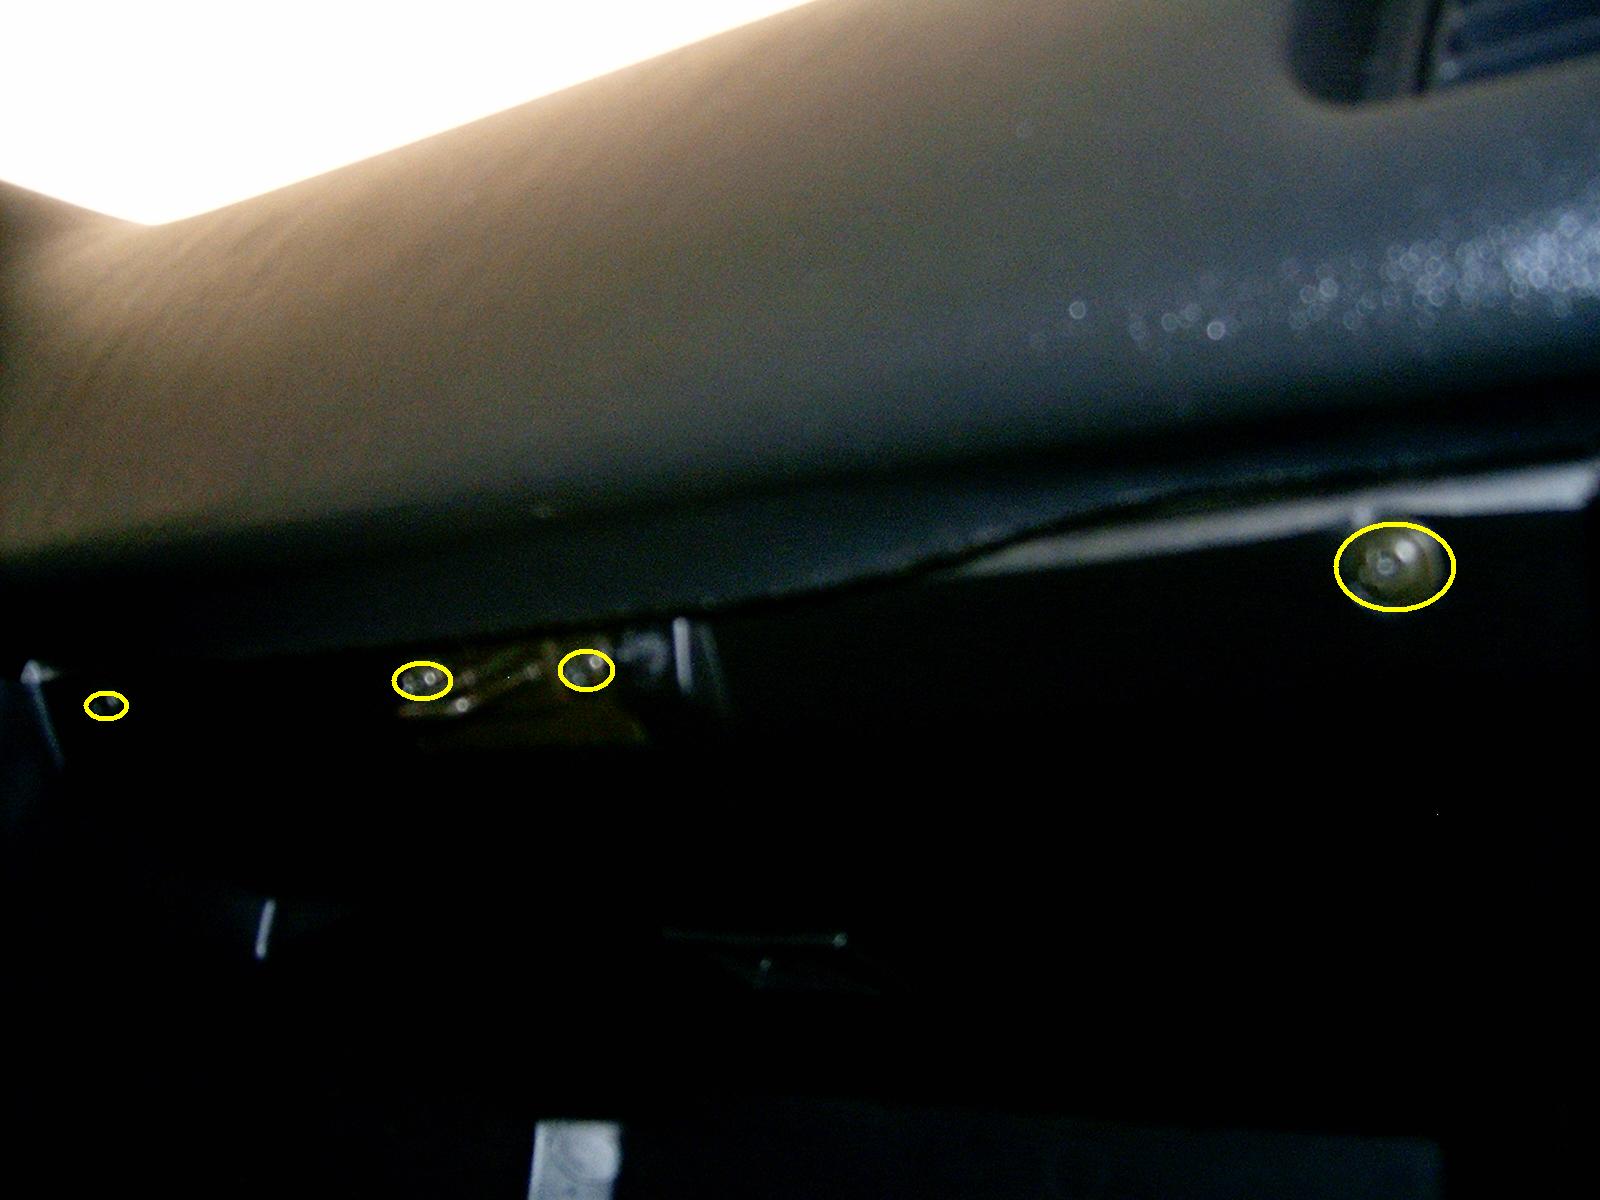
 Now remove the three Phillips head screws and two 10mm screws that hold the perimeter of the dash frame in place. This will free the frame from the dash so you can set it aside with the removed screws in a plastic bag.
There is a 10mm nut at the far right bottom of the main dash panel that should now be visible. I don't have a photo of this but it's opposite of the 10mm nut removed from the driver's side (by the fuse box and main harness plug).
 Remove the three Phillips head screws from the center dash area. This will free the dash panel from the center section.
Finally, remove the three 10mm bolts that hold the top of the dash in place. These were located under the defrost vents removed earlier. After you loosen the bolts with a socket you can then switch to a #1 Phillips head screwdriver. This makes removal much faster since there is very little room to move the socket wrench. Go slower towards the end so you don't end up dropping a bolt into the nether regions of the dash. Telescoping magnets come in handy and anything dropped will be easier to find once the dash is completely out.
 Now it's time to remove the dash from the car. Wiggle and shake the dash slightly to make sure you didn't miss any screws, bolts or nuts. If it seems to be loose go ahead and pull the dash towards you and then tip it towards the passenger side. Watch out for your wiper and turn signal levers when do this. I found it was easiest to tip it down and over the steering column. Then bring it out the passenger door. The dash isn't heavy and I did it solo but you may want to have help.
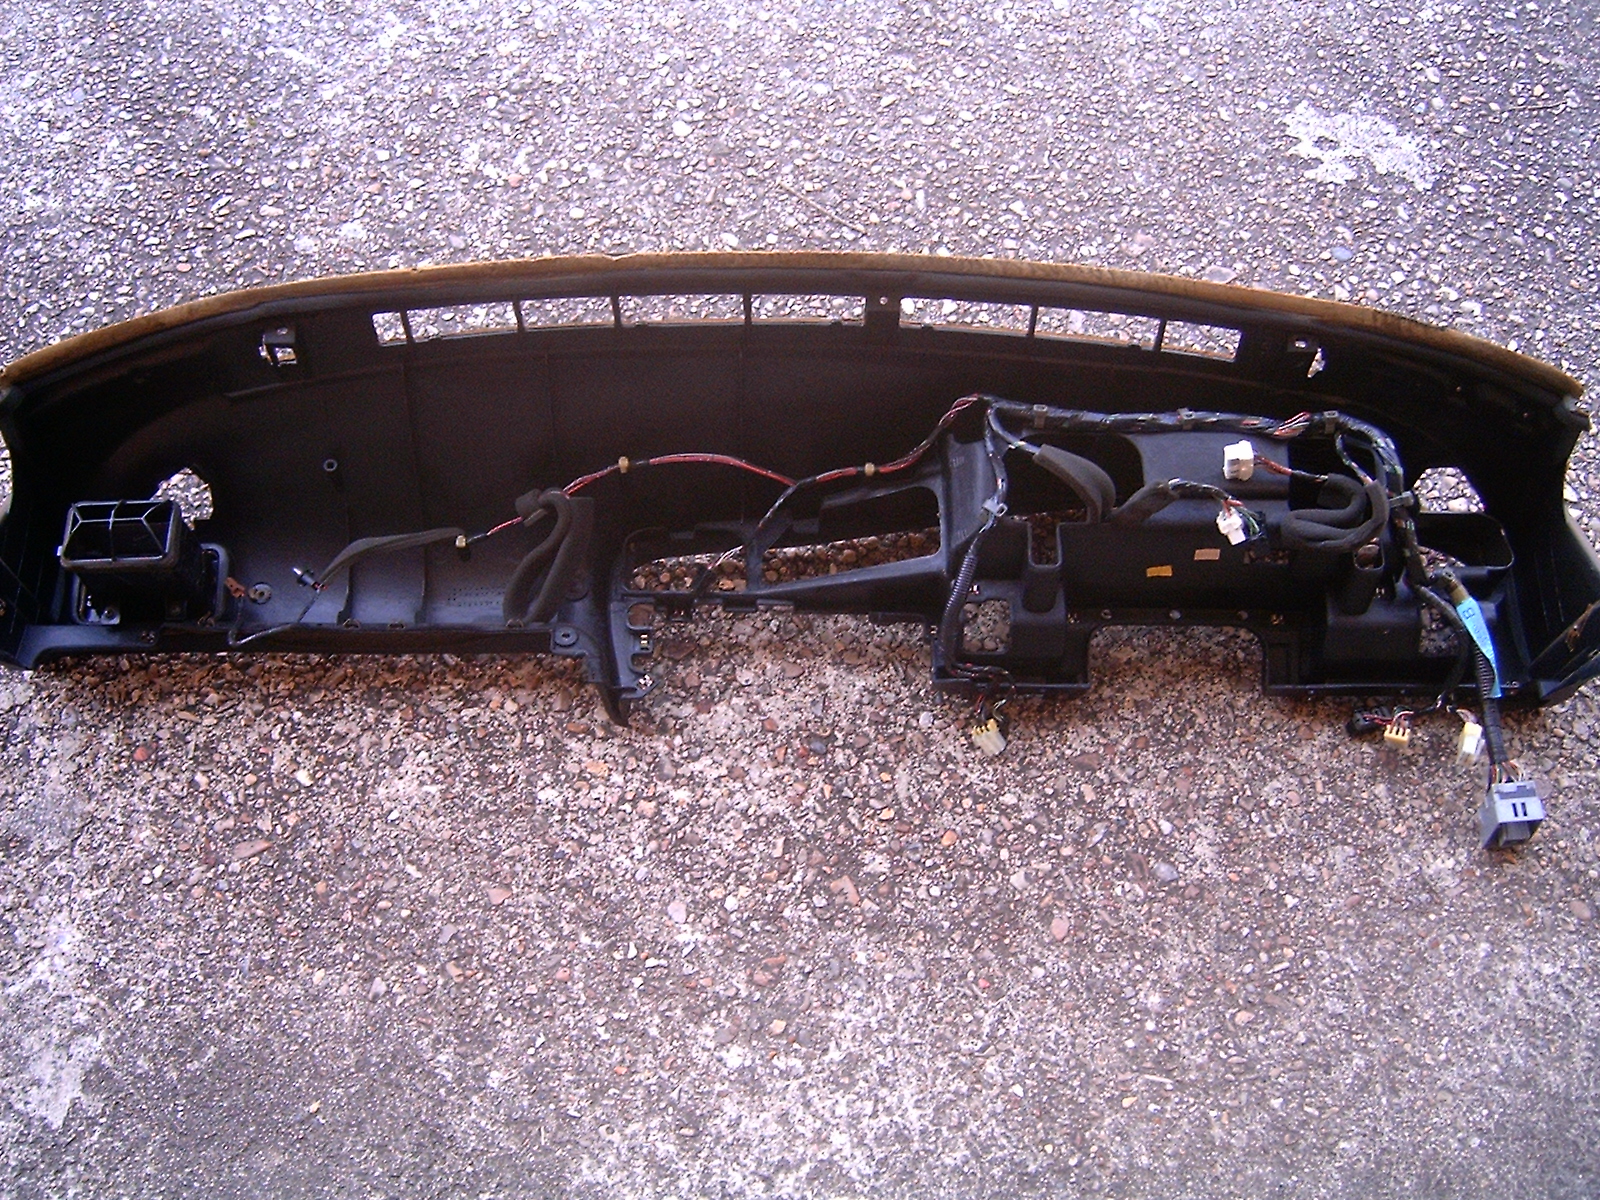 You should now have one removed dash with the wiring harness still attached to the back of it.
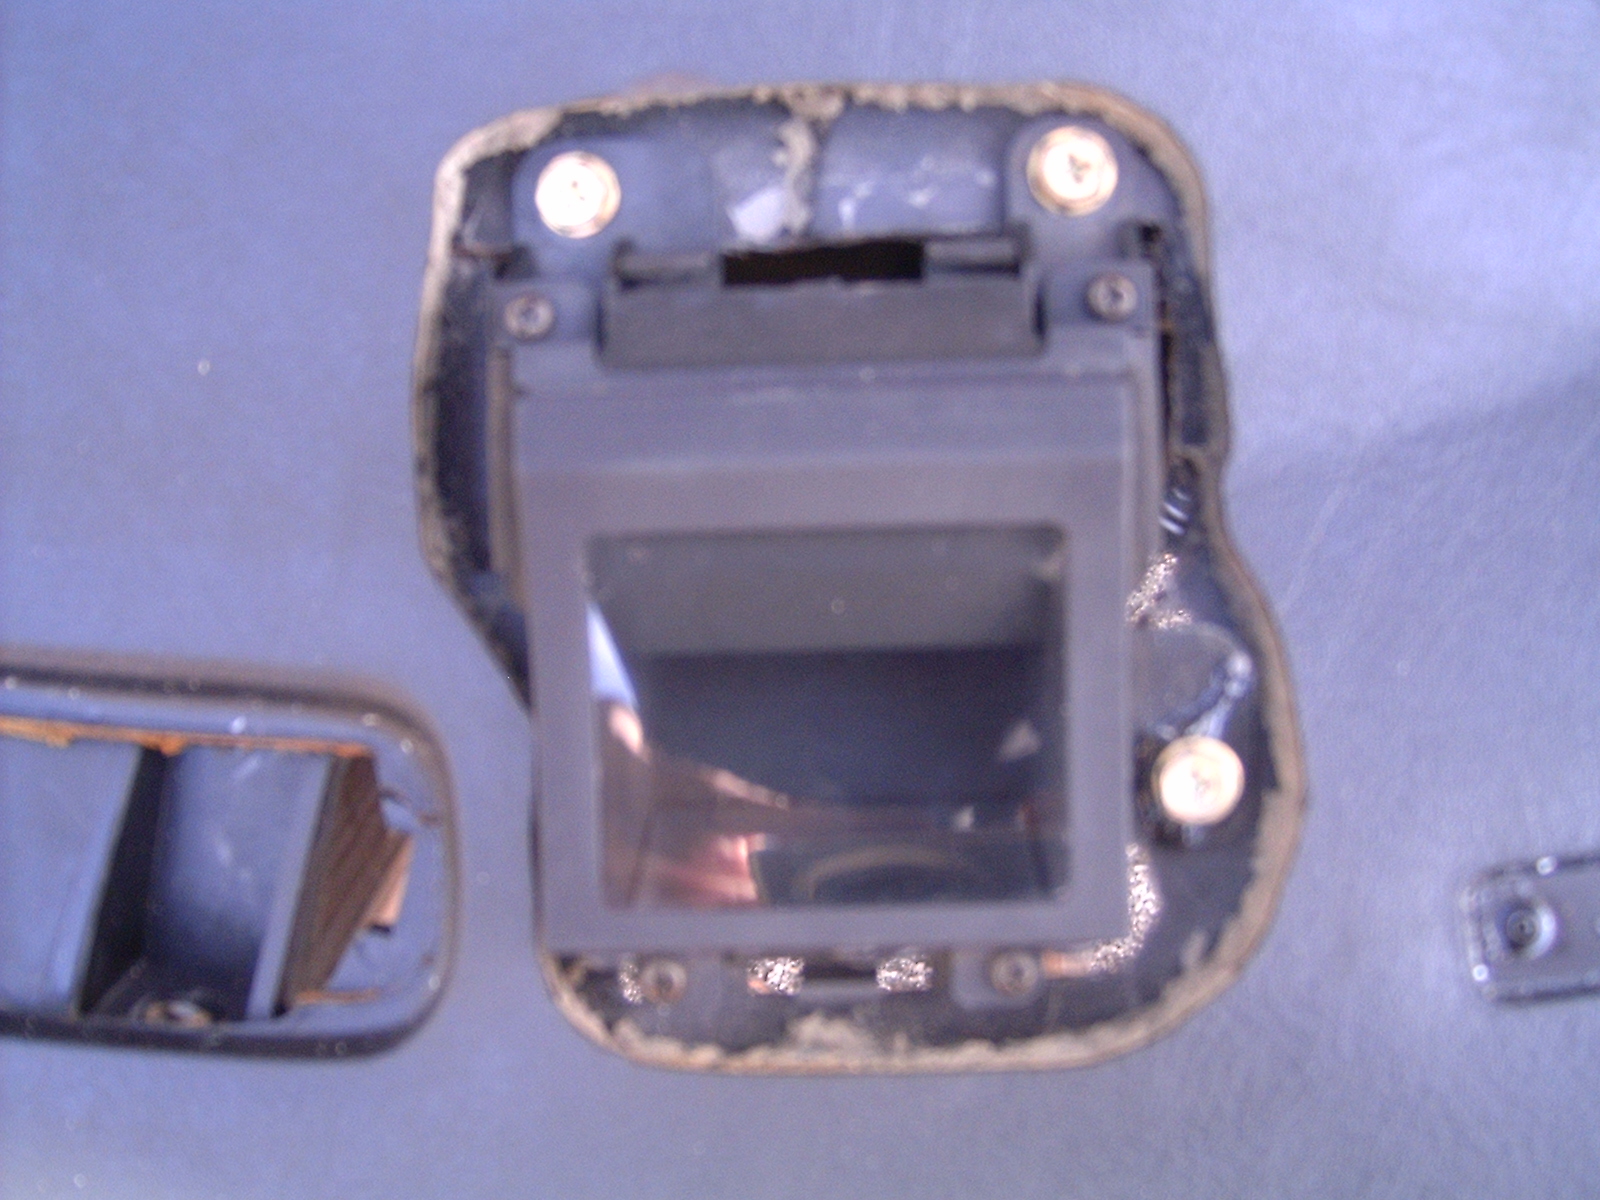
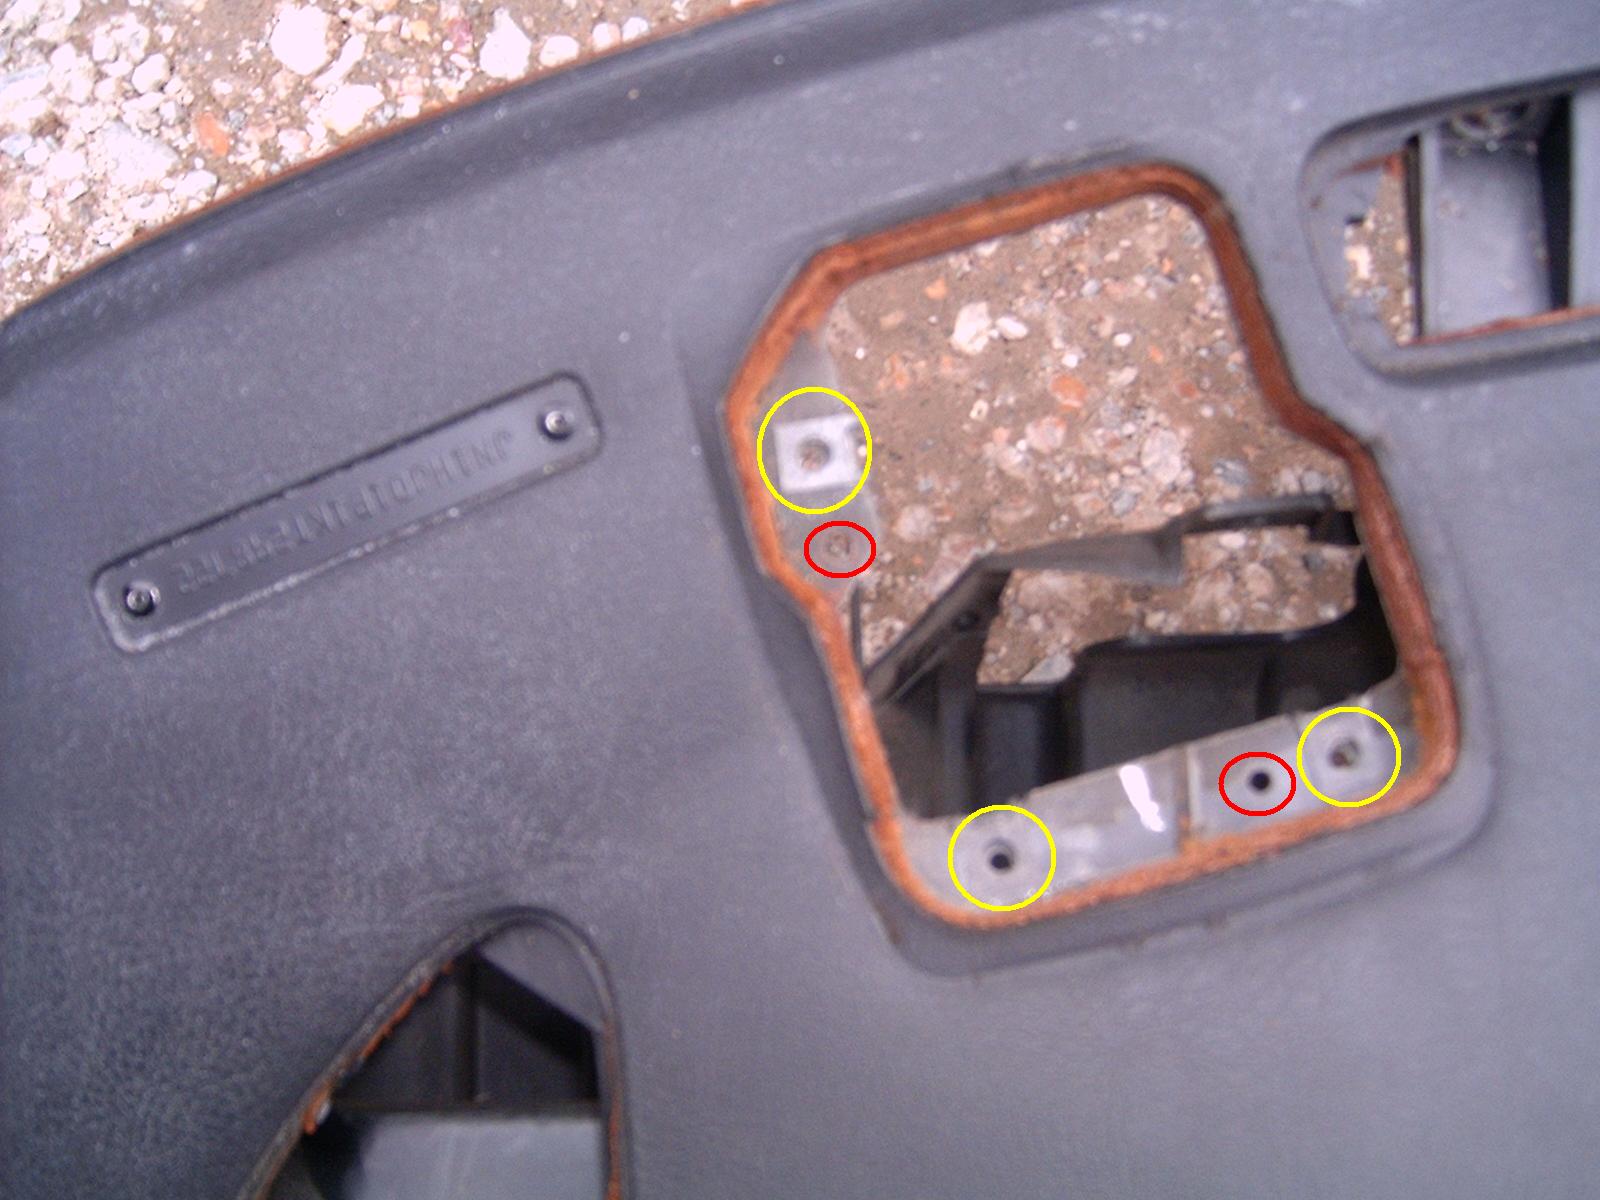 If this is the donor car dash you'll want to remove the HUD trim and projector. The trim pops up fairly easily but as always don't force it. There are plastic tabs in the bottom of the trim that mate with metal clips on the HUD projector. After the trim panel is removed you'll want to remove the three Phillips head screws holding the projector to the dash. Also remove the three metal "speed" clips that are attached to the HUD projector mounting flange (in the dash hole). Also note the location of the projector pin holes shown in red. In addition to the screw holes you will also need to drill these in your own dash. You may decide to just take the entire dash from the donor car rather than cutting up your own. If the color is a match and the donor dash is in good shape this can work. But keep in mind the VIN plate is located on the dash so you'll have to swap these out between dashes. The VIN plate is riveted in. I'd imagine you can just grind out the rivet from the back of the dash and then use small machine screws and nuts to hold in the new VIN plate.
Removing and Replacing the Fuel Pump
 Now it's time to remove the fuel pump so you can swap sending units. First, remove the back seat. The bottom seat cushion simply pulls up. I've removed mine so many times it just pops right up but if you've never done it before it can take some work.
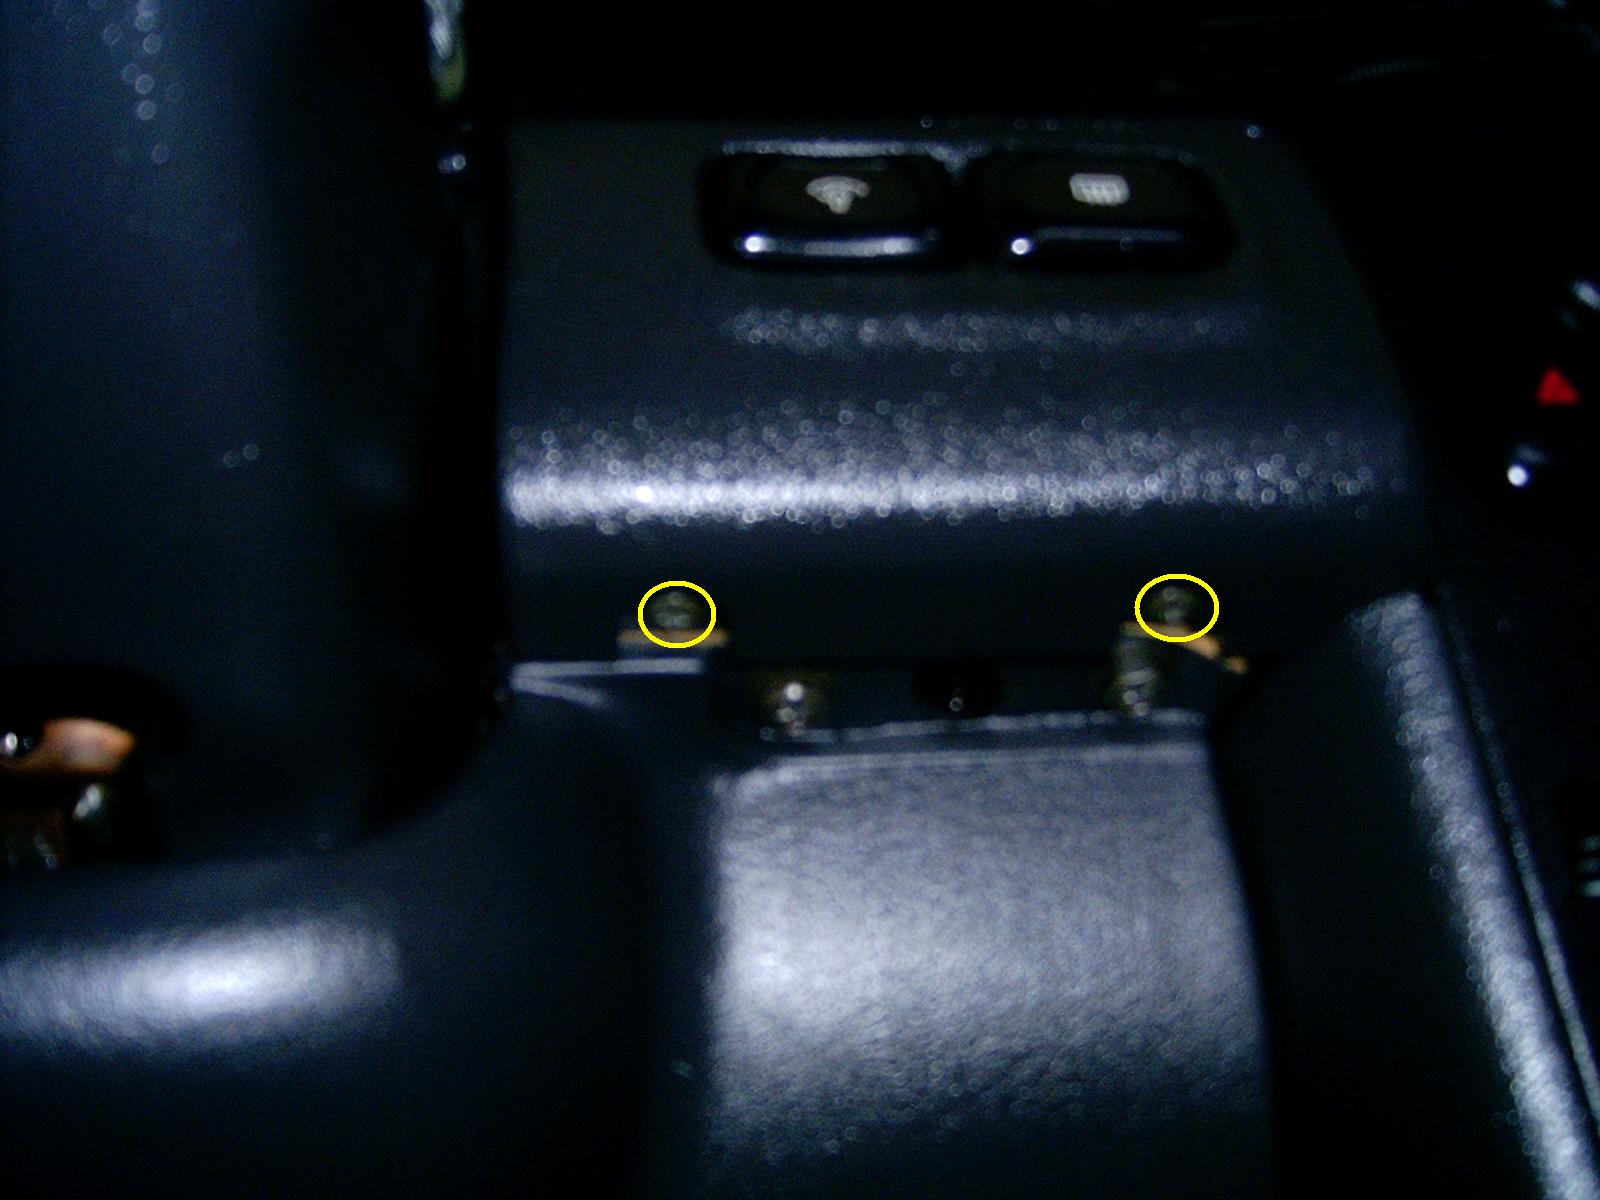
 Once the bottom is removed you need to remove the two outer 10mm screws. These are located under the outer seat bolsters of the top cushion. There is one on either side of the cushion.
 Next, fold down the middle armrest and remove the two circular covers from that panel. There are two bolts to be removed from this area. They attach to the brace that runs across the rear of the vehicle. I removed my brace long ago so I can't show you that part.
 Once these are removed you can push up on the rear cushion. There are three U-shaped metal tabs (thick bent wire) that slide into the plastic clips shown in this photo.
It can be quite a job to get the top cushion out for the first time. You'll need to get inside the vehicle and basically squat on the area where the bottom cushion used to be and then use your arms and legs to push the seat back up.
 Once the back seat is removed you can get to the fuel pump. Remove the four screws/bolts that hold the top cover. You may want to unclip the wiring harness to give yourself some slack. Follow the harness about a foot or some from the cover to find the plug.
Now the fun part. Loosen (a lot) but don't completely remove (for ease of reassembly) the two hose clamps that hold the fuel lines in place. Place a bunch of shop rags into the cavity around the two hoses to soak up any spills. Keep all of the doors of the vehicle open and do this in a well ventilated place. If you're easily overcome by gas fumes you might want to wear a mask and/or have someone with you. This is why we ran the vehicle with the fuel pump fuse removed. It should have depressurized the fuel system which minimizes the spills we'll get here.
 After the area has been prepped and the clamps loosened you'll need to pull the fuel lines away from the fuel pump. This is necessary so you can remove the pump from the tank. DO NOT use sharp metal objects such as screwdrivers or pliers to grab, pull or push the hoses as you could easily damage them. Instead use some hose clamp pliers (if you have them) or push the hoses off with something non-destructive. I used some plastic panel pullers to push against the outer/exposed edge of the hoses. It took a lot of effort and patience but they finally came off.
 Now remove the six screws/bolts that hold the fuel pump in place. I believe these are all 8mm hex head.
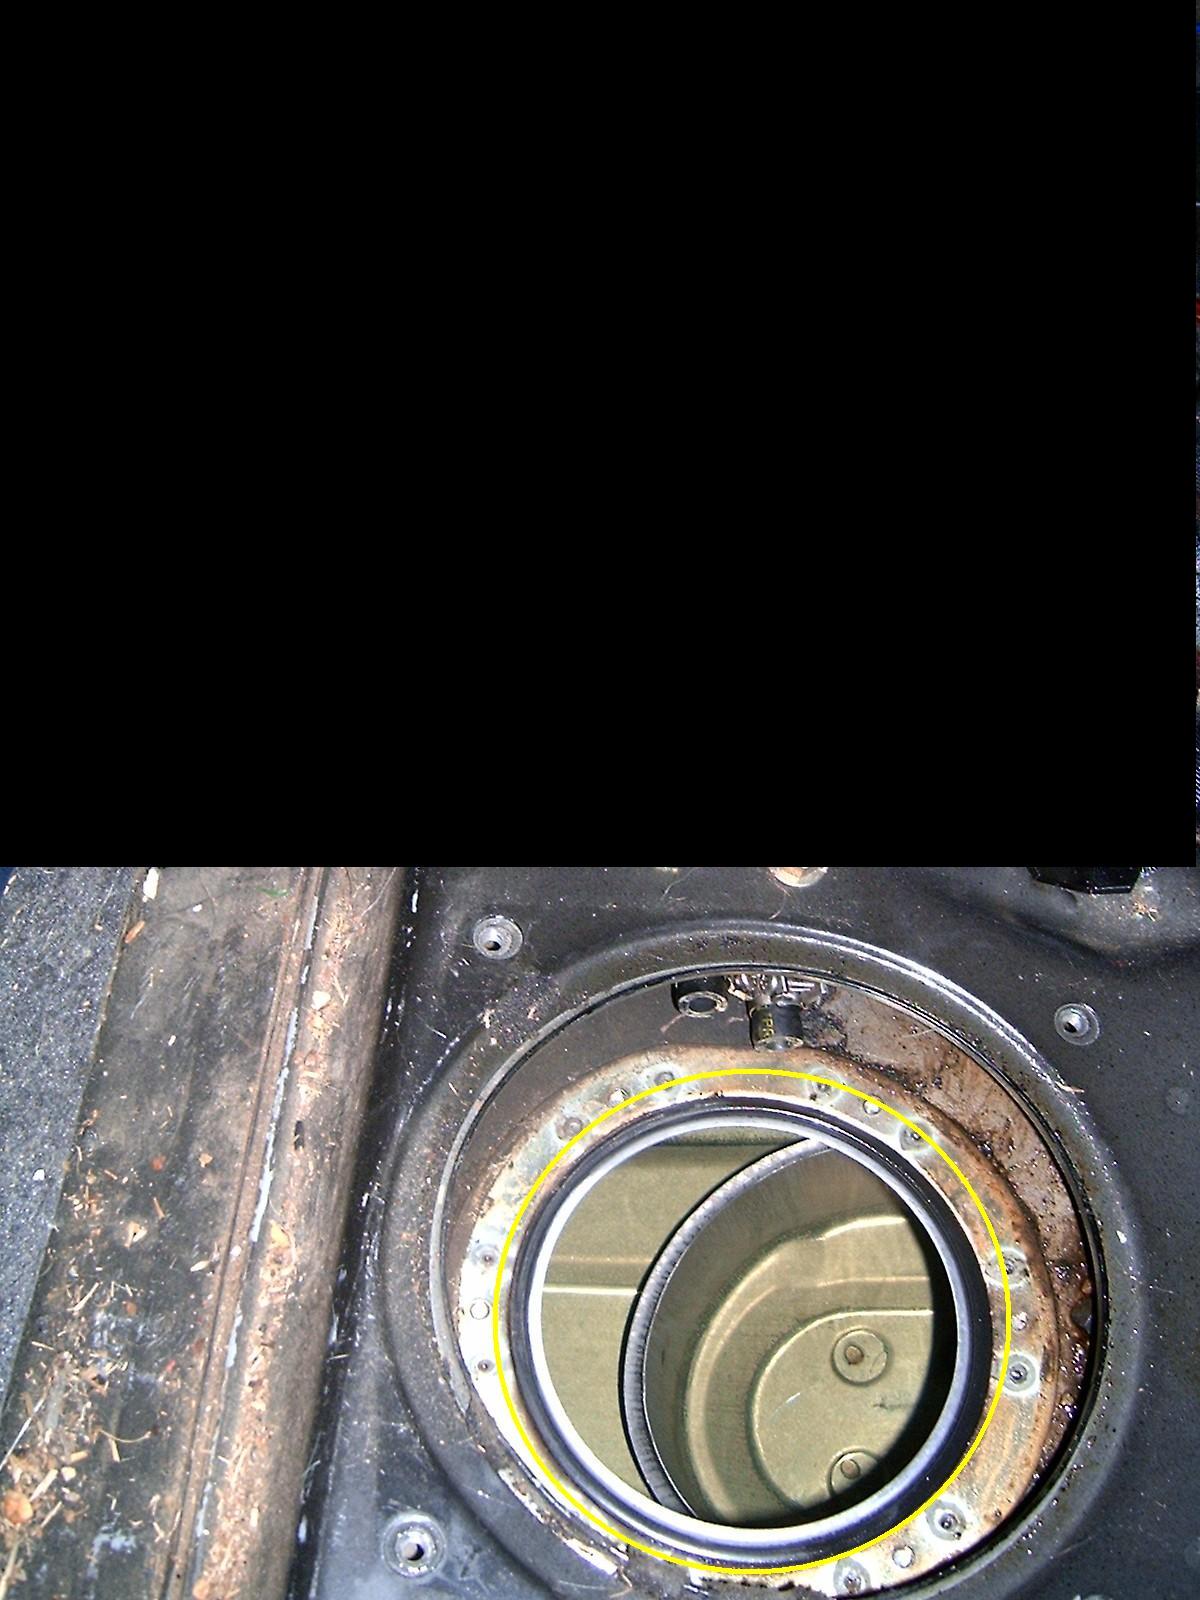 Remove the fuel pump assembly from the tank. Be careful not to drip across your interior. Also note the location of the black gasket ring for reassembly. These can easily drop into the tank so careful when removing or replacing the fuel pump assembly.
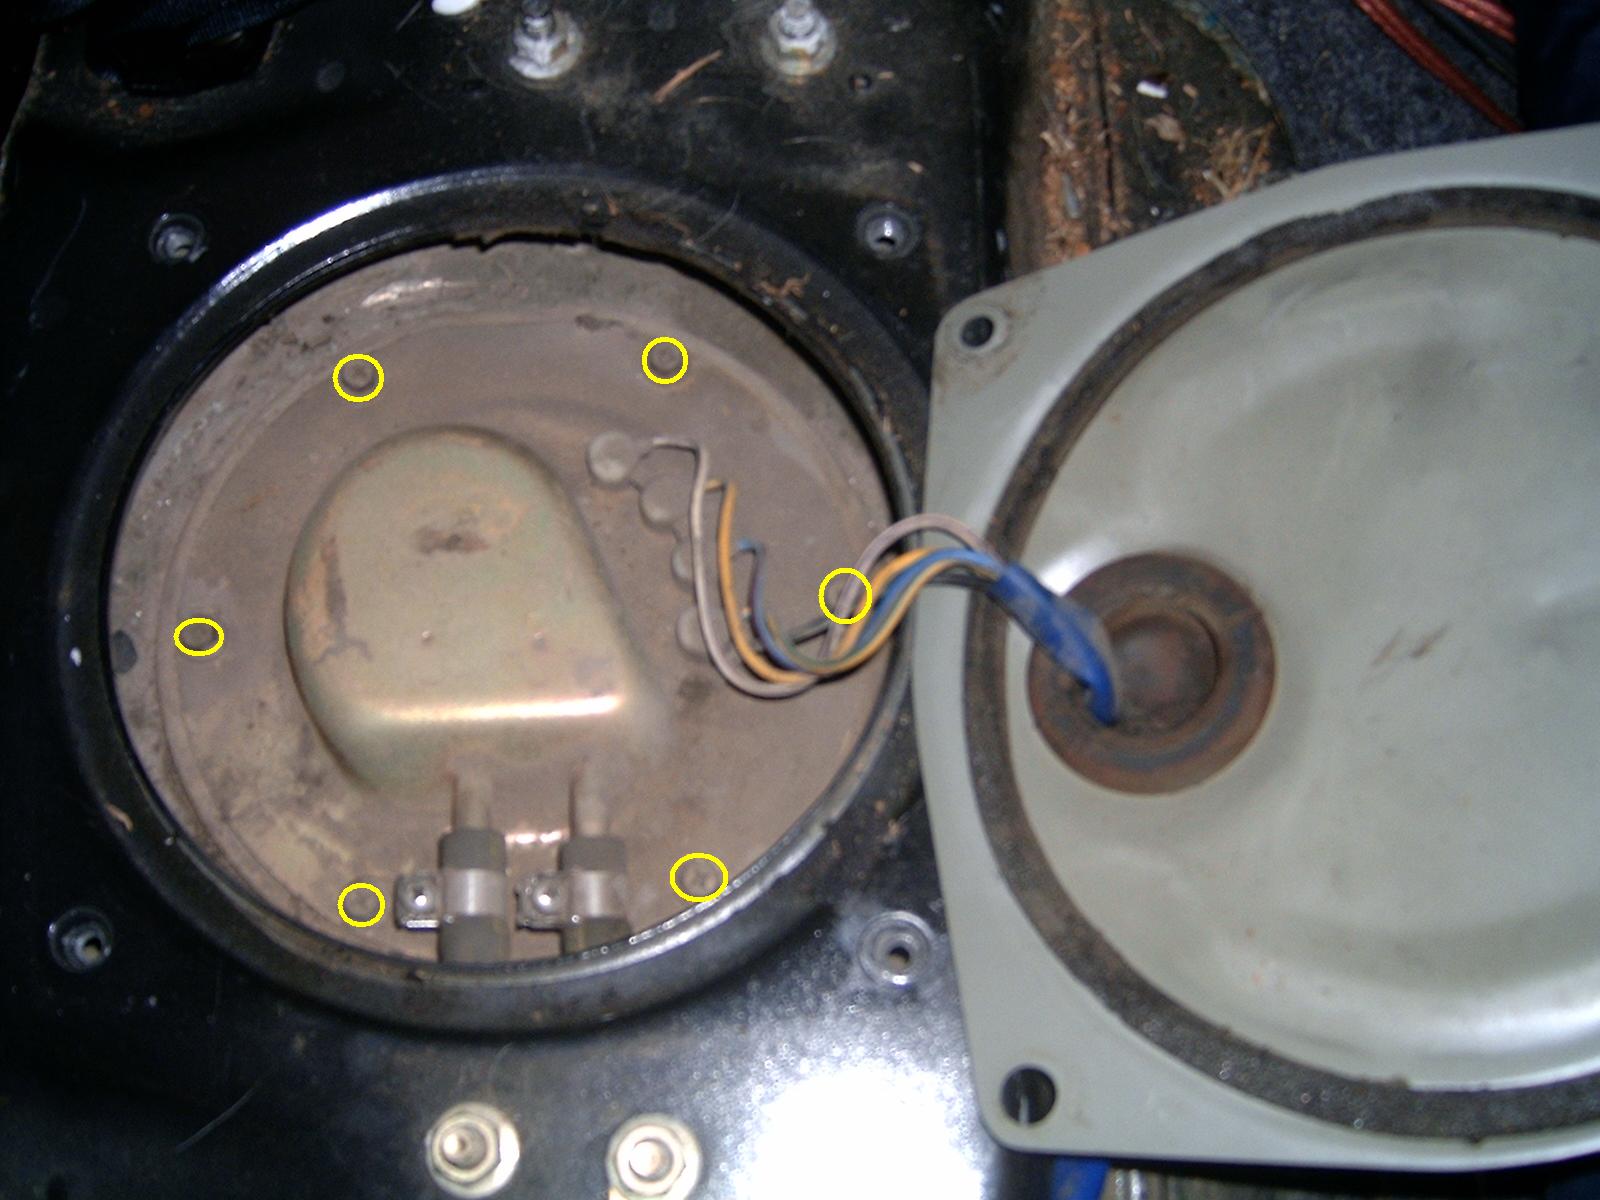
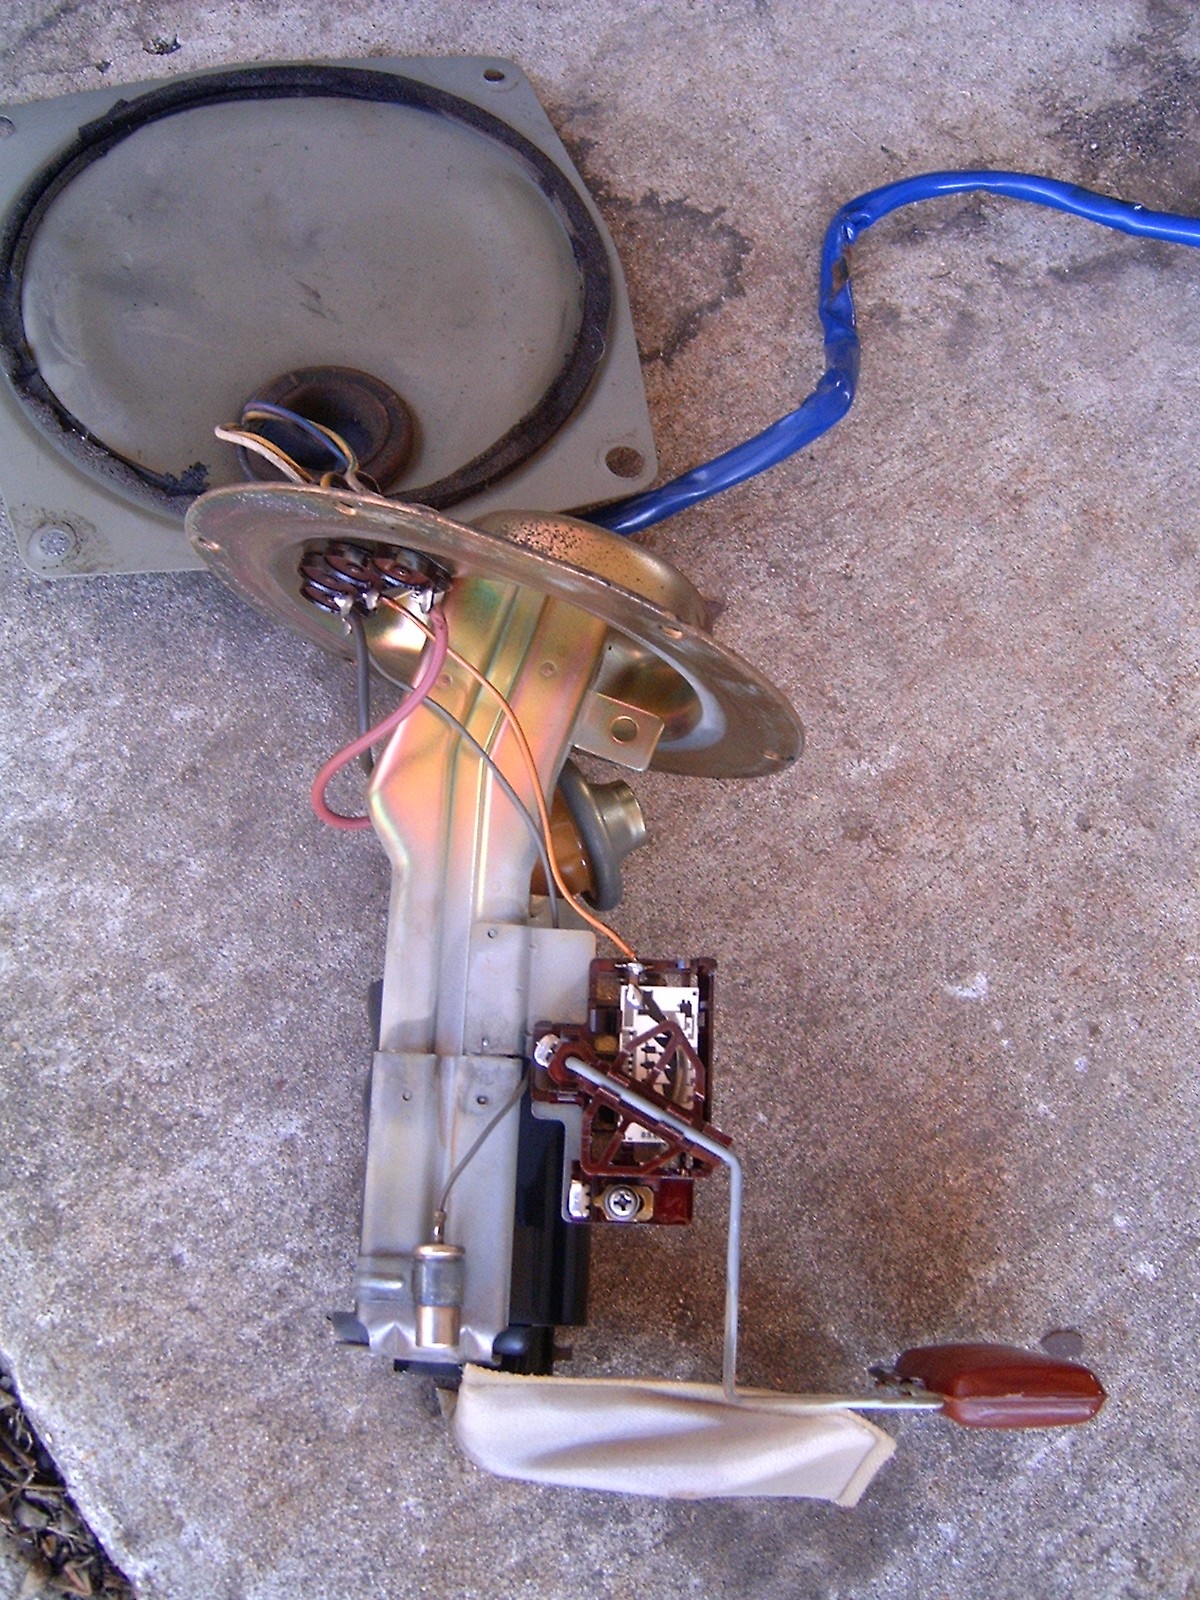 Here is the completely removed fuel pump assembly.
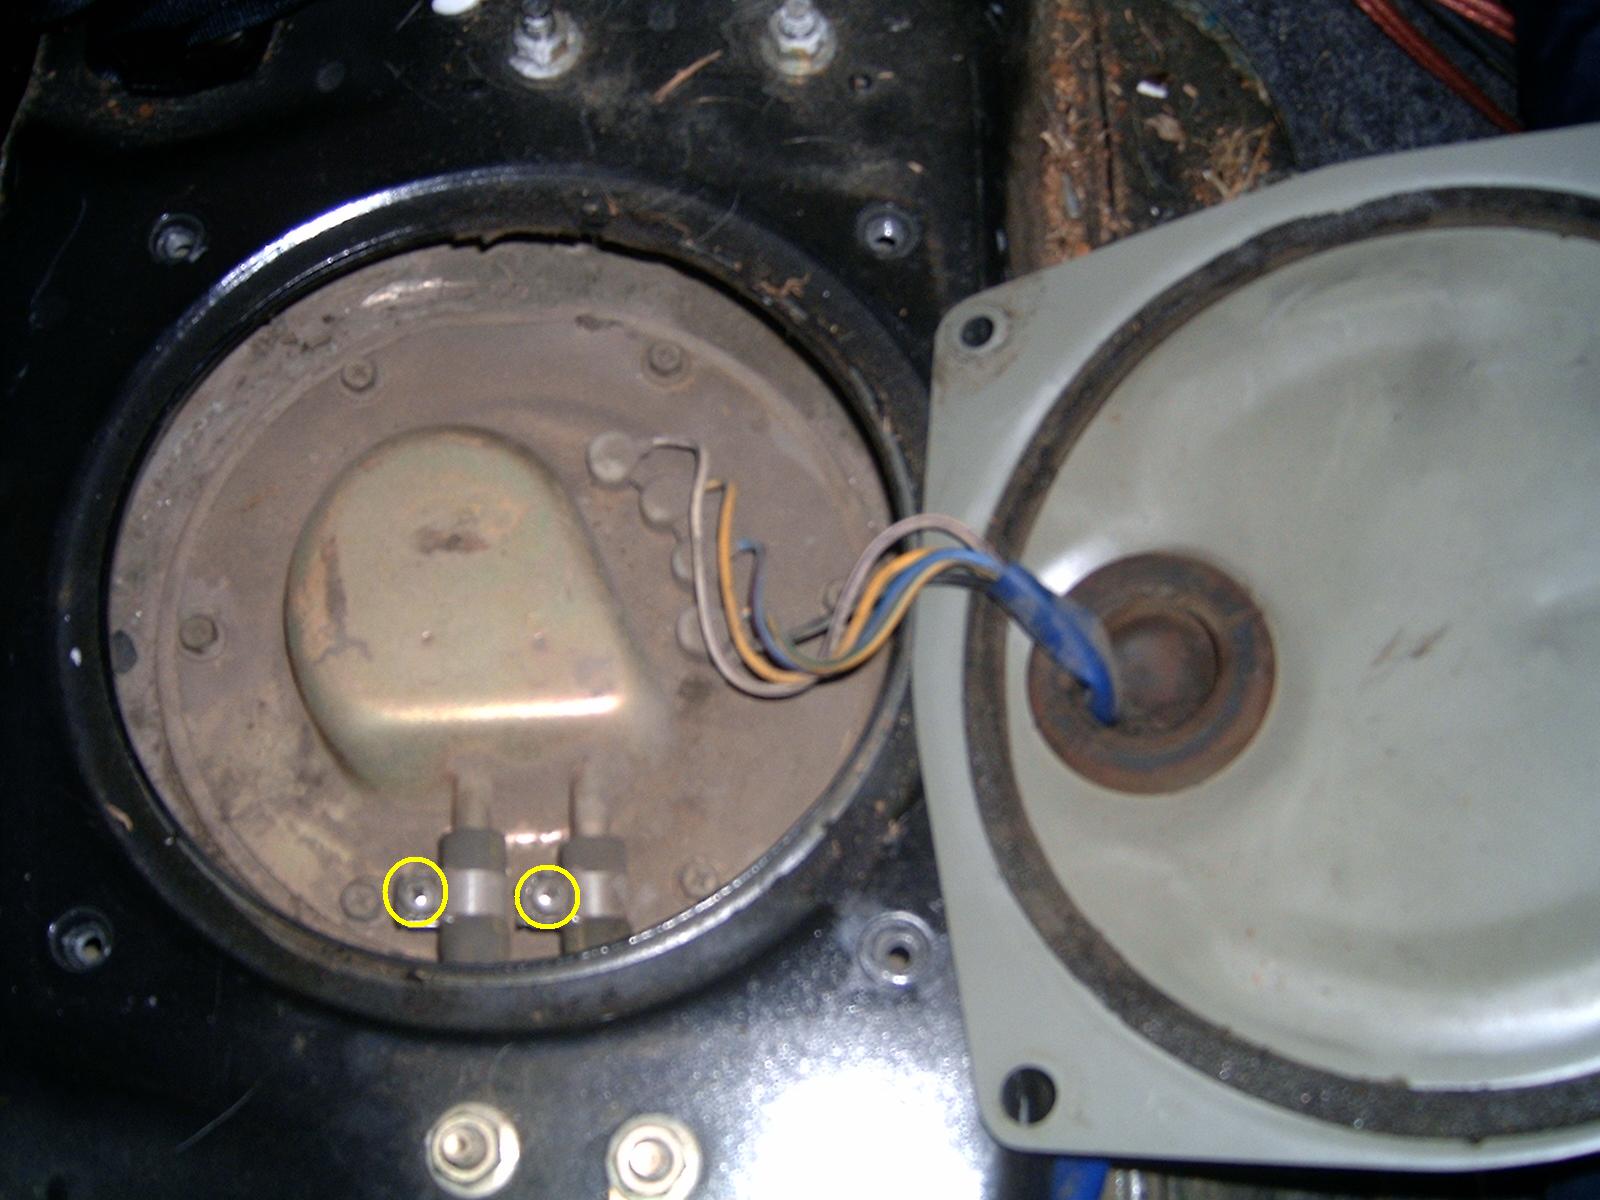
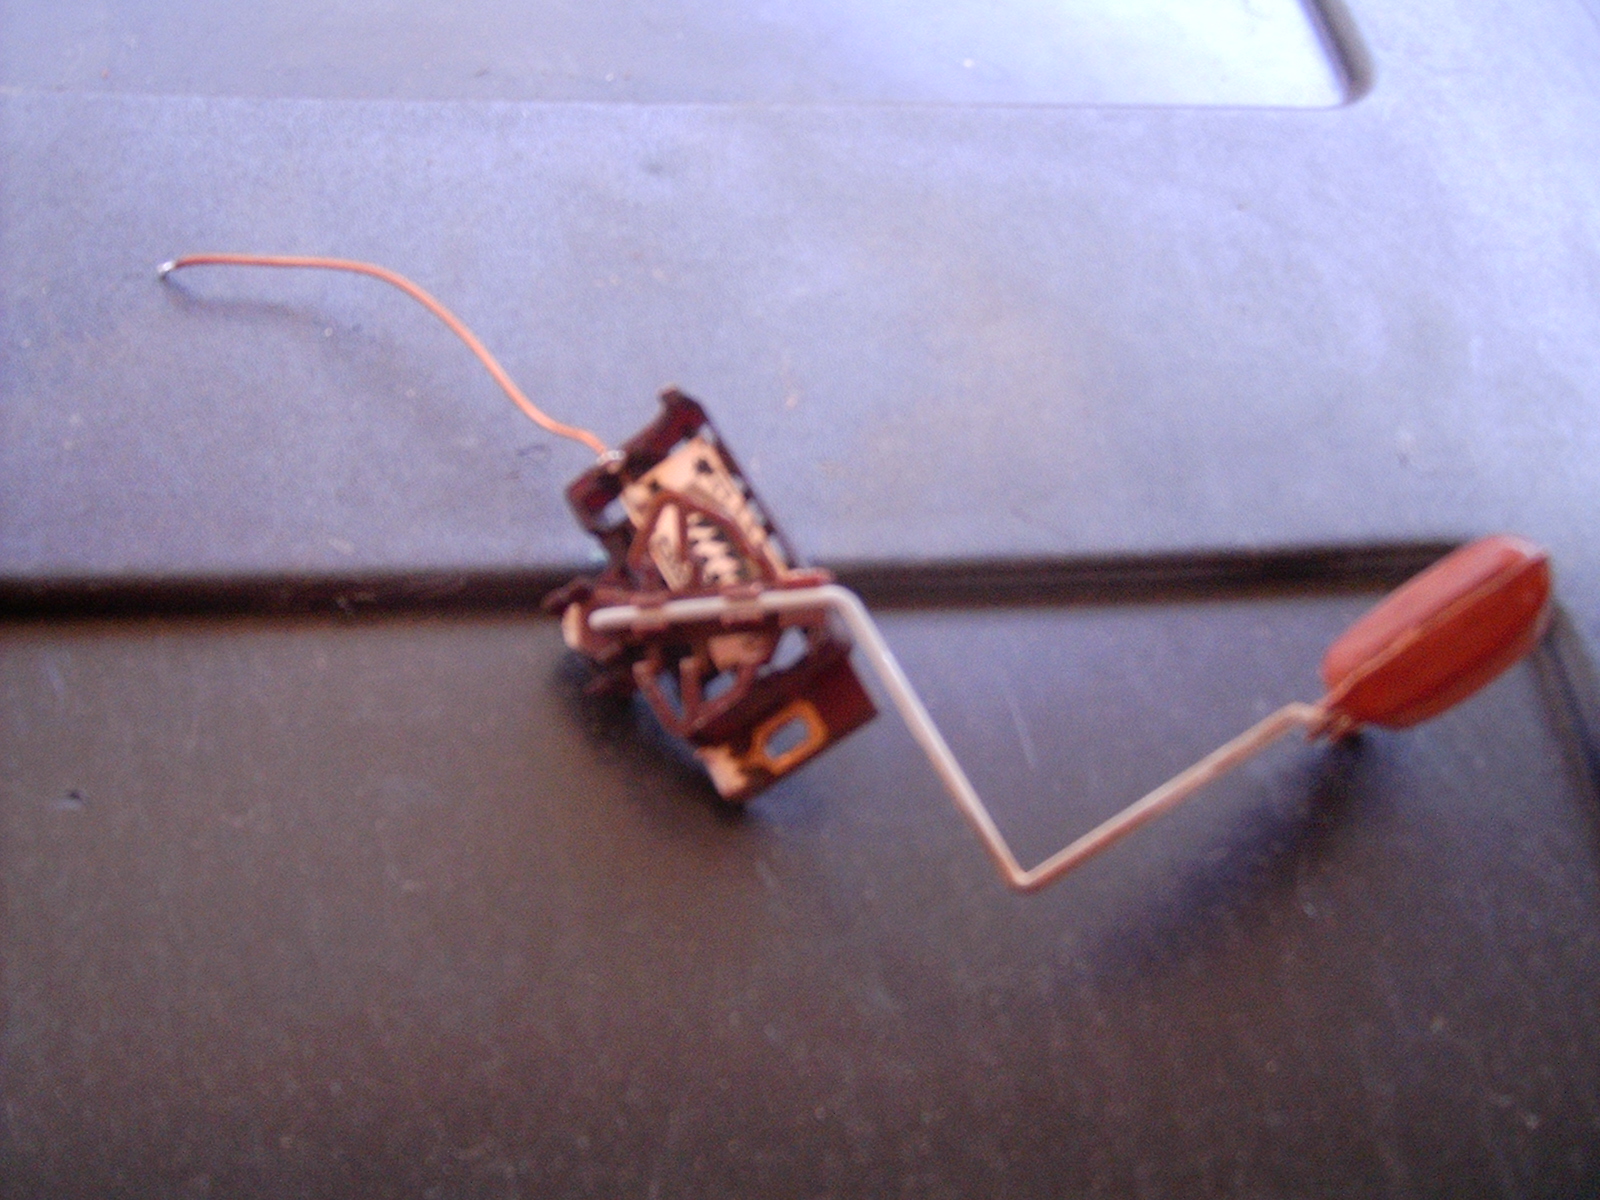 I think all you need is the board and the wire that runs from the board to the top of the assembly (the gray metal cover). I took the entire float and plastic assembly just to make it easier. On the donor vehicle I just clipped the orange wire running from the board.
When you remove your own fuel pump you can swap out this entire assembly. I soldered this back in place on the fuel pump in my car. Obviously a hot soldering iron and gasoline don't go well together so be careful and keep the iron away from the vehicle, away from the fuel float and also allow the fuel pump assembly to dry before doing the work. By the time you are done swapping wires between harnesses the assembly will probably be dry.
Once the digital dash GXE sending unit is on your fuel pump you can reassemble the fuel pump area. Make sure the black O-ring is installed correctly and then lower the fuel pump into the tank. Install the six 8mm screws that secure the fuel pump assembly. Put the fuel lines back on the fuel pump assembly and tighten the clamps (don't over tighten). Replace and secure the fuel tank cover and re-attach the blue wire harness if it was removed/unclipped. Also replace the fuel pump fuse at this point so you don't wonder later why the vehicle won't start.
Swapping Wires Between Harnesses
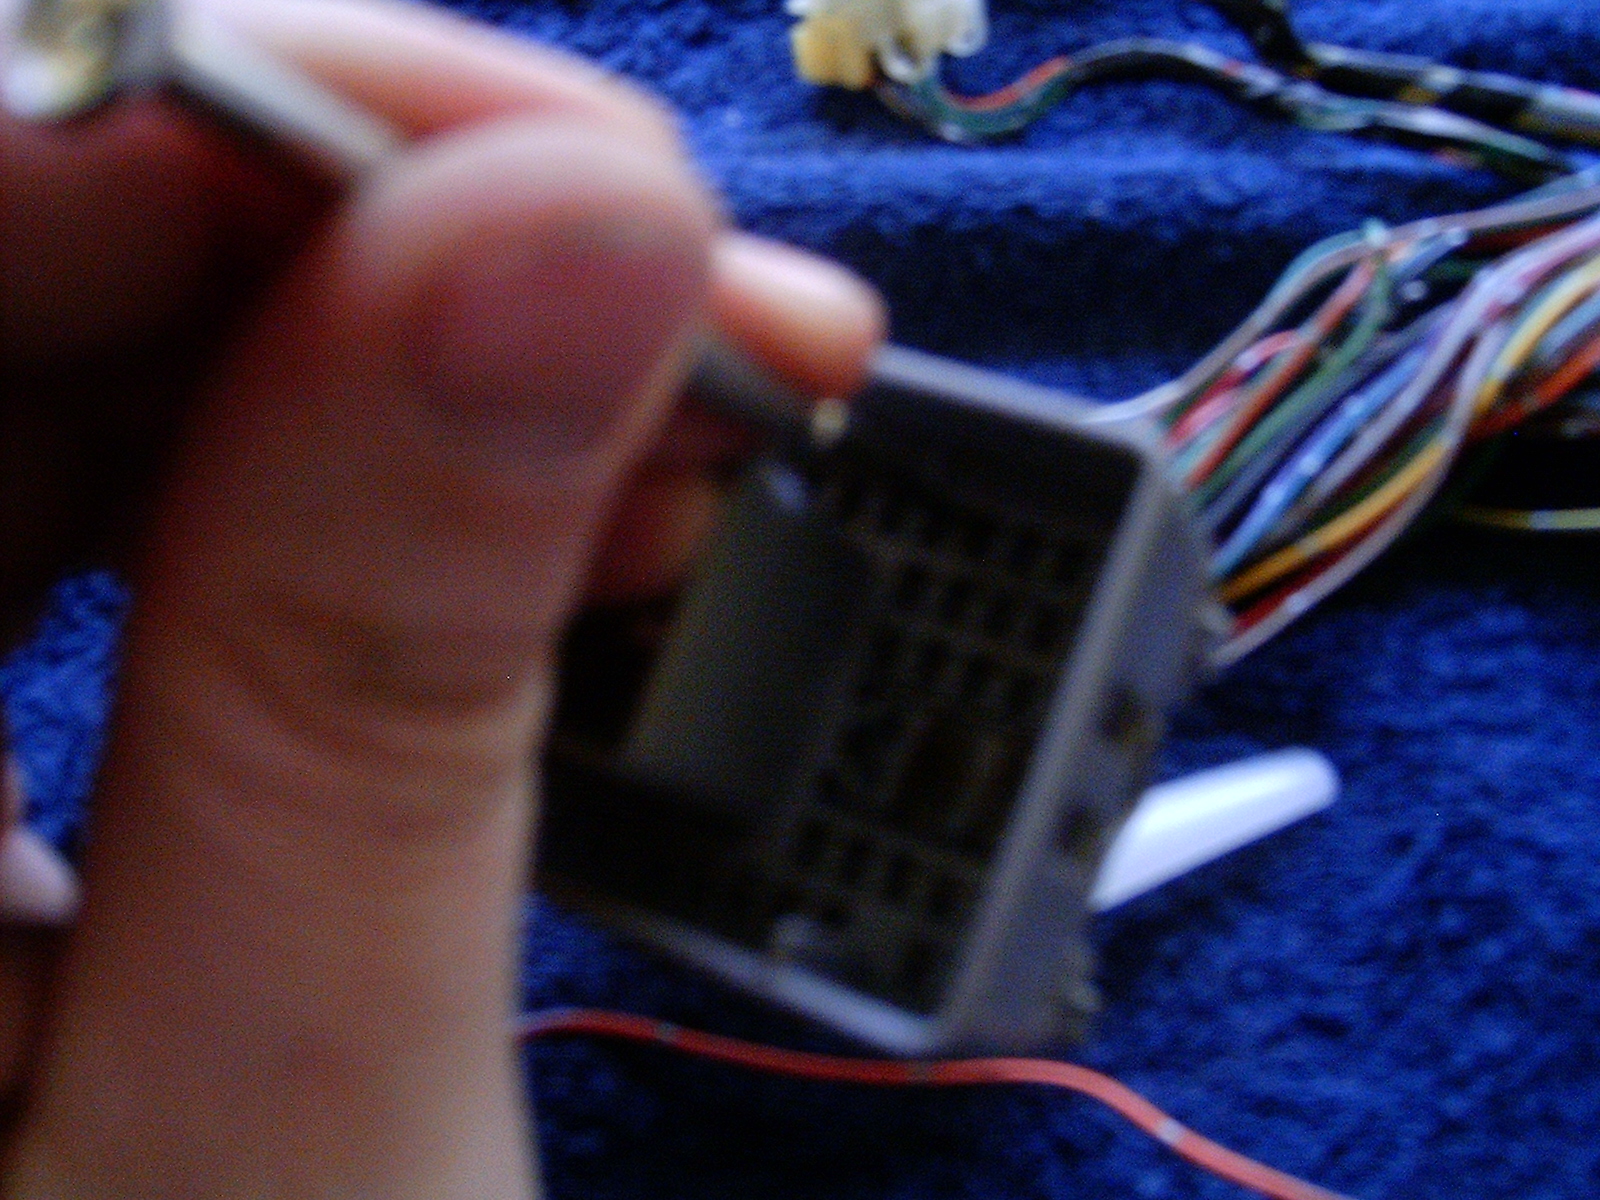
Next we remove the wiring harness from the dash. There are some gray clips that hold it in place. Use a pair of pliers to squeeze the split pins together and push from the cabin side of the dash. Since I have an SE, which has fog lights, and the digital dash was from a GXE, which doesn't, I had to do a little modification to the harness.
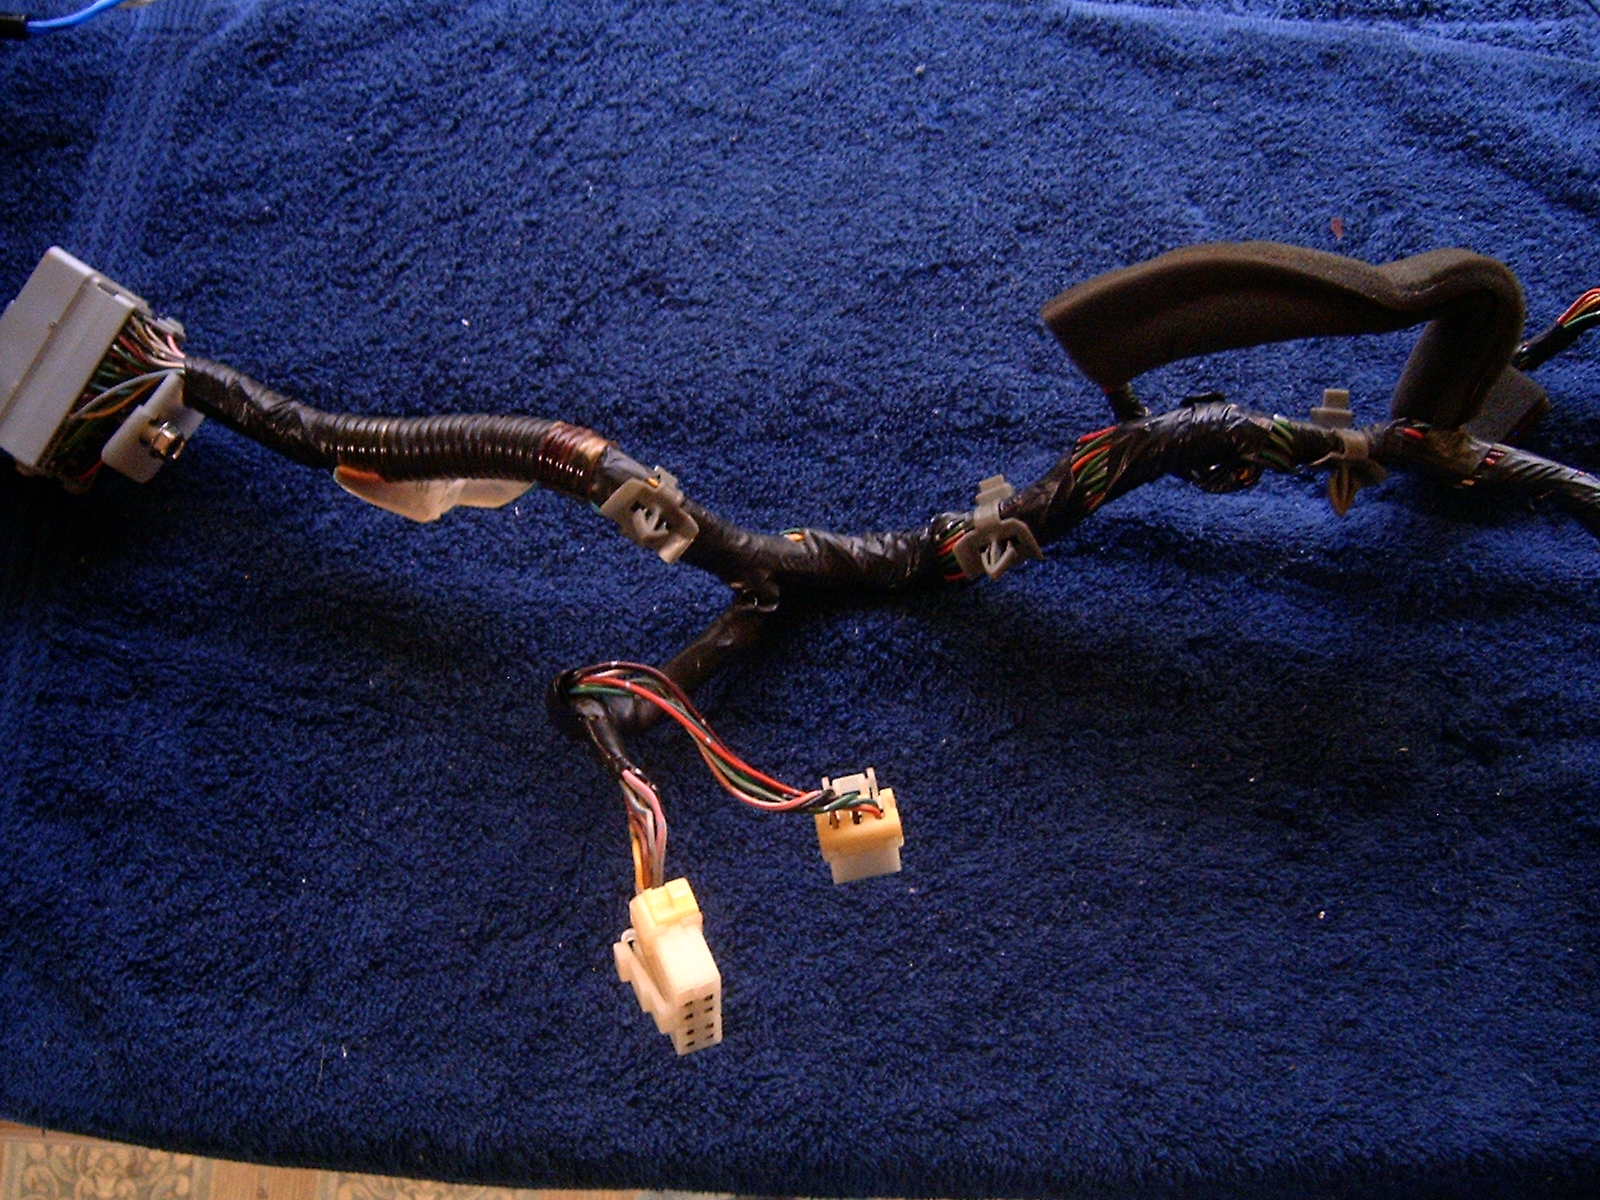
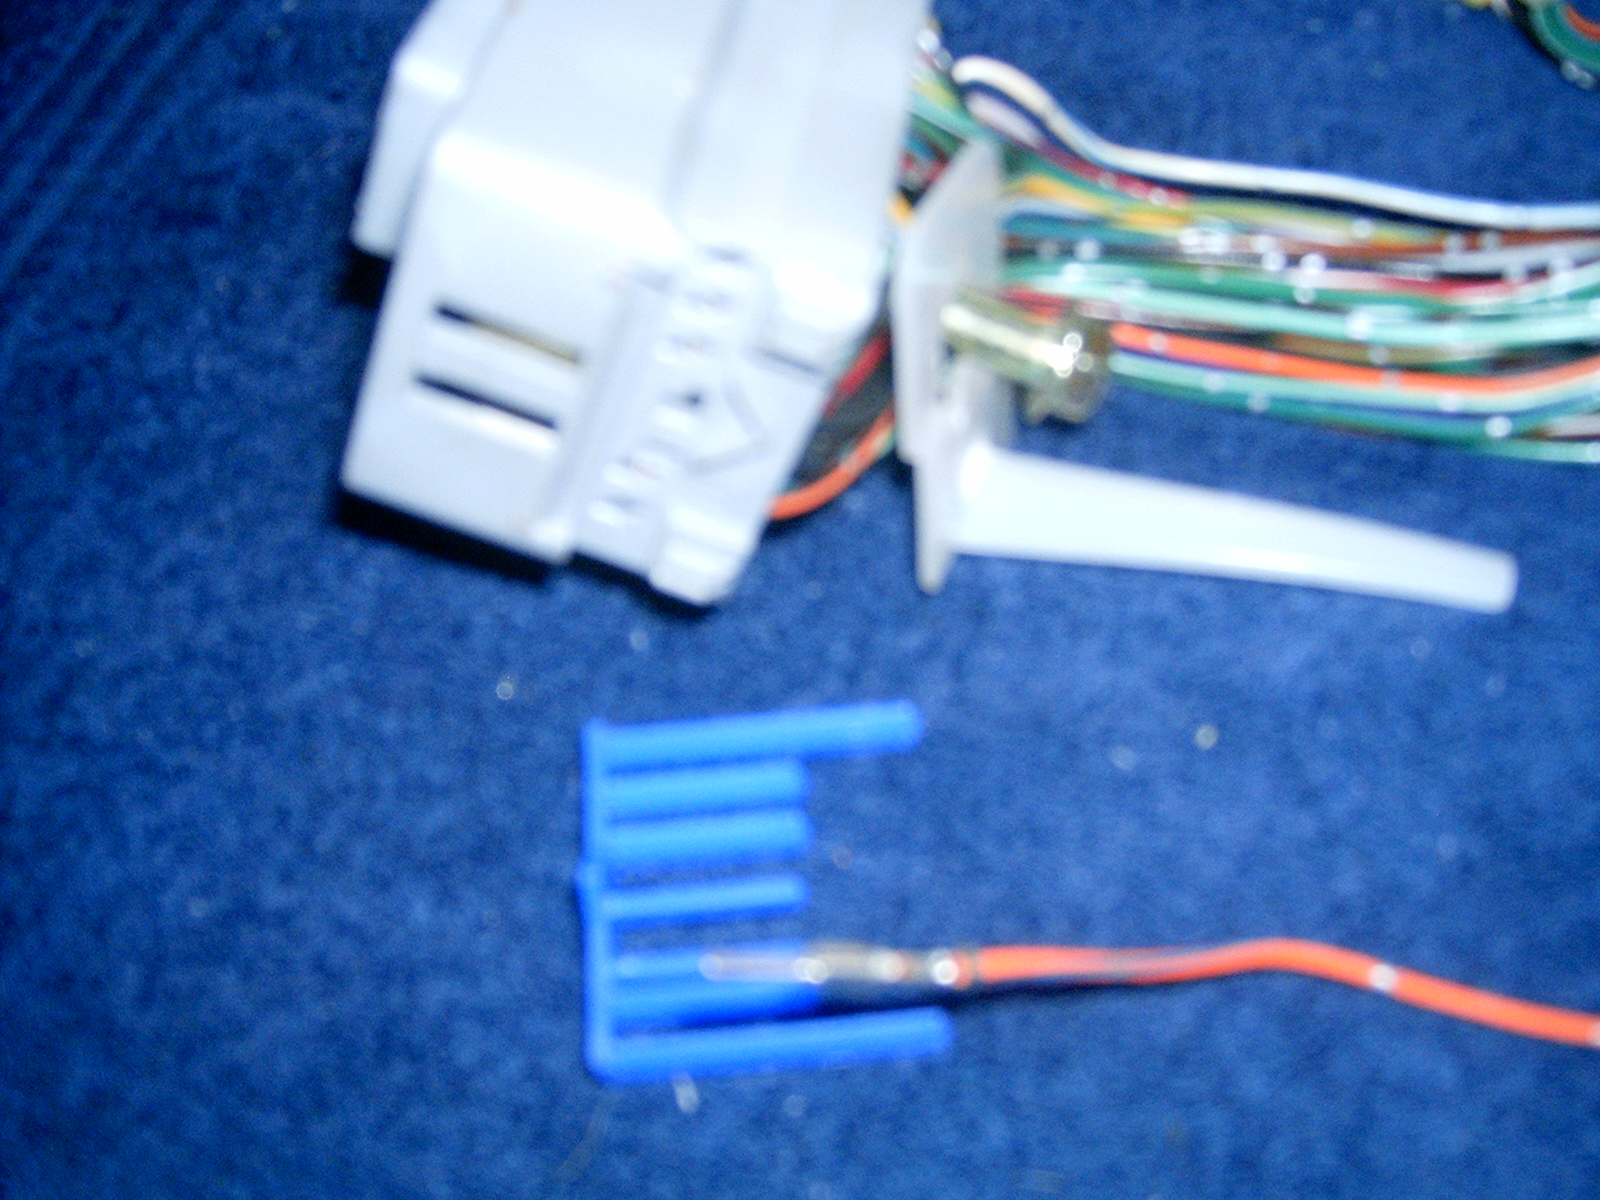
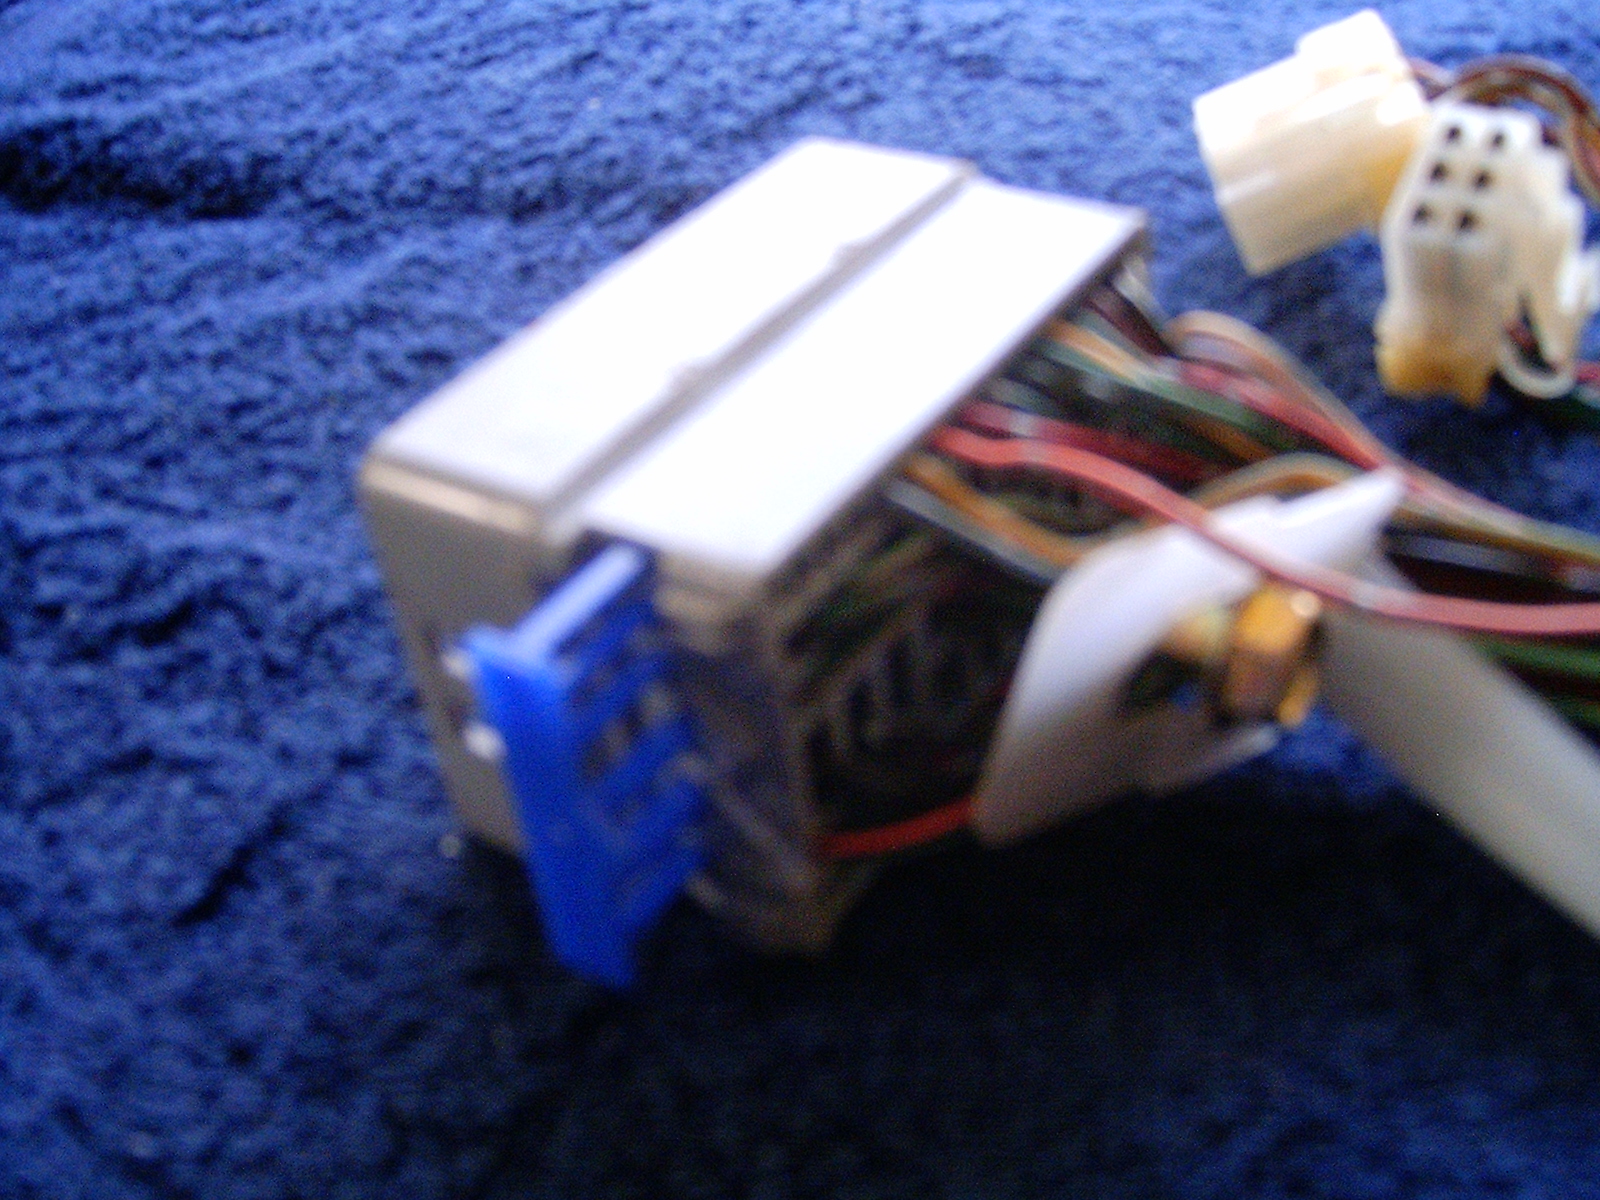 First, I had to determine what I needed to remove from the SE harness and put on the GXE harness. Fortunately the fog light harness is only four wires. Three of them are common to the GXE harness while one is not. The only wire that is different is an orange wire with a gray stripe. This would need to be removed from the SE main plug, pin and all. To make this happen I removed all of the necessary tape and ties from the SE harness until I could free the orange/gray wire from the main wiring cluster. Then to remove the wire from the plug I pulled the blue plastic keeper from the side of the plug.
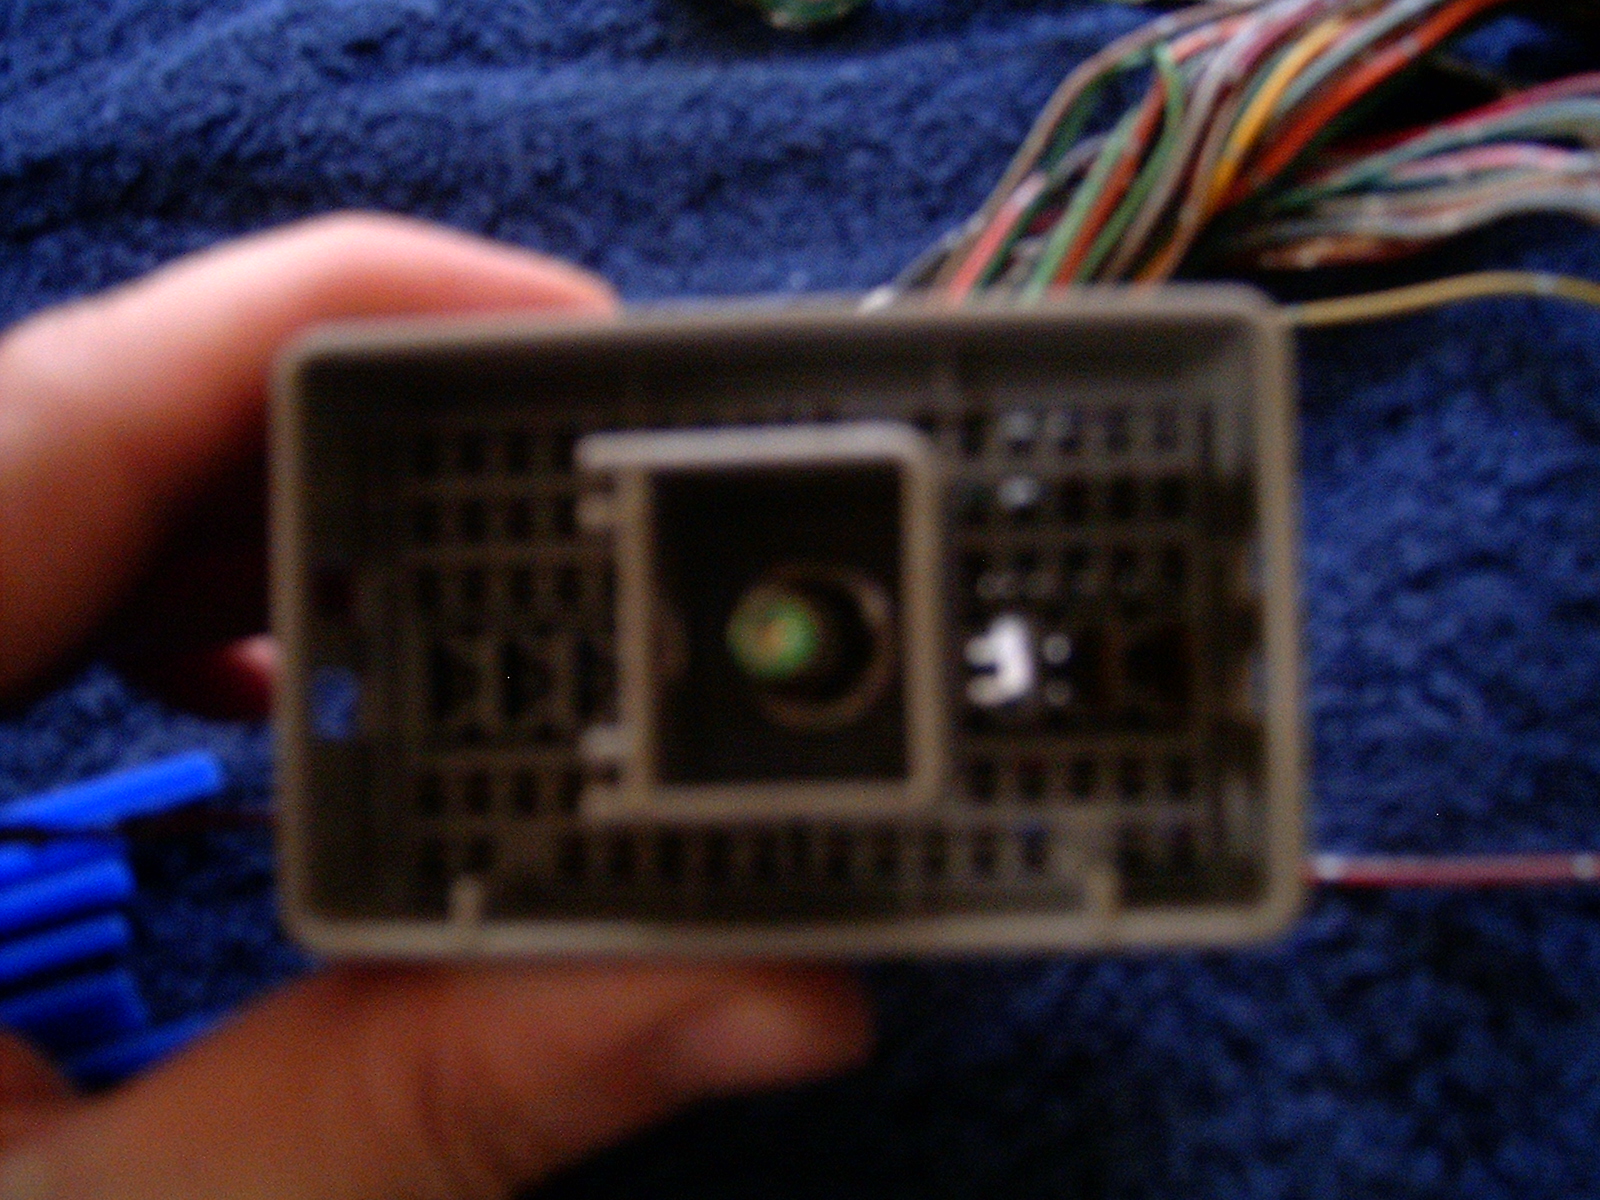
 Next I inserted an eyeglass screwdriver from the pin side and pushed down on the small plastic tab. It's impossible to show this in detail but if you look at the plug under good light you'll see it. Pay attention to the openings that have no pin to see what it looks like.
 Note that the orange/gray wire pin is the third pin (not counting empty slots) from the right as you look from the pin side. Verify that this is correct with your own harness. Remember that if you have a GXE you won't have fog lights and this modification is not needed. As you press down on the plastic tab, pull the orange wire from the other side. This can be tricky but don't pull so hard you yank the wire from the pin. Make note of how the pin went into the plug (which side is up).
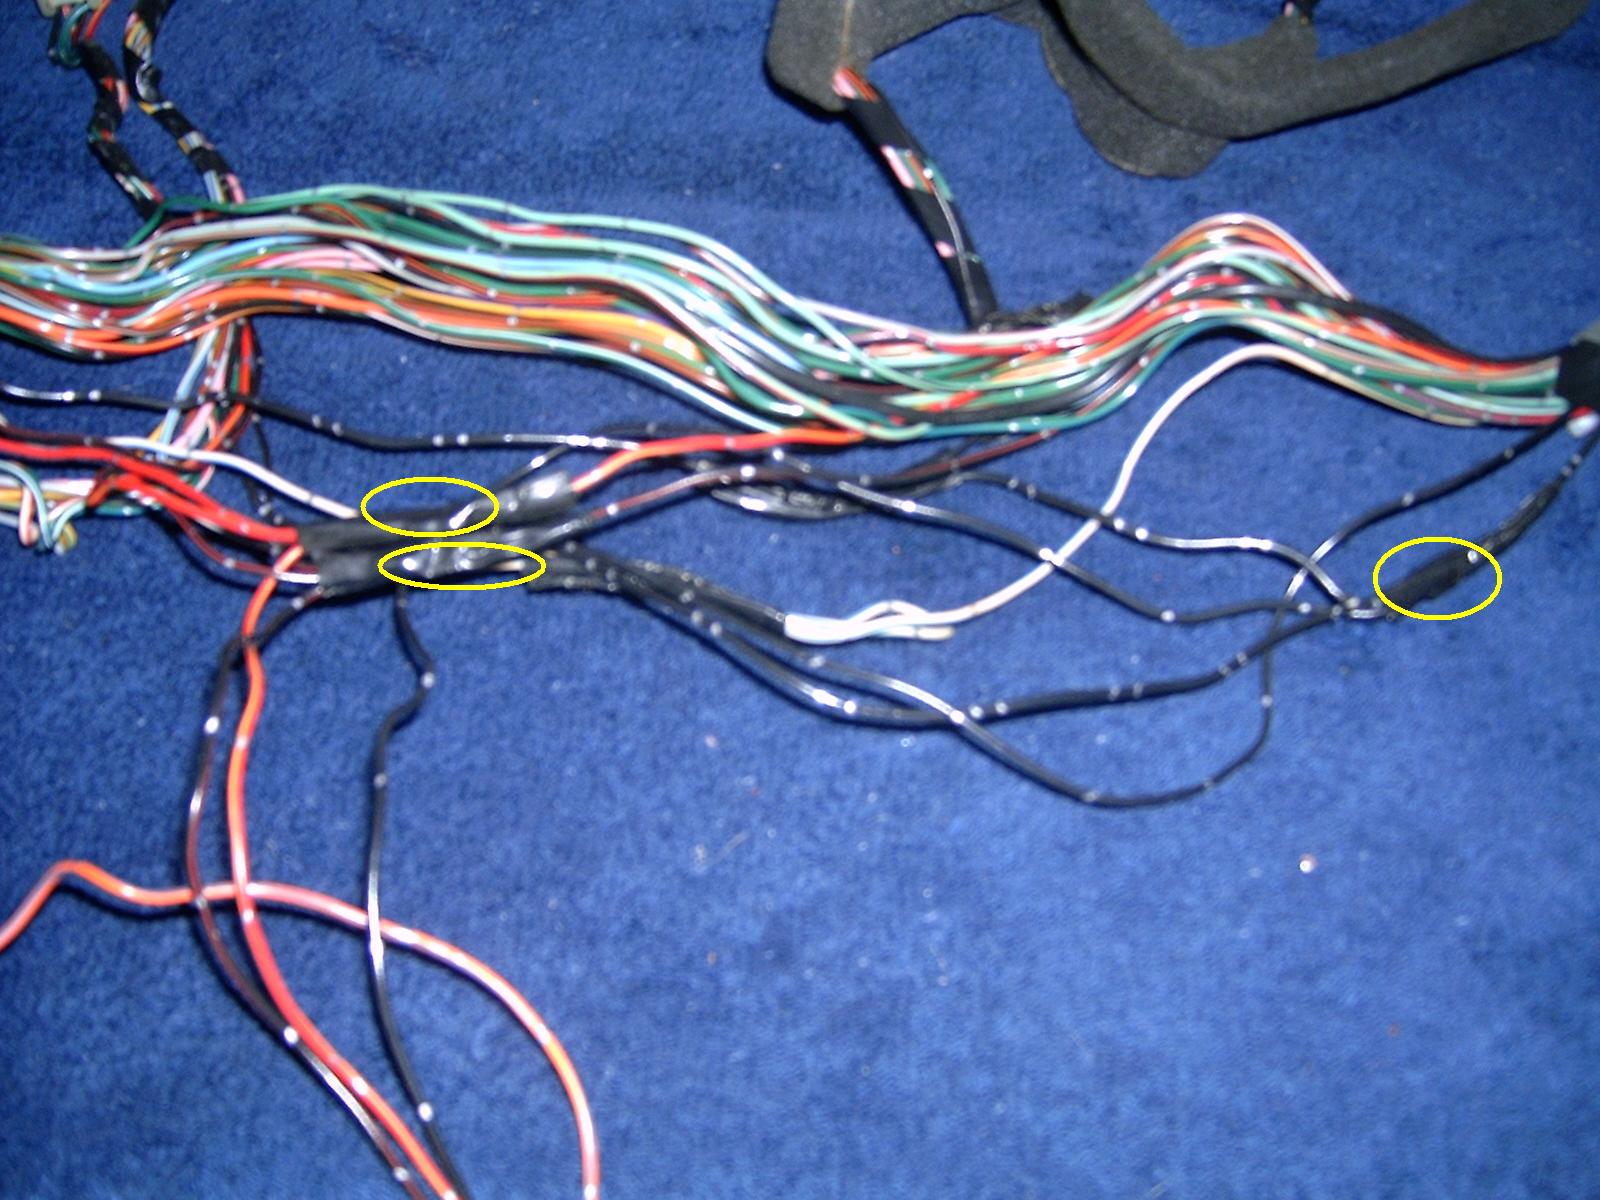
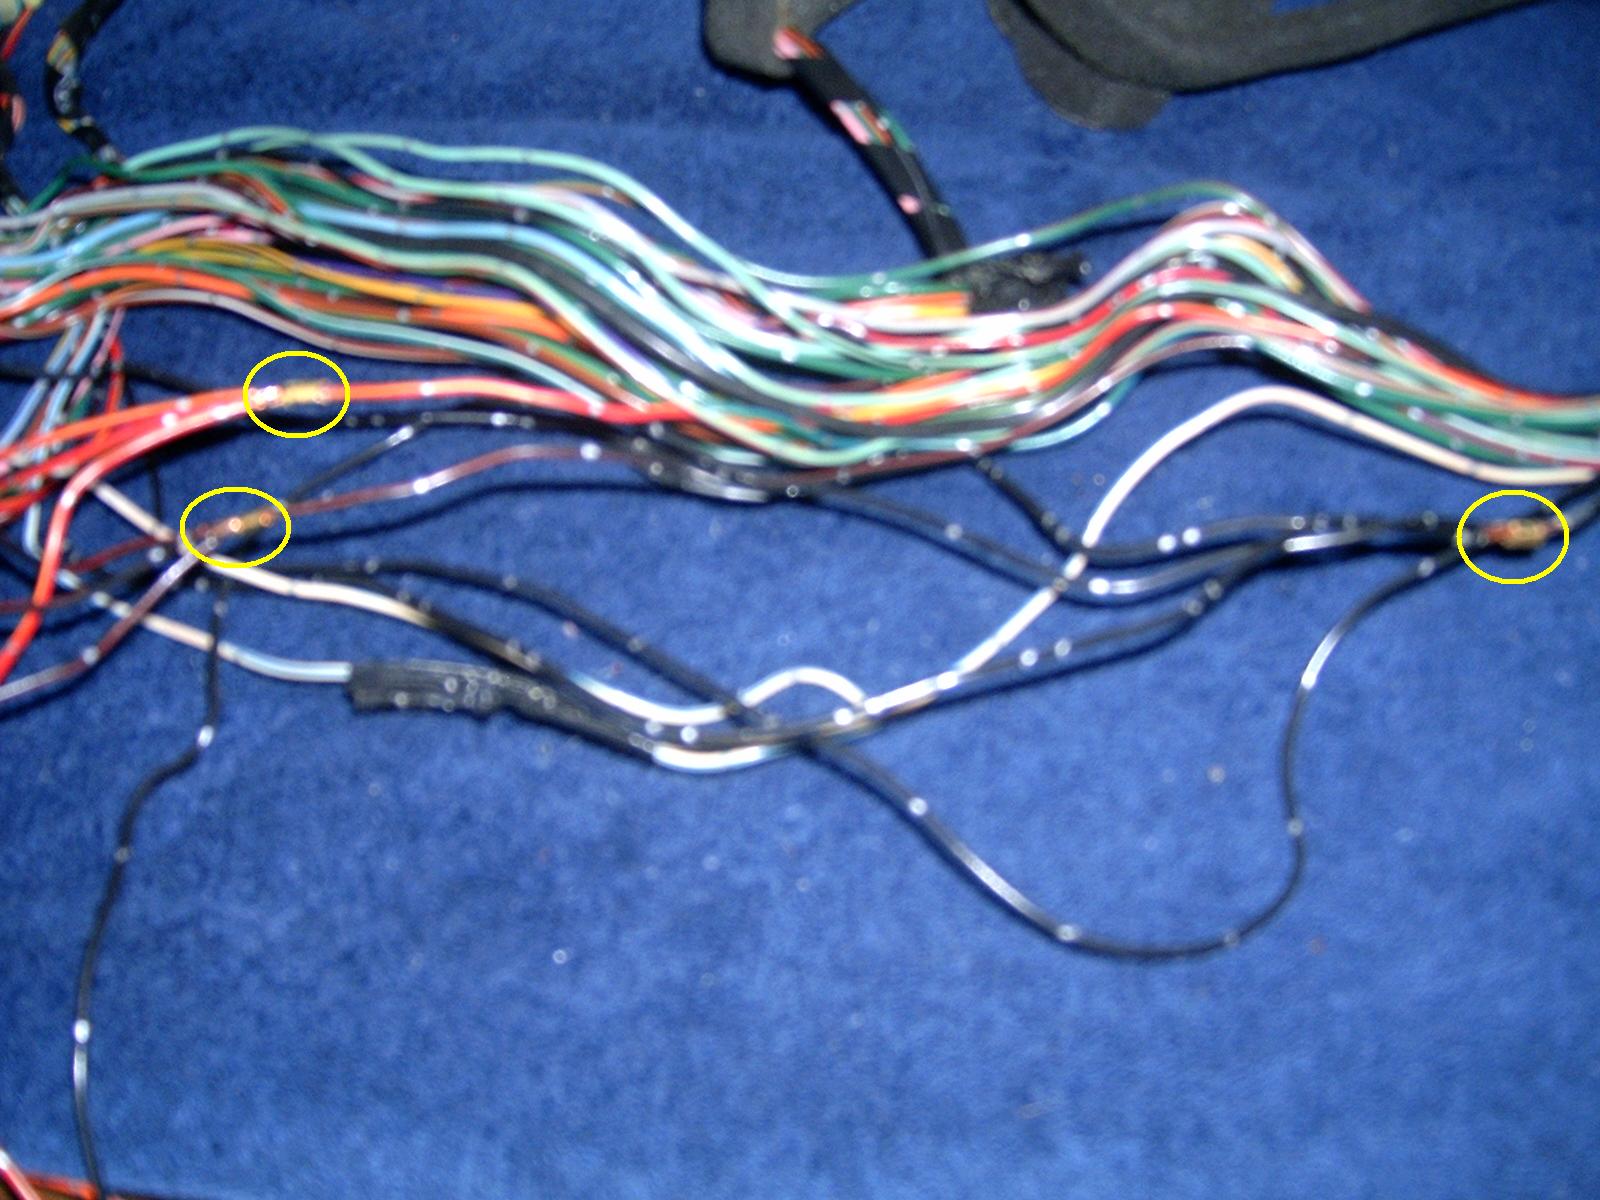 Put the blue plastic keeper back into the plug. Now follow the three remaining wires from the fog light harness until they meet their junction point with similarly colored wires. These will be covered in black tape (even after removing the main harness black tape covering). Remove this tape and you'll see a brass colored crimp connector. Find the wire that goes to the fog light plug and clip it as close as you can to the brass connector. Do this for all three wires.
Find the same junction points on the GXE (donor) harness. Remove the black tape until you see the brass connector. Strip about 1/2" of wire from the three bare wires of the fog light plug removed from the SE harness. Wrap each fog light harness wire around it's corresponding color junction point and solder them in place. Allow to cool and then wrap with black tape. Insert the orange/gray wire into the same spot on the GXE plug as it was on the SE plug. Be sure to put the wire in the correct way as it will not seat upside down. Finally re-wrap the GXE wiring harness as the factory did with black tape. Be sure to leave yourself enough slack on the fog light plug so it reaches the same place as the power mirror and cruise control plugs.
Cutting the Dash for the HUD Projector
For this next part you will need a template of the area to be cut. Here is the template I made for that purpose.
Nissan Maxima HUD Template (PDF)
Note the 5 1/8" measurement on the template. After printing the template make sure that this measurement (from point to point) on your printout is also 5 1/8". If it is not then your hole will be incorrect. This is very important.
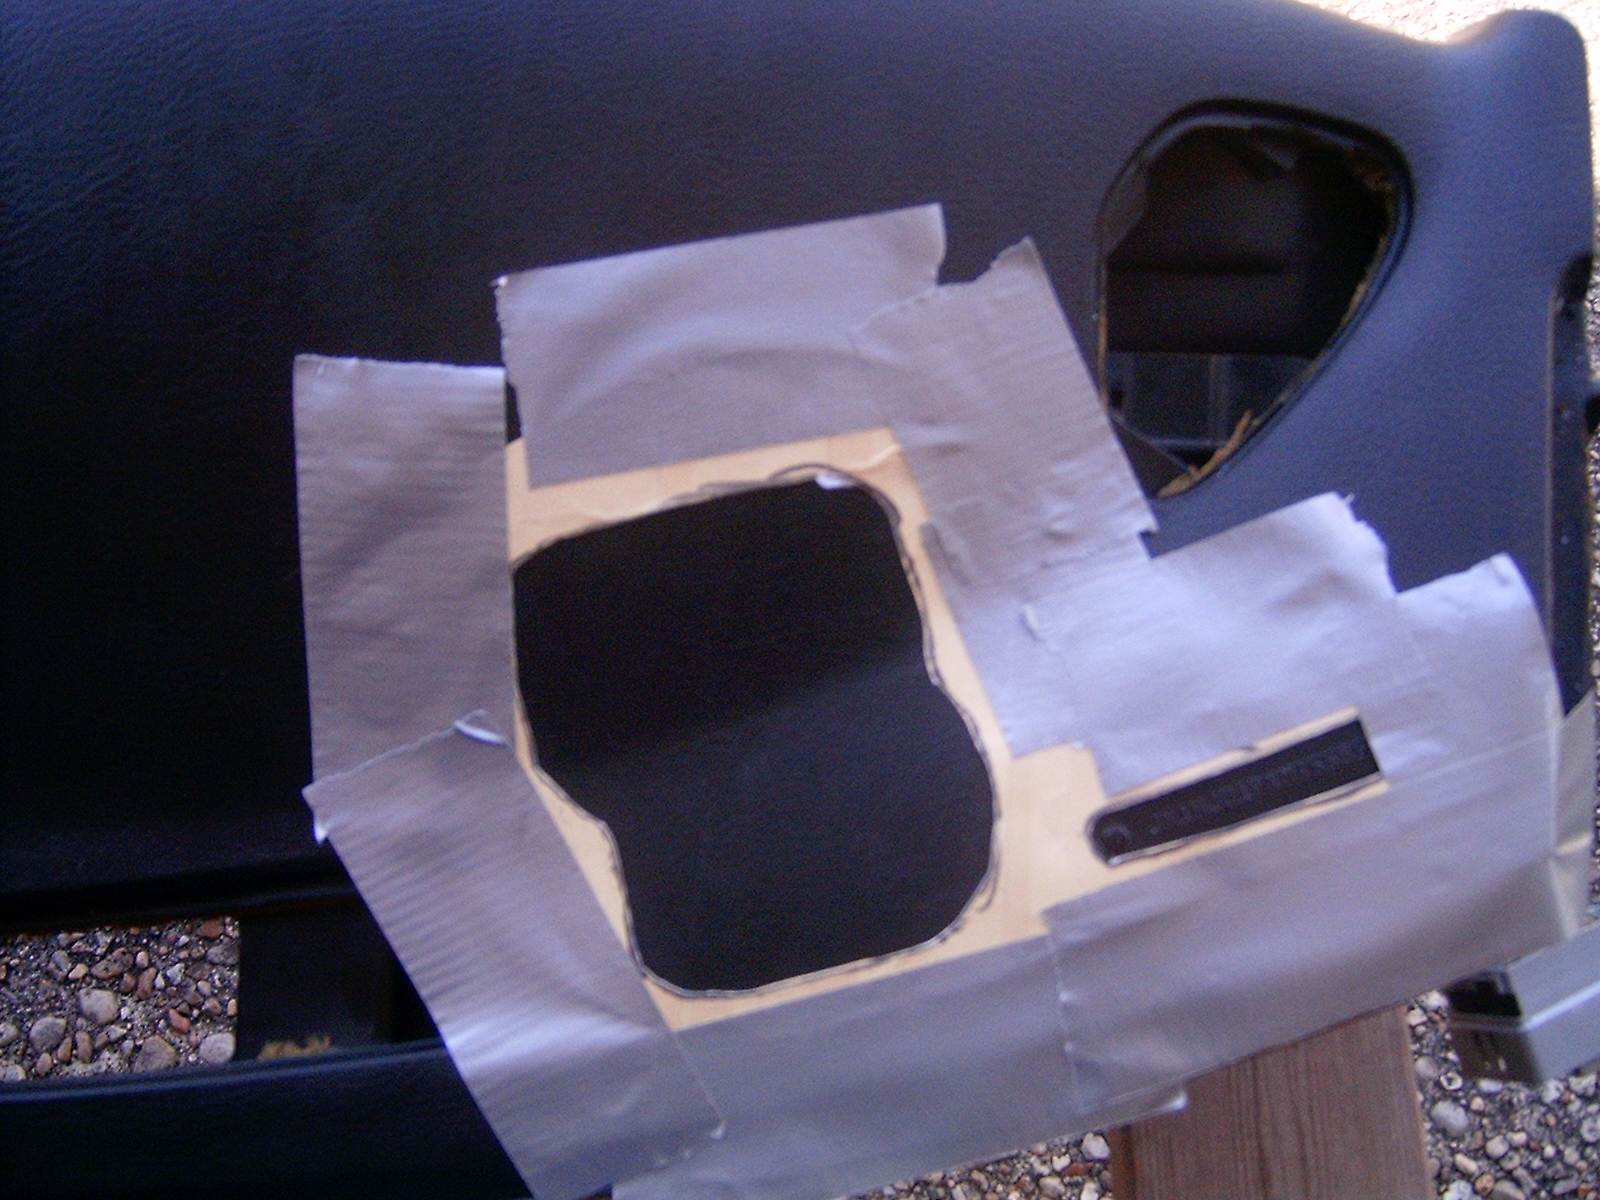 Now the really fun part. It's time to cut your dash for the HUD projector display. Note that on the template I have the VIN plate located. This is so you can have a point of reference for lining up the template on your vehicle. Carefully cut out both the HUD and VIN plate openings from the template. Then cut about a 1/2" border around the outer template lines to be cut. Using duct tape secure the template to the dash using the VIN opening as a location guide. The template should follow the curve of the dash so make sure it sits flush and is not hovering over the dip in the dash.
 If you use vinyl protectant on your dash the duct tape may not stick very well. If this is the case just wrap the duct tape around the edges of the dash and it will stick to the bottom. You should also hold the template as you trace around it. I used a razor knife with a new blade to CAREFULLY cut along the perimeter of the template opening. You just want to make a mark to go by once you remove the template. After you have this shallow cut line remove the template and continue cutting around the perimeter again, this time a little deeper. You can now remove the outer layer of vinyl.
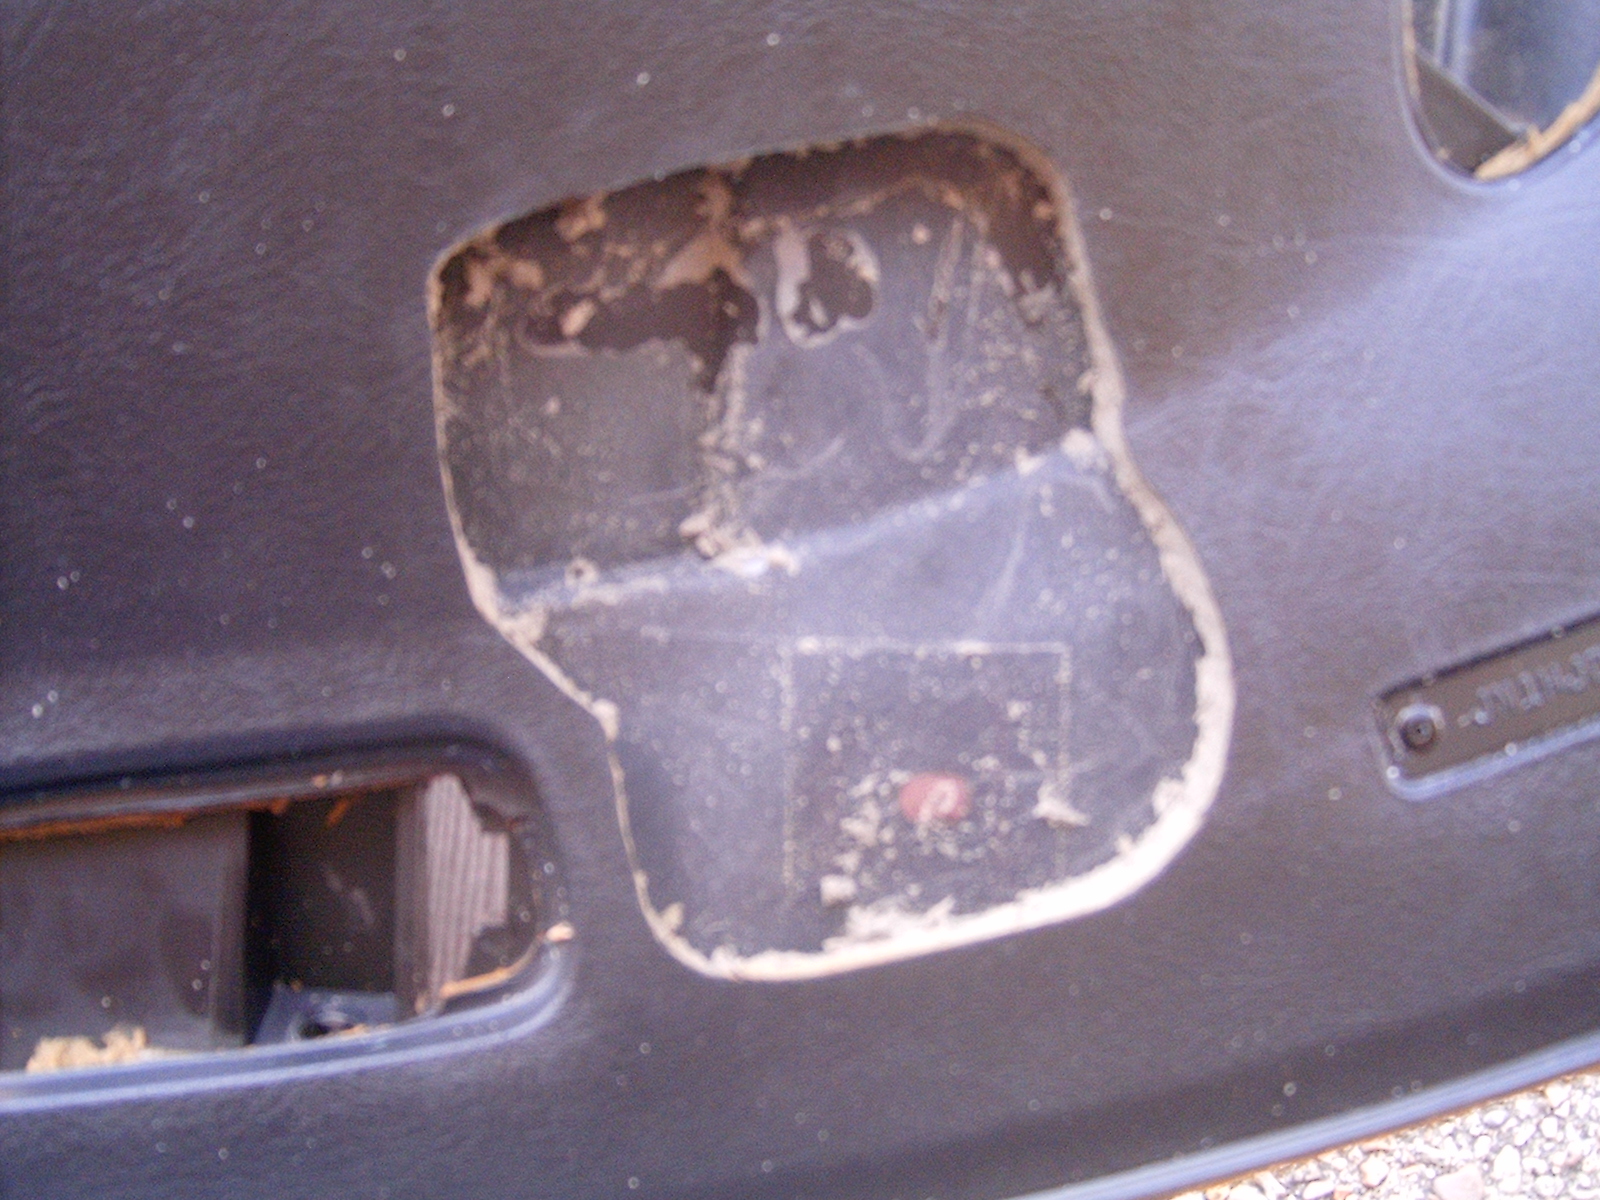 Finally use the razor knife to cut along the perimeter one last time. This time you want to plunge the knife all the way down until it contacts the hard plastic of the dash. Then use the knife and your fingers to carefully dig out all of the dash pad foam.
Now it's Dremel time. First I had to decide where I didn't want to cut. This is along the areas where the projector will mount. Based on my photos of the original dash (shown below) I estimated how far I needed to cut. I actually printed the photo below and used it as a life-size guide for my own cuts.
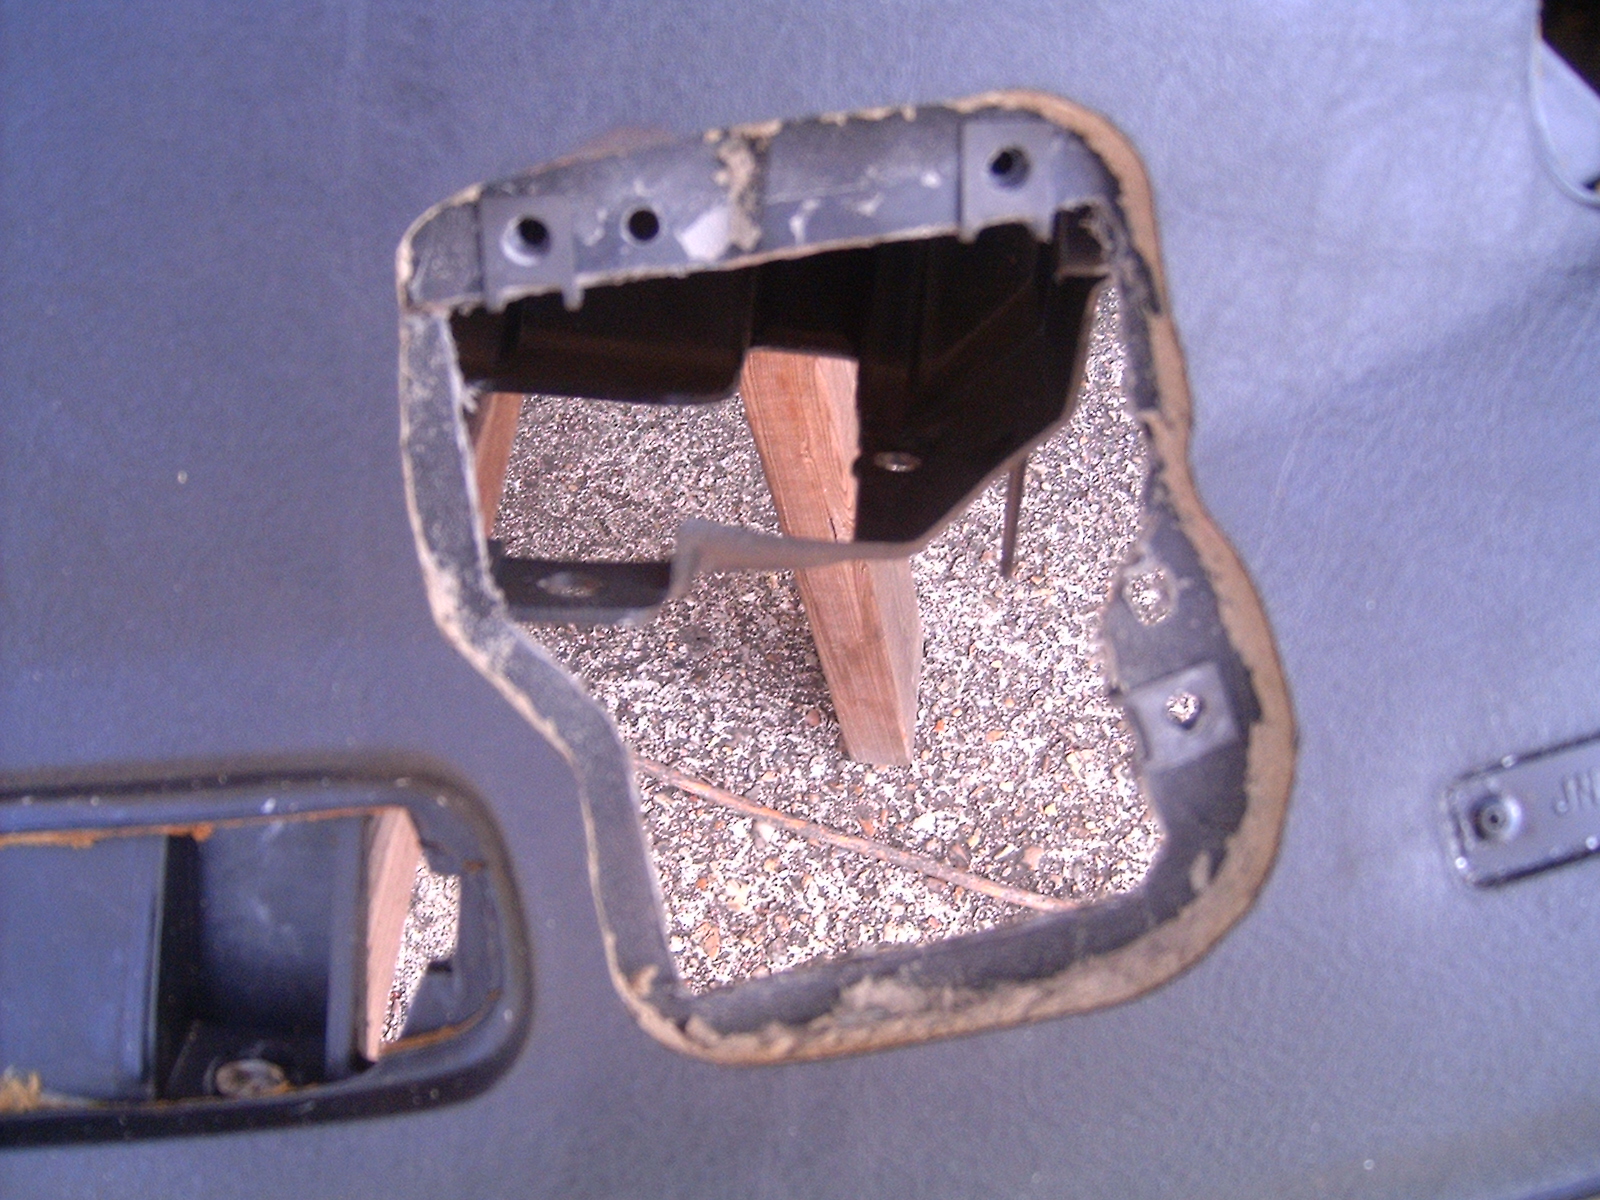 Once I had those approximations I used a Dremel with a cutting disc to cut as close as I could to the outer perimeter of the opening while still leaving room in the attachment areas so I had enough material for adjustment. I found that you do not need to cut right up to the edge of the opening as was done by the factory. I also found that it was just trial and error to get the projector to sit just right. Here is the final product.
 It's not that pretty but it works and it is covered by the HUD projector and trim piece anyway.
I have not made a template of this layout because it does seem to require fine adjustments. I would rather have you make these based on your own vehicle than take mine as correct and end up with a poorly fitting project. Here is what you want in your piece.

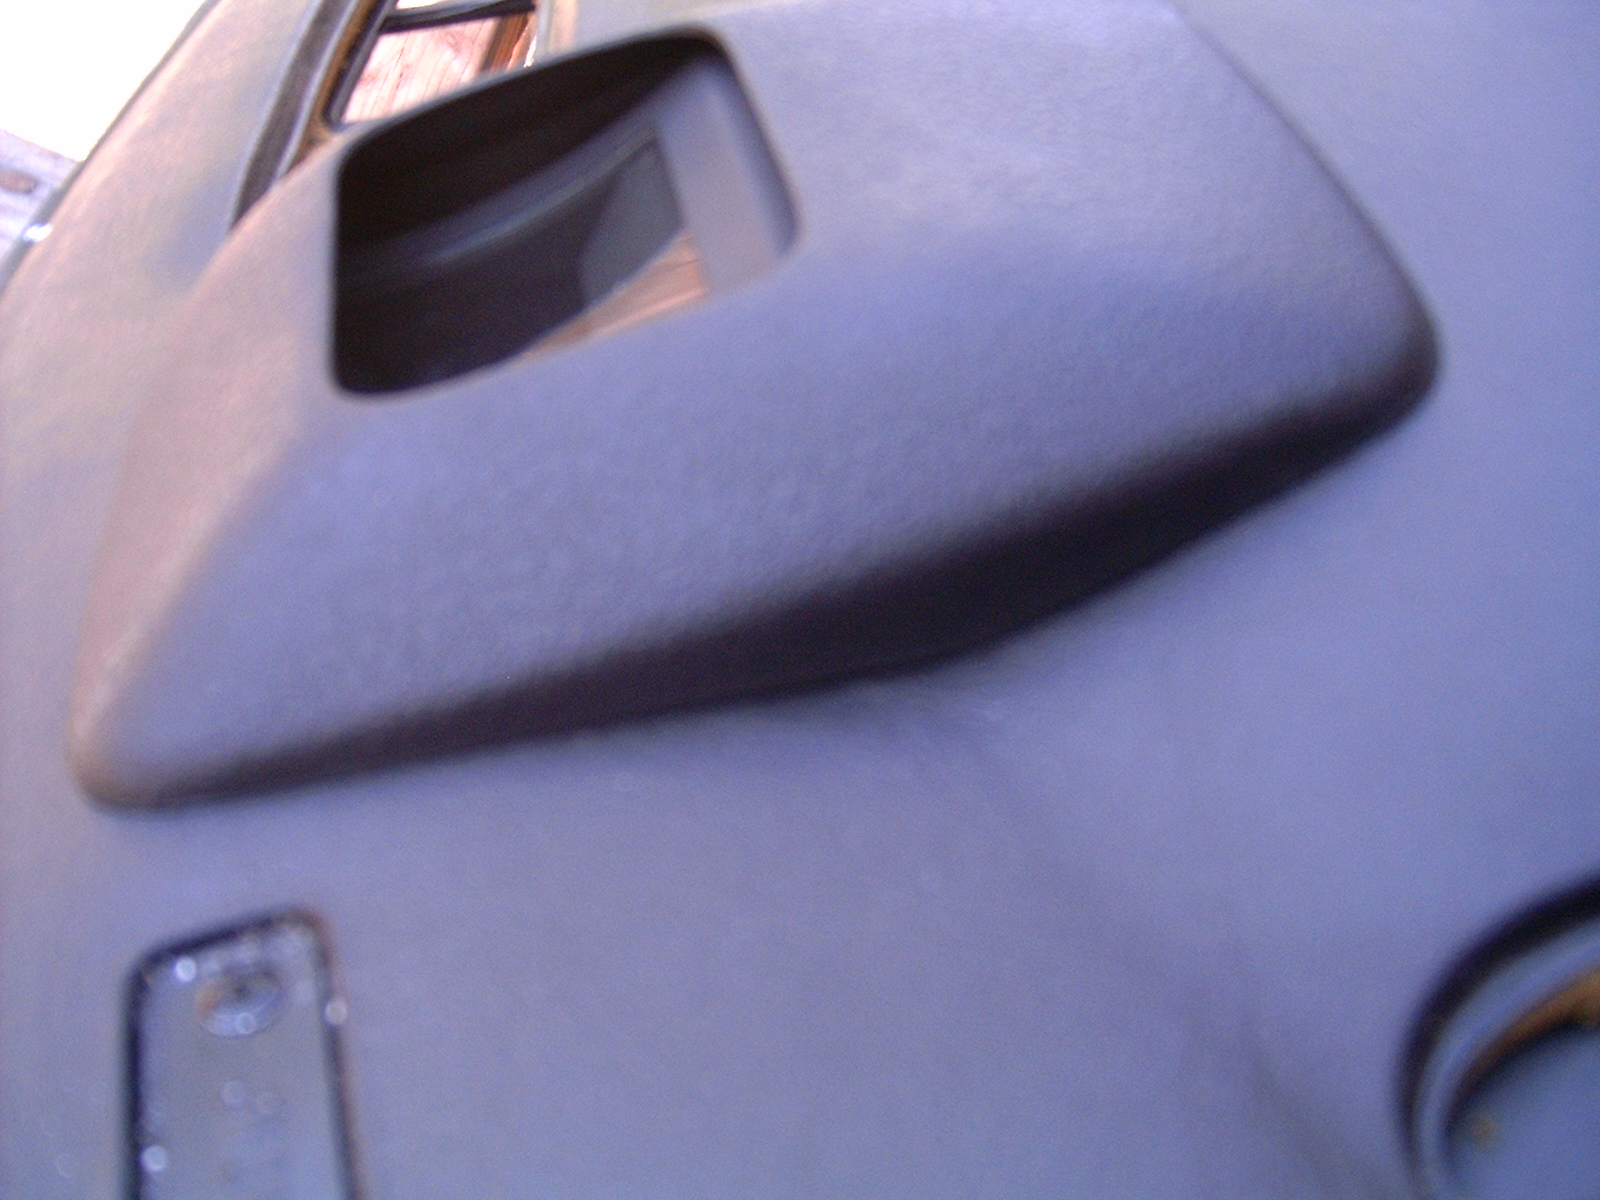 Notice the tight fit on both sides of the trim piece. Gaps here were my biggest concern but with careful fitment I was able to get good results.
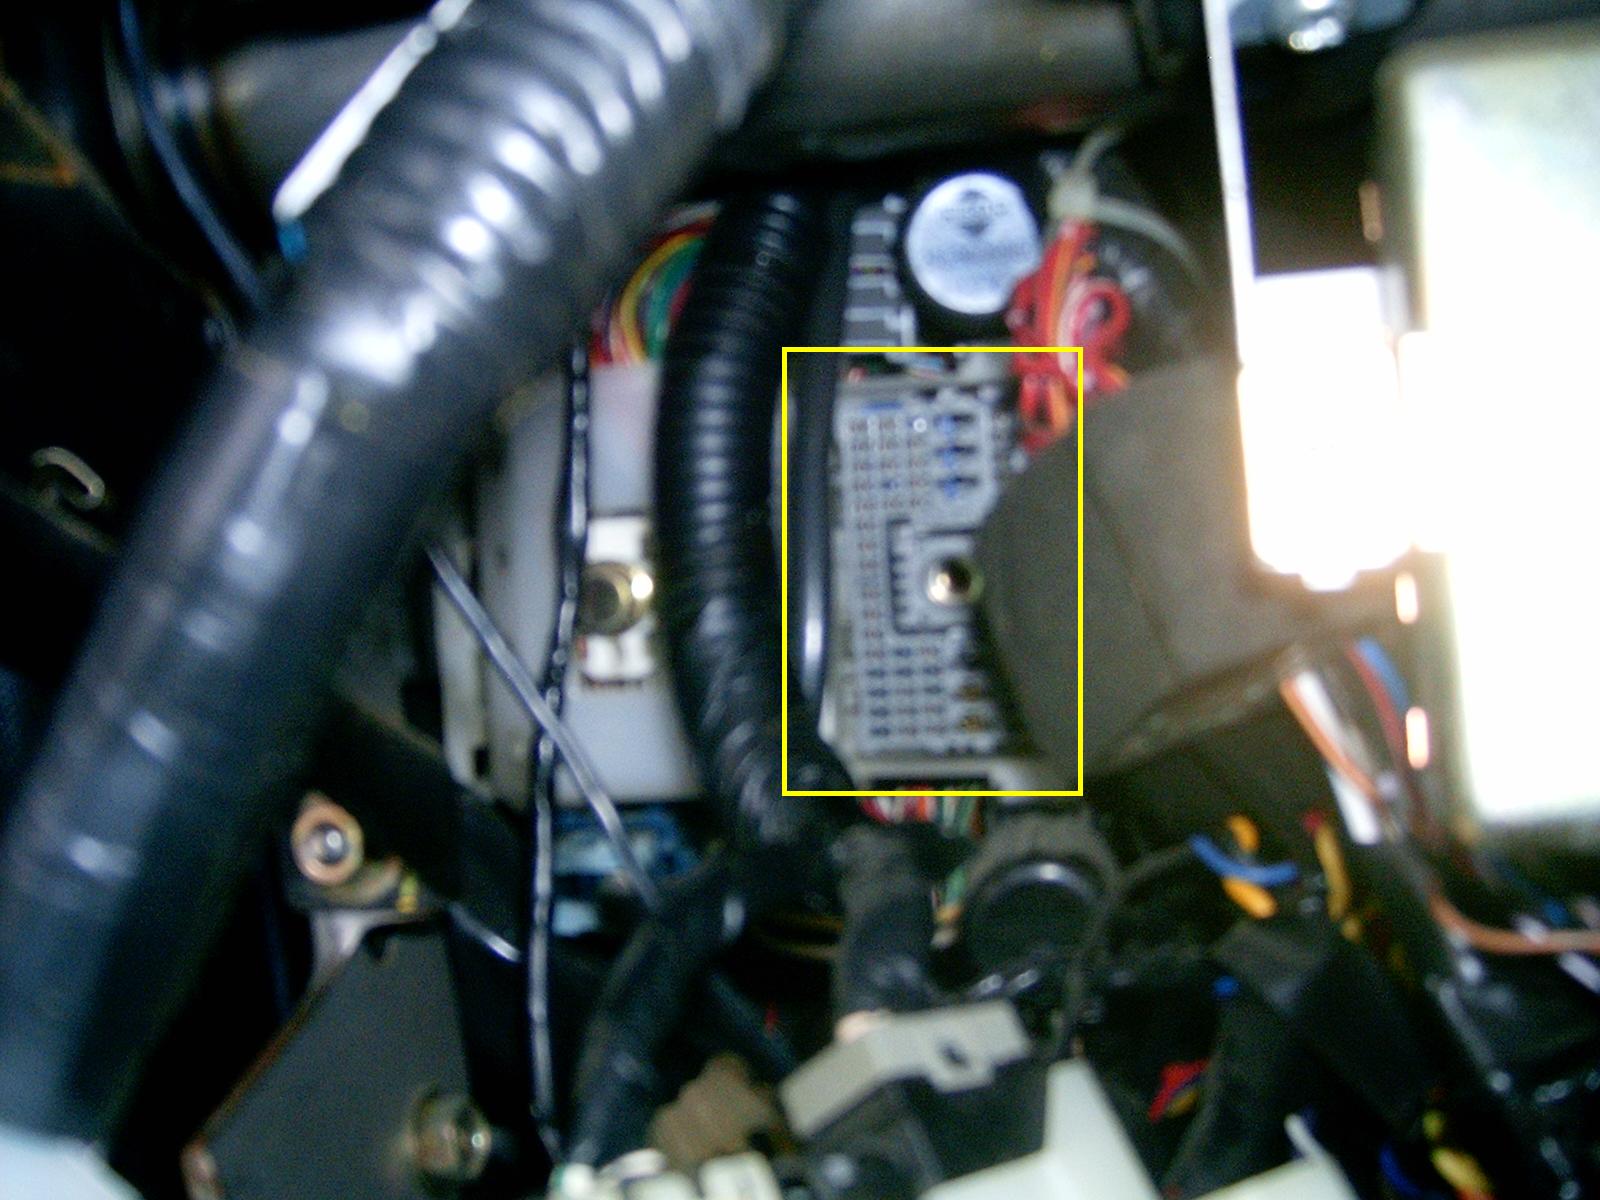
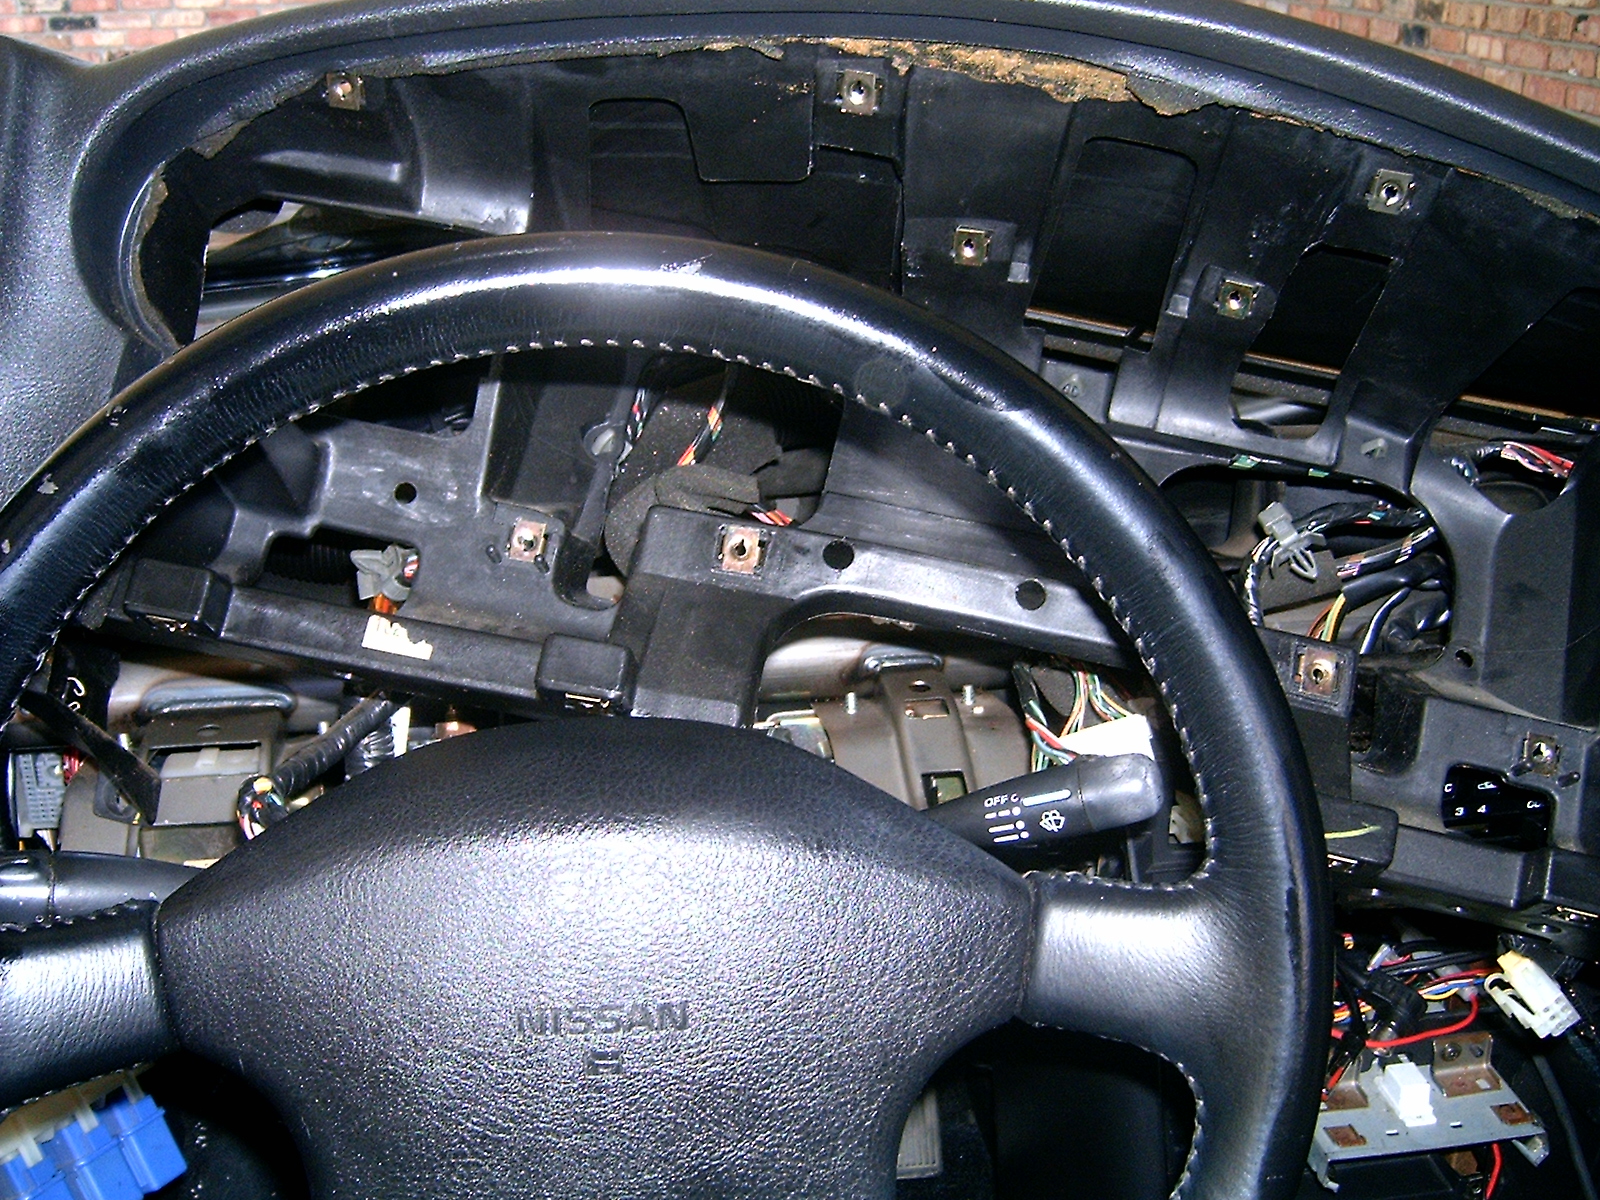
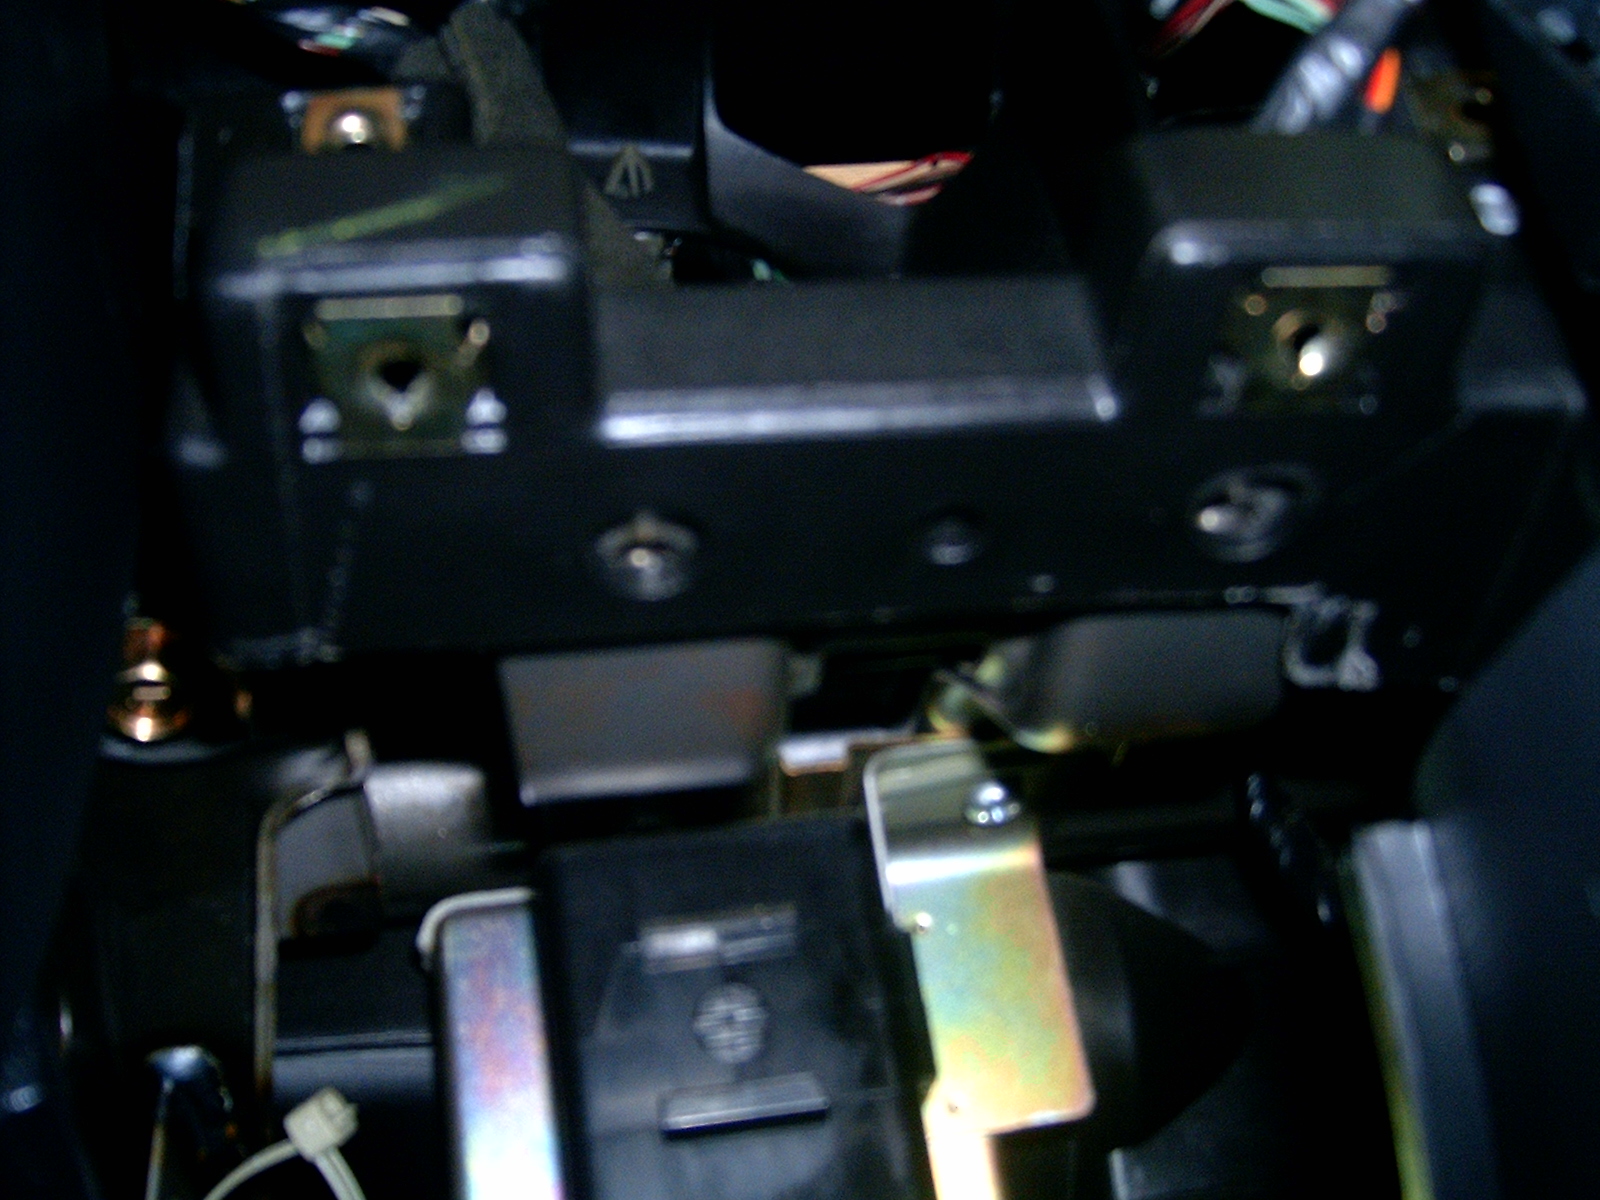 That's basically the entire process. Now you just need to put the newly modified dash back in your vehicle. One note I would make is in lining up the dash with the metal support brackets in the vehicle. On first attempt I could not get things to line up in the center area of the dash. Upon inspection I had placed the plastic of the dash over the metal bracket when it should have been placed under it. Just this one small mistake threw the whole fitment off. Here is a photo of the bracket that was causing me problems. It sits just to the right of the steering column.
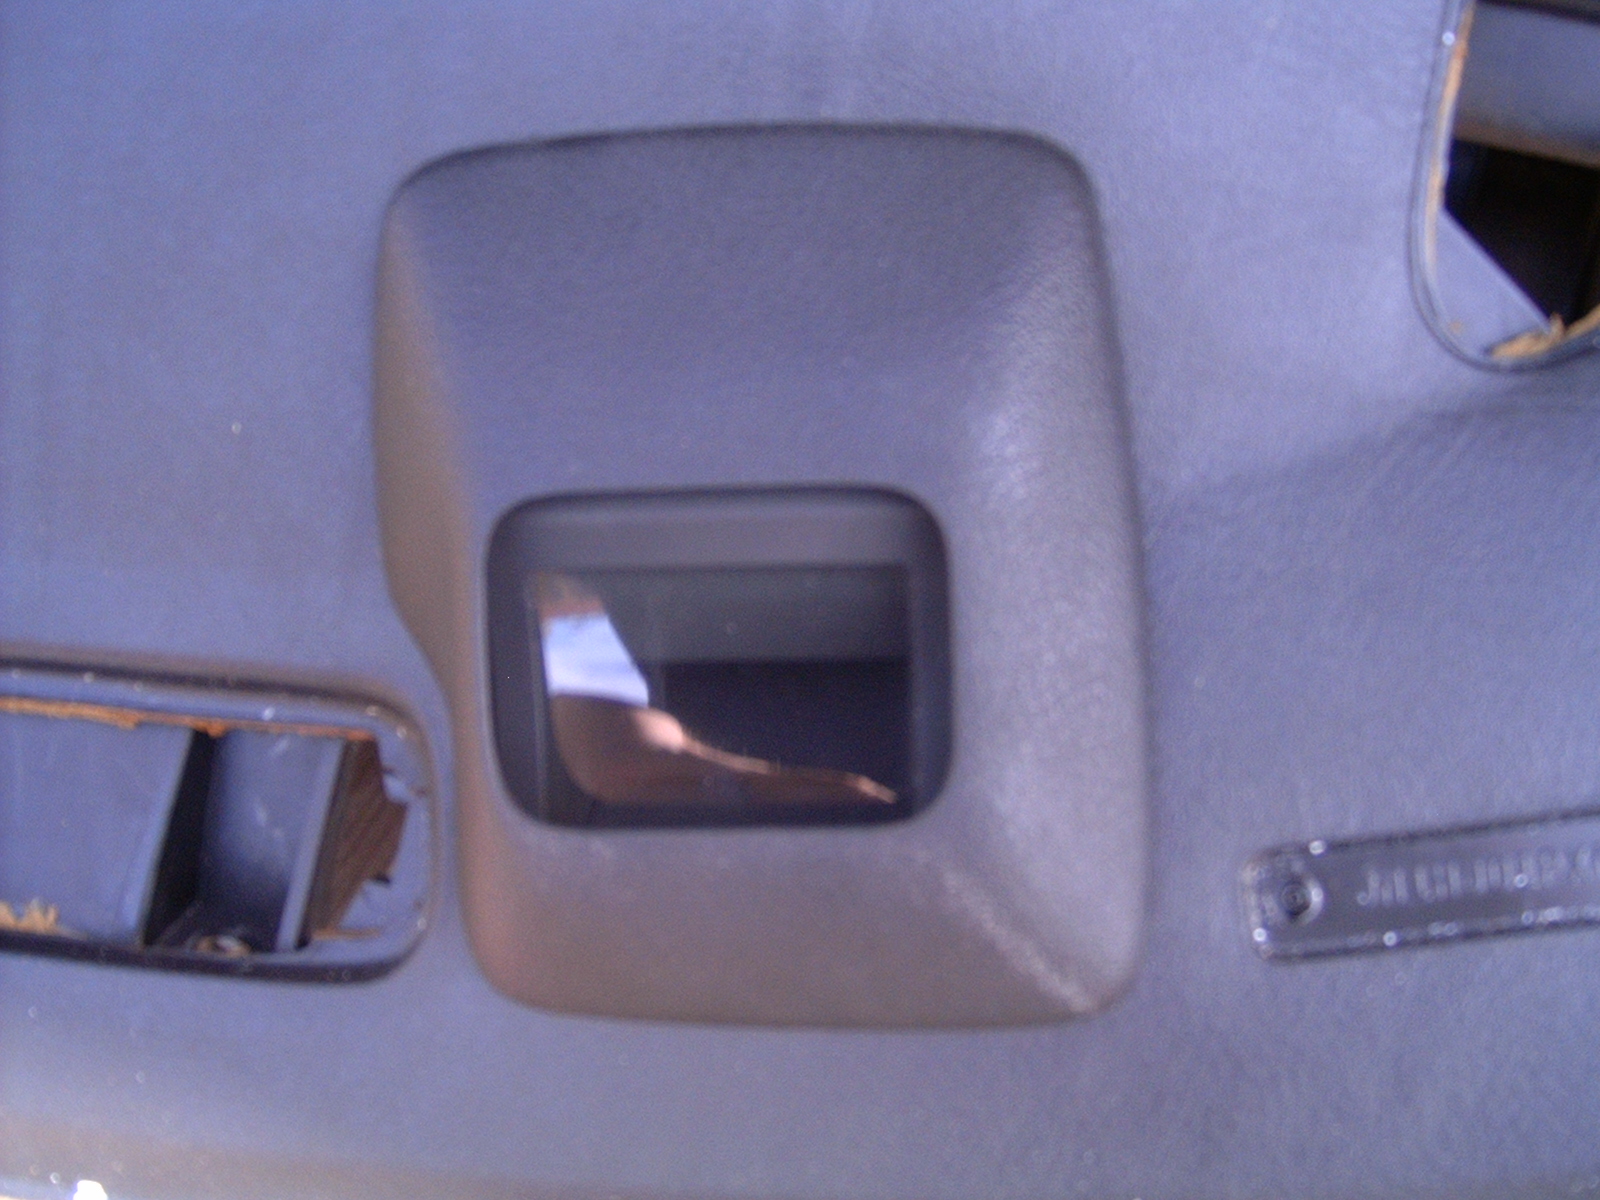
Notice that on the donor vehicle, assuming an original or correct windshield, there is a reflector panel built in (shown below). This is so the HUD is more easily visible. I've noticed that on a windshield without this panel you got a blurred "double vision" as the projector reflects off both the interior and exterior of the windshield surface. The cure for this is to either get the correct windshield (expensive) or place a small piece of window tint on the interior side of the windshield. It can be much smaller than the reflector the factory uses if it's placed just for one driver. The factory has to assume a multitude of possible driver heights so the reflector must be sized for all.
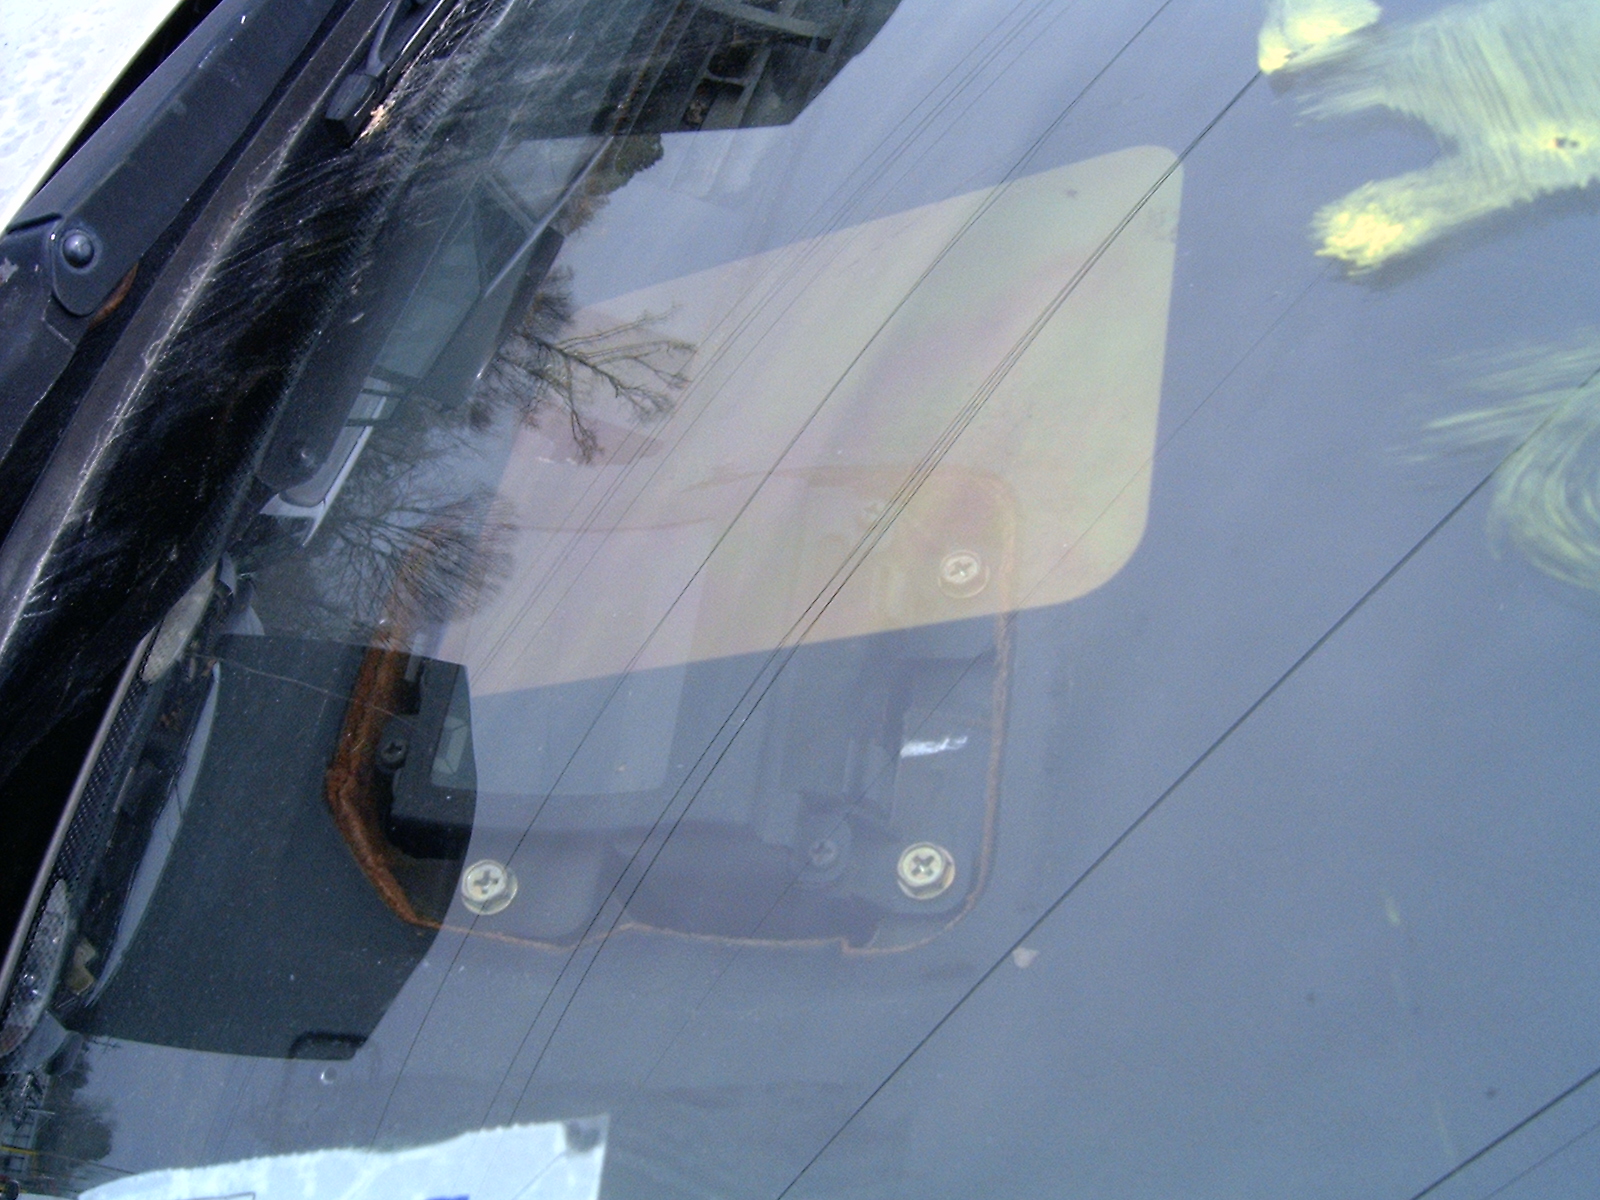 I am using a 2.5"x2.5" square of 20% tint. When you apply a piece this small you have to make sure it is lined up with where you sit while driving. That means put the seat where you want it and sit like you would when you drive. Turn the key to the "run" position and see if the "0" is visible. There should also be some room to the left of the "0" for double digit speeds. You might want to experiment with different tint levels and maybe even try the mirrored tint. You can also play around with the size of the tint square. I'm currently thinking about making the tint piece a little larger and also rounding the corners (using a coin as a guide) like the factory reflector is. I tried 40% tint today and it seemed to wash out in sunlight. I'm hoping a darker tint will help with this and will go to 5% limo if needed. You might call a few tint shops and see if you can get some of the scraps for this project.