Neon and Lighting
Neon and other accent lighting is used with great results in custom car audio vehicles. Neon is usually used in conjunction with plexiglass (acrylic) as a backlight to give a colored glow that will usually match the color scheme of the installation. Combining the plexiglass with this accent lighting can give numerous affects depending on how it is used.
Neon can also be used as a stand alone item for accents and a wide variety of neon products are available. The classic tube in various lengths has been supplemented with neon speaker rings, shift knobs, flexible lighting (neon wire) and a variety of other neon accented equipment. Undercar kits are popular and a few competitions for neon use are being seen at some of the major sound off events. These "glow offs" are usually sponsored by StreetGlow in an effort to further promote neon use in the automotive environment. Neon is pretty easy to work with but making it really stand out requires some imagination. Check out StreetGlow's online photo gallery to get some ideas for yourself.
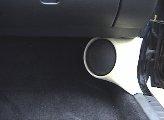
One of the real keys to making neon and lighting work is to obscure the lighting. With a few exceptions, you don't want to be able to see the neon tube or the bulb. You just want to feature the glow. This is accomplished by hiding the actual light from view but allowing the light to shine into the featured area. For example, to highlight the footwell in a vehicle you'd want to place the light behind the lower dash. Or you can also accomplish a similar effect by placing the lighting in front of the seats. If you can't find an existing piece to obscure the bulb then create one.
In addition to neon the new ultra bright LEDs (light emitting diodes) are becoming very popular and are no longer available only in red or green. In fact most of the neon manufacturers are now making many of their lighting products with rows of LEDs. The LED has many advantages over neon, and some disadvantages. The primary advantages are size, current and cost. A typical LED is 5mm in diameter or a little less than a 1/4". This makes it ideal for locations where space is tight and a neon tube won't fit. With the small size you also have the flexibility of creating custom lighting patterns and using pinpoint lights to highlight individual components.
And because an LED runs on DC voltage there is no need for a high voltage transformer like a neon tube requires. You will need to drop the voltage down from a vehicle's 12 volts to about 3 volts. This can be accomplished by using multiple LEDs in series or by using a single resistor in series with each LED.
Lastly there's cost. A small, 10" neon tube has an MSRP of about $25 (street price is lower). An ultra bright LED has a cost of $1 or less, often $0.50 cents or less. Of course you'll need more than one LED to get the same effect as a 10" tube but it is still much less than you'd pay for a neon tube.
The disadvantage of the LED is in the lighting effect you can achieve due to the narrow output of the bulb. A row of LEDs can end up looking like a row of lighted dots instead of a single glow that a neon tube will give. Manufacturers are creating special lenses to go over the LEDs that will diffuse the light to help overcome this. LEDs are also available in multiple lens configurations from a narrow eight degree beam to a diffuse 45 degree beam. Usually the brighter the LED, the narrower the beam.
There also certain effects such as the "lightning" or "lava" effect that you can't achieve with LEDs but can with neon. The choice to use one or the other depends on several factors that are particular to each installation. Look into the lighting products available and see what will suit your own installations. You'll be amazed what $10-50 in lighting can do for the "wow" factor or your creations.
You should check out Fiberglass Fabrication I. It covers an introduction to fiberglass work with sections on kick panel speakers pods, MDF enclosures with curved fiberglass baffles and spare tire subwoofer enclosures. Click here.
For those with fiberglass experience or who want to create more advanced fiberglass projects Fiberglass Fabrication II has just been released. It shows you how to create vehicle molded subwoofer enclosures, multiple woofer/amp rack combinations and custom door panels. Click here.
Both DVDs are available together at a special price.
Back to the Newsletter Archives Index