Building a Custom Subwoofer Enclosure II
Last issue we covered the pros and cons of buying vs. building your own subwoofer enclosure. Now I'm going to share some of my personal tips for building custom enclosures.
Enclosure Design
As I said last time, you don't want to guess what size and type of enclosure to build. The easiest method is to just follow the manufacturer's recommendations and go from there. Or you can design your own enclosure using special software. There are several available and I have a list on the site.
For the novice builder I recommend sticking with a basic sealed enclosure. They're easier to build and much more forgiving of size variations. Vented isn't much more difficult to build but you will need to pay closer attention to your enclosure size and must take into account for woofer and port displacement more accurately. Bandpass are the most complicated design as they require a vented box be built on the front of a sealed box. Since they have two chambers they are also more difficult to fabricate.
Materials
The main material in a custom enclosure is the wood. Specifically medium density fiberboard or MDF. Particle board is an acceptable substitute if MDF is unavailable but isn't as strong and tends to chip easily. You'll need to use either 3/4" or 5/8" depending on the size of your enclosure and the amount of power it will see. To hold the enclosure together you'll want to use a combination of wood glue and either drywall screws or an air nailer. An air nailer is much faster but requires a substantial investment as compared to a power drill.
Tools
You'll need a power drill and drill bits for drilling pilot holes and openings for a jigsaw to pass through. The jigsaw will need at least one blade for cutting composite wood. You'll also want a yard stick (preferably metal), a pencil and a compass for marking the wood and the hole for the woofer. You'll also need a method for cutting your boards. This can be a table saw, circular saw or you can have the wood cut by someone else (many lumber yards and home centers will cut it for free or low cost).
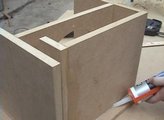
Fabrication
Start the fabrication by attaching the bottom to the back of the enclosure with wood glue and nails/screws. This will form an "L" shape. Then add the two sides into the corner formed by this "L". Now add the top piece and attach it to the back and side panels. Save the front panel attachment for last so you have room to caulk the interior and clean out the sawdust before adding your woofer. If you're using drywall screws I'd recommend getting a bit with a built in counter sink for drilling your pilot holes. This will keep your screw heads from sticking up and catching on something. Use silicone caulk to seal the enclosure.
When mounting the woofer be VERY careful not to slip off the screw head and puncture the surround. This is a very frustrating and costly mistake that every installer has made at least once. It usually happens when you're in a hurry so slow down and use extreme caution. Use pan head screws for mounting the woofer. NEVER use drywall screws.
No enclosure is complete without a subwoofer grill. There are two main types available. The wire mesh and the waffle grill. I like the two piece wire mesh but the waffle grill is usually cheaper for those on a budget. You can either get a grill that comes in two pieces or one that is clamped on. I think the two piece looks much better and is easier to remove. If the enclosure is going into a hatchback or otherwise shares the vehicle's cabin then you'll need to secure the enclosure to the metal of the vehicle using metal "L" brackets. The last thing you want in a sudden stop is an 80 pound enclosure hurtling towards the back of your head.
Finally, I have a page on the site that gives a break down of some of the costs involved in creating your own enclosure. I've even created a list of items that I often order and put them on the site as well.
You should also check out Advanced Enclosure Design and Fabrication. It covers designing enclosures using free computer software, maximizing the output of a subwoofer system, building the box like a pro and testing the output using inexpensive equipment. Click here.
Back to the Newsletter Archives Index